Add your feed to SetSticker.com! Promote your sites and attract more customers. It costs only 100 EUROS per YEAR.
Pleasant surprises on every page! Discover new articles, displayed randomly throughout the site. Interesting content, always a click away
How to make tempeh
This blog is full of tutorials of making tempeh with a variety of beans. Making homemade tempeh is easy, only needed minimum effort with easy to follow instructions.Buckwheat tempeh 22 Nov 2022, 11:12 am
How to make buckwheat tempeh

How to add spices to tempeh prior to fermentation 26 Jan 2022, 8:50 pm
PLEASE NOTE: this tutorial is for colder countries where the temperature in your house is no more than 22C. If your room temperature is above 27C, there is no need to cover the beans with tea towels or electric blanket. Just leave the batch in a safe place. How do I know when the house is around 27C? If I walk around the house in a tank top and all the windows are open.
I made another visit to my local Asian shop and bought several bags of beans that I'd never heard of.
This turned out to be another easy to make tempeh, vall dall sweet or split fava beans (according to Google). Cooking time was only 9 minutes (using an induction hob) after soaking overnight. Then after inoculating the beans (please use the tempeh starter according to the instruction on the label), I added black sesame seeds to contrast with the pale kernels along with some dried chopped garlic for flavour. You can only add dried herbs or spices that you like as long as they are not oily. Fresh herbs may interfere with the fermentation.
It was very cold and windy in Scotland when I made this so I had to use an electric blanket. It turned out so beautiful and delicious! The sesame seeds add a lovely crunch to the tempeh.
Give it a try, you won't be disappointed!
A collection of tempeh diagnosis 7 Mar 2021, 8:53 pm
We have compiled the photos in this page from our Q and A with our customers. We hope that this blog will help anyone struggling with the same problems
The above batches failed because there was too much moisture on the surface of the beans. The reason for this is that beans were still wet when inoculated. To avoid this try to ensure that the surface of the beans are dry to touch. You can achieve this using hairdryer, air drying by the window or with an electric fan.

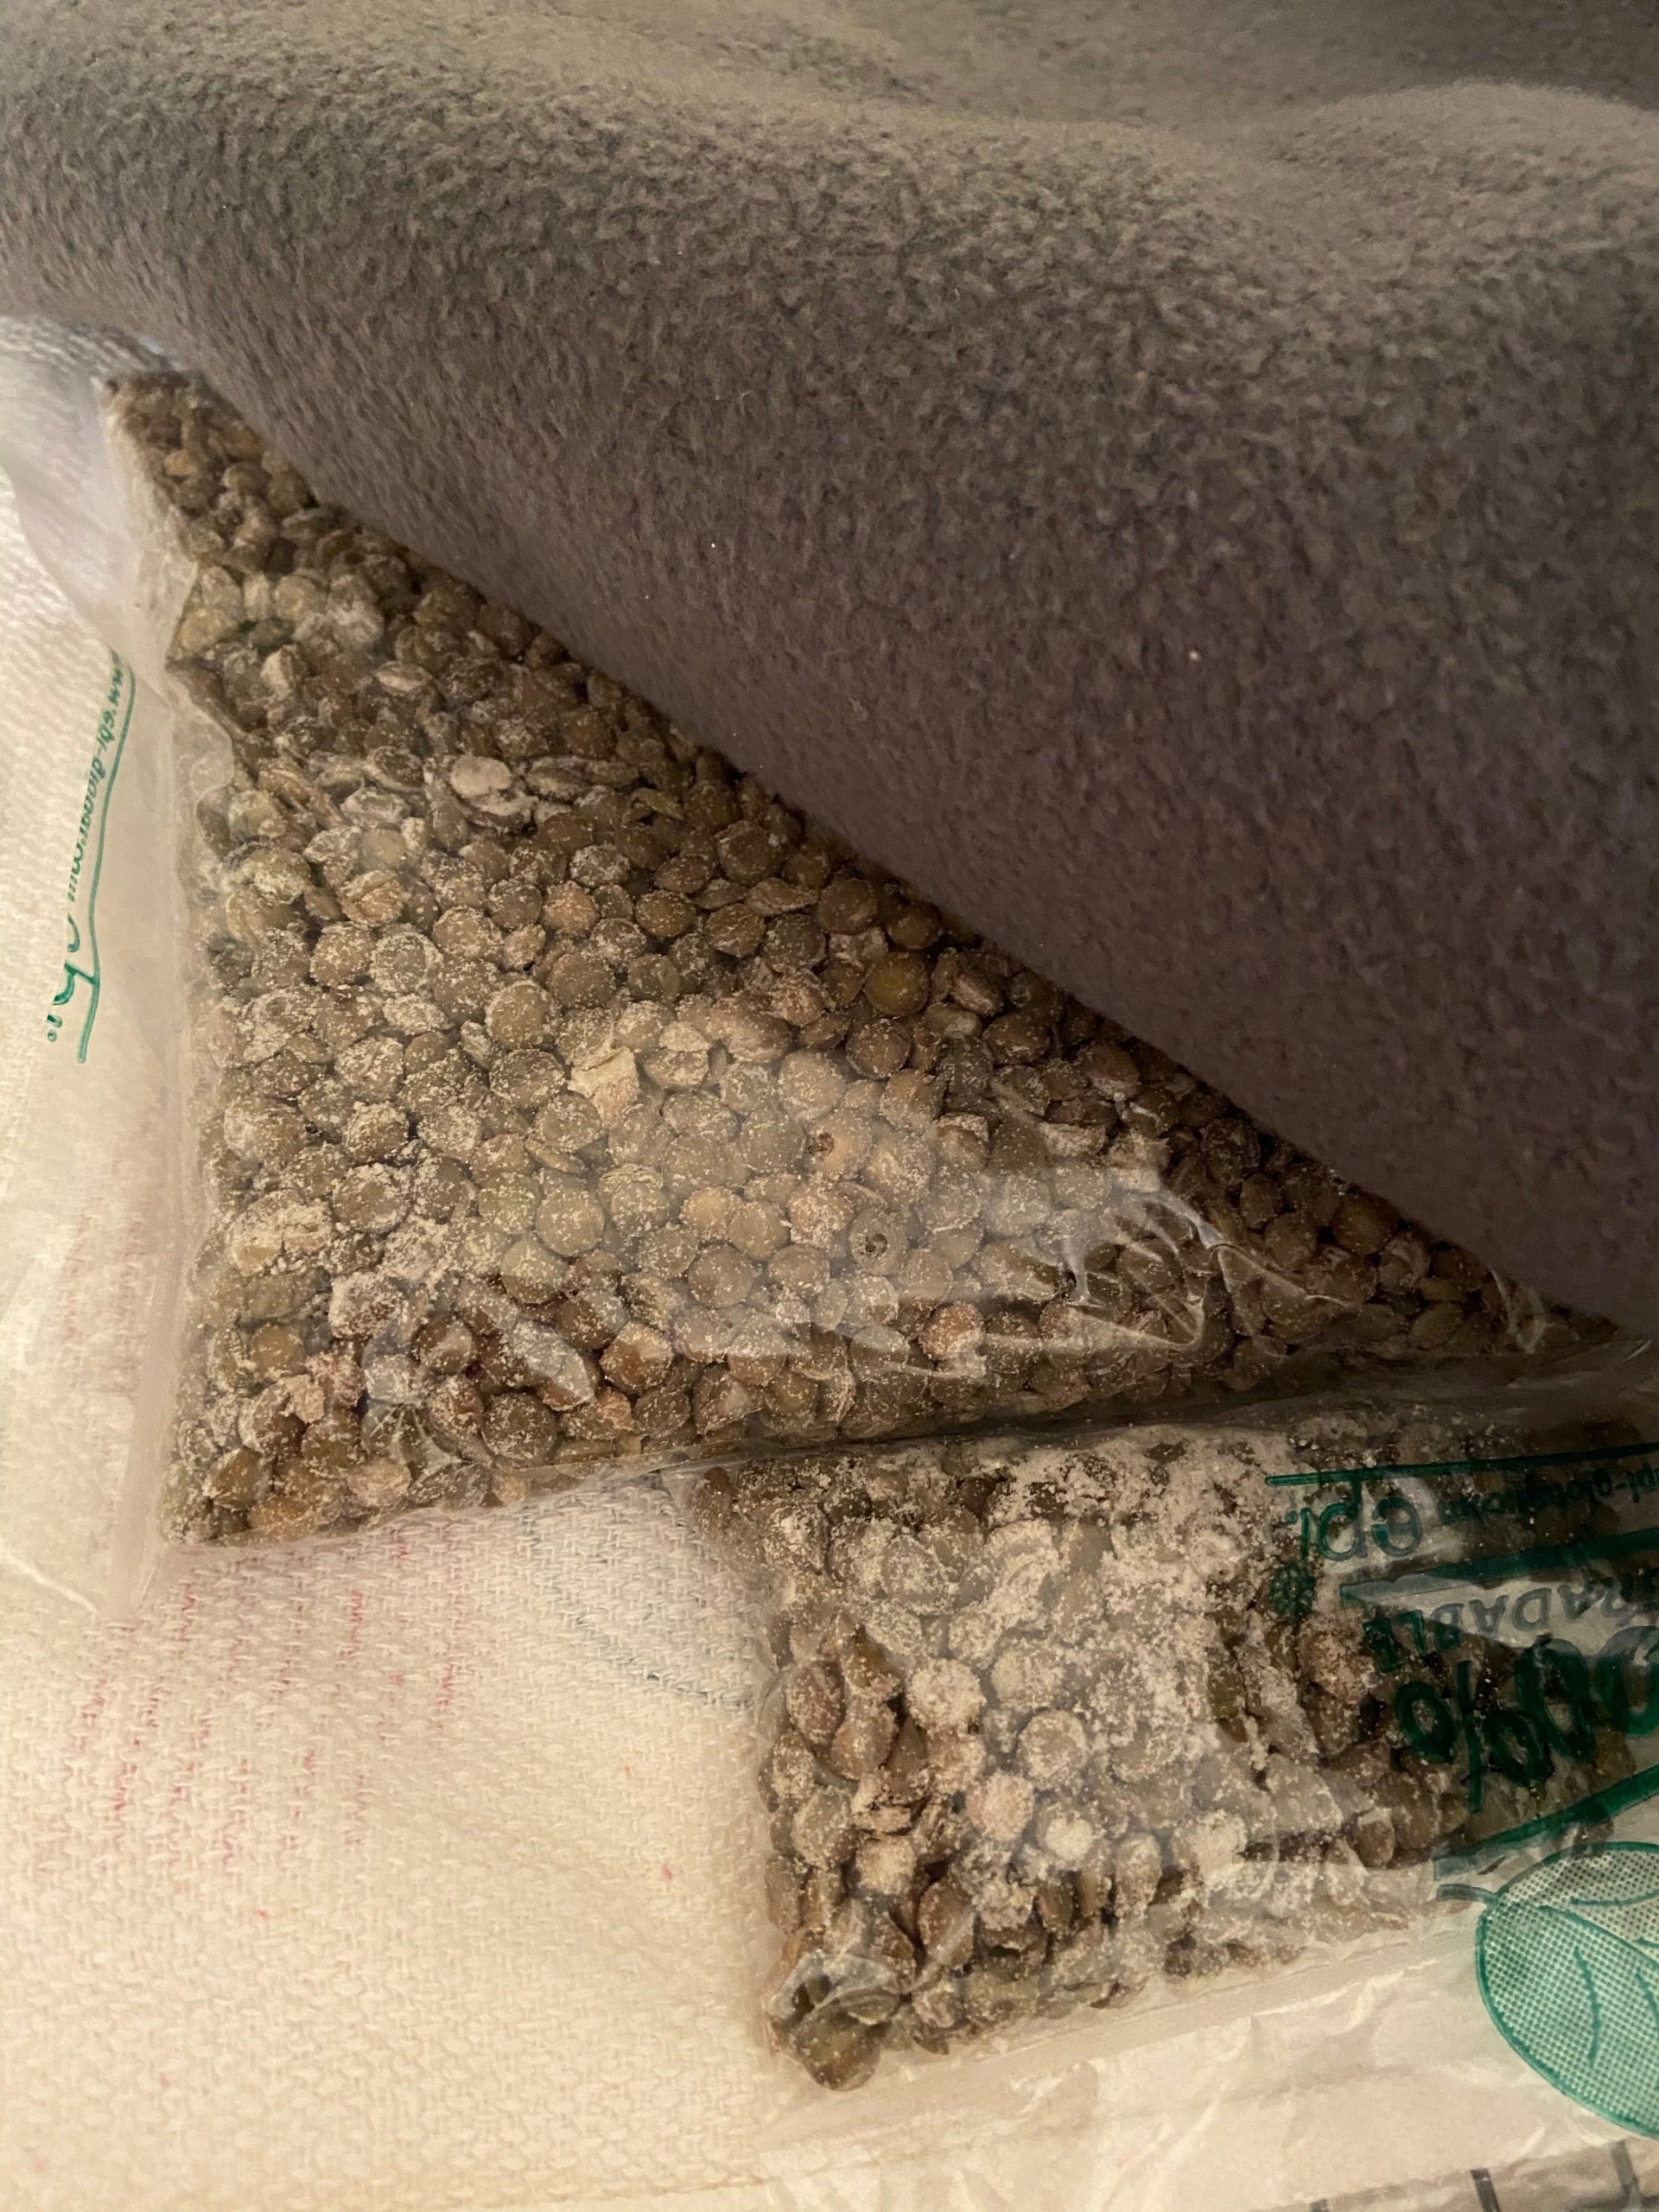
In this example from Lorna M the spores couldn't penetrate the beans because the skins were still intact. We suggest splitting the beans and removing the soya skins before cooking the beans.

The above tempeh (from Witri J) turned into mush as it was stacked in the fridge and continued fermenting. The solution here is not to stack tempeh in the fridge, or alternatively store in the freezer where stacking is fine.


Pete J sent us the above photos. After 24 hours of fermenting he noticed water on the lid. He therefore removed it and replaced with foil. Unfortunately condensation water dripped back into the batch combined with the heat from the incubator that was not switched off.
We suggest that you check your tempeh every 6 hours to wipe off the condensation. This is important. Also remember to switch off the incubator immediately when the top of tempeh feels warm. At that point the batch is already generating its own heat and extra heat is unnecessary and could result in a ruined batch.
The above batch is absolutely fine. Just cut the dry bits on the top and enjoy the rest of the tempeh. The grey spots inside the beans were caused by excess oxygen. If you wish for a white fluffy result, split the beans, remove the skins and press the beans down tight prior to incubation.
Sprouted lentils and chana dal tempeh 22 Jan 2021, 9:01 am
Step by step tutorial

-
Instant Pot if you have one, or use a steamer
-
Clean utensils and a bowl
-
A clean tea towel to spread the cooked sprouts and chana dal. Spread them out to dry at room temperature
-
A clean silicon mould or a clean glass dish with lid (I don't use plastic bags anymore to make my tempeh)
-
Incubator (we use a reptile mat or an electric blanket. Check our
link here
for other types of incubator)
-
Digital thermometer
-
Extra clean blankets or tea towels
Okara tempeh 19 Nov 2020, 11:13 pm
How to make okara tempeh


After squeezing the milk out of your soya beans pulp, transfer to a bowl. Add water to cover the top and stir. Scoop up any grit that floats to the top. The purpose of this step is to remove any soya skins that are still floating around which enables the tempeh starter to w ork better.

Transfer the o kara to a large wok, cover with water and boil (set the timer for 15 minutes from when the water start s boiling ). Be c areful not to let the water boil over.
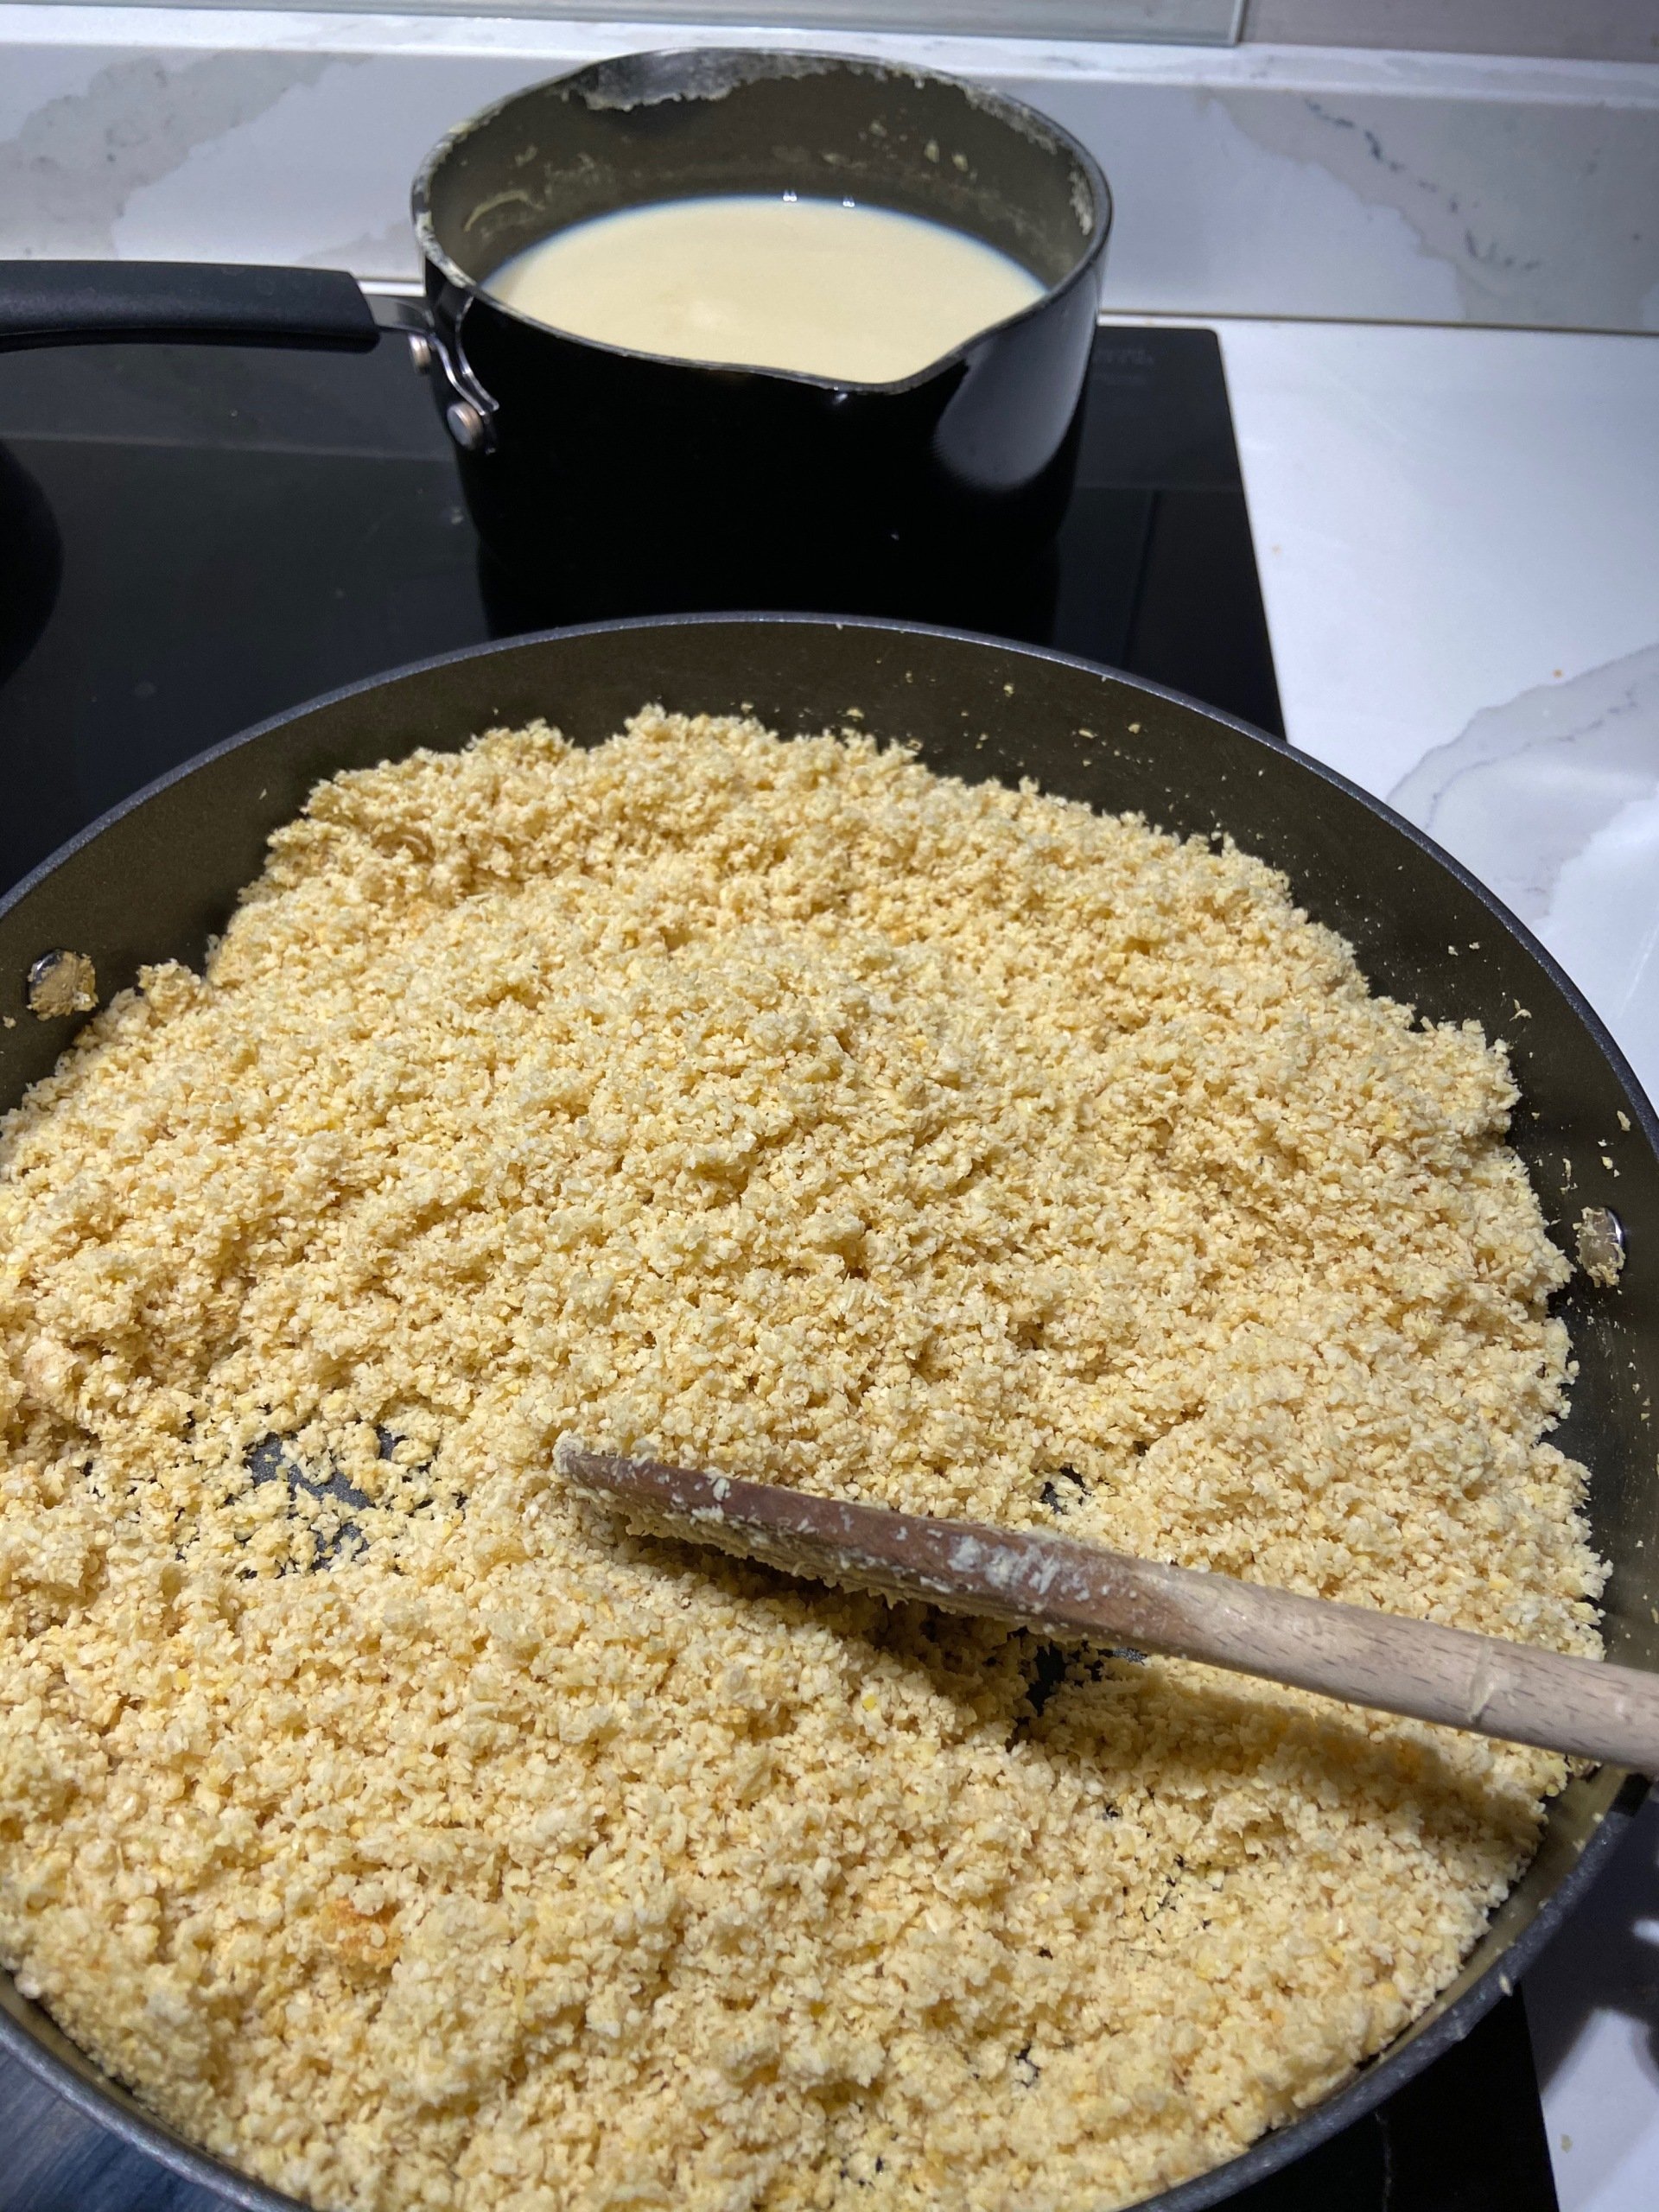
After boiling for 15 minutes, d rain the excess water and return the wok to the hob . Keep stirring to avoid the beans b urning . Set the timer to 20 minutes and reduce heat to medium high. C ontinue stirring

After 20 minutes the water from the o kara should have evaporated. When you are confident that the moisture has disappeared, switch off the hob and leave the o kara to cool for around 10 minutes. T he picture above is how the dried okara should look

Once the o kara is cooled, transfer to a clean bowl ready for inoculation

Add the rice flour and the tempeh starter. In this tutorial we use a little more starter than usual as the starter seems to stick to the okara and didn't distribute well. Mixing the starter with the rice flour will reduce this problem. Also t he purpose of rice flour is to remove excess moisture that might still exist in the beans and to enhance the fermentation.

Mix the rice flour and the starter thoroughly. To ensure that they are fully mixed, stir them continuously for 2 minutes. If you don't mix the starter thoroughly, the tempeh could end up patchy and crumbly.

Transfer the o kara to the food safe plastic bags and pierce the bags with a clean satay stick or a large needle. Place the bags on an airy tray - see above for an example . This is important for air circulation.

As you can see my room temperature was 19C, which is too cold for fermentation . I therefore put them inside an incubator, in this case an electric blanket. I switched on the heater at medium heat and cov er ed the tempeh with tea towels. I started incubating the okara on Tuesday at 7pm.

On Wednesday at 6pm the temperature on top of the tempeh batch is around 30C. This is a good sign as it means that the spores are growing. There is also a little condensation inside the bag. Switch off the heater immediately and leave the batch inside the tea towels.

On Thursday at 10am the spores have already covered the okara. But don't get too excited yet as you need to leave them for another day. From our experience if you harvest them too soon, we find that some of the tempeh inside the bag will not be fully formed. This is perhaps because the beans are in grits and rough shape. Therefore please wait for another day to allow the spores to grow fully inside the bag.

Check this out! On Friday this b eautiful white okara tempeh is ready . The texture was firm and not crumbly, the flavour was very much like soya beans but softer. Now this has become our weekly diet of high protein tempeh. Good luck everyone!
DIY tempeh incubator inspiration from our buyers 9 Sep 2020, 10:18 pm
There are many different ways that you can incubate tempeh. In Europe we are not lucky enough to have a perfect outside temperature all year round to make tempeh and therefore have to be creative to achieve this. We use an electric blanket in colder months, but some of our customers have successfully created their own incubators and have kindly shared these below. This page will be updated regularly.


Reptile heating mat

Sometimes when I fancy making a small batch of tempeh I use this reptile heater (no, I don't have any reptiles in the house). On line the price can vary from £13 - £30. I use the smallest wattage (7W) which gives the best result along with fast fermentation. There is no need to buy a higher wattage heater.
Please follow the clockwise step by steps using the photo above. For this batch I switched on the mat at around 7pm on Monday evening. On Tuesday morning at 7am condensation was already appearing on the plastic (see photo below) so I quickly switched off the heater, gave the batch a quick fan before putting the tea towel back on. The first 12 hours of the process are crucial as if the heater is left on too long the batch will overheat and spoil. Therefore it is important to check for condensation within the first 12 hours and turn off the heater if necessary.
After turning off the heater I left the batch to ferment on its own in the kitchen for a further 24 hours. The result on Wednesday morning at 8am can be seen below - a perfect white and solid block of soya beans tempeh (made with our very own organic split soya beans ).
We hope you find this article helpful and, if you use any of the methods below, please tag us on social media. Good luck!

Hot water bottle method
Dagmar kept it for 24 hours under 2 blankets with aluminium foil just above the tea towel and a hot water bottle that refilled twice during that time in between the two blankets.
She measured and the temperature was just over 27C. There was no oven or electricity needed other than to boil the kettle. She then kept it at room temperature for another 24 hours and that was it. She cooked one piece and froze the rest immediately.
Black spores, the most asked question 20 Aug 2020, 2:15 pm
No cook method - tempeh using tinned butter beans 19 Jul 2020, 8:32 am

-
A large strainer
-
A dehydrator to dry the beans at 40C for 1 hour or an electric fan (takes 2-3 hours)
-
Plastic ziplock bags or biodegradable ones
-
A clean satay stick to make holes in the bag (or a large clean needle) - sanitise by soaking in boiling water and leaving to dry for 1 hour
-
A clean cookie tray/oven tray
-
Clean scissors or a knife
-
An incubator (essential for autumn - winter use), or a clean blanket in the summer (incubator isn't needed when its warm)

Remove the water and rinse the beans under the tap using a sieve and leave for 10 minutes

Then sprinkle in 1 tablespoon of vinegar. Transfer to the dehydrator tray, spread the beans out, switch it on and use 40C for 1 hour

Or if you don't have a dehydrator, use an electric fan or a hairdryer.
A fter 1 hour check the beans. If they are still moist to the touch, dry for a little longer. It is essential that there is no more surface moisture on the beans

O nce you are confident that the beans are dry to touch, transfer to a clean chopping board . Cut the large beans with the scissors or knife into smaller pieces. If the beans crumble or break that's ok as long as they are dry.

Add 1 teaspoon of rice flour and mix through. The purpose of rice flour is to absorb any excess moisture still exist on the surface of the beans. Add 2 teaspoons of Tempehtation starter and mix thoroughly.

Transfer to a ziplock bag, recyclable plastic bag or use a container. Check the ideas here

P ierce both sides of the bag with a clean satay stick or needle . Place the bag on an airy tray as shown in the video. Air circulation is crucial. Flatten the bag and make sure that every corner is filled with beans. Make sure the batch is no more than 2.5 cm thick as this will help to speed up the fermentation

Check the temperature in the room. In the summer when the temperature is around 24C, the only thing needed to help the fermentation is a clean blanket or several tea towels. An incubator is not required
-
Leave the bag in a safe place, put a reminder on the phone to check again in 10 hours
- When condensation is visible, remove the blanket/tea towels. Leave the batch to ferment on its own
- Check again in 24 hours. If the spores are visible that's a great sign

The tempeh is
ready when the whole batch can be lifted in one piece, smells of mushrooms and is covered in white spores. Well done!
Please follow the video tutorial below for the step by step instructions. Any questions? We are happy to help. Our email address is on our homepage.
Almonds tempeh, it is possible 17 Jul 2020, 1:45 pm

-
200 grams of raw almonds
-
2 tablespoons of 5% acidity white vinegar, apple cider vinegar or juice of a lemon
-
2 grams of Tempehtation starter (please use the tempeh starter according to the instructions on the label)
-
Clean tap water
-
A large pot to boil the almonds or an Instant Pot
-
A large strainer
-
A dehydrator to dry the beans or a
n electric fan plus some tea towels
-
A satay stick to make holes in the plastic bag (or a large needle if you have one). Sanitise the stick or needle by pouring hot boiling water on it and leaving to dry for 1 hour
-
Plastic zip lock bags (these can be reused) or biodegradable plastic bags
-
A blanket or tea towels to keep the tempeh warm
-
An incubator of your choice (check our DIY incubator page for inspiration).
-
Soak the almonds
overnight
- The next morning, rinse the almonds until the water runs clear under the tap
- Cook for 25-30 minutes. I use an Instant Pot
- Strain off the water and leave to cool
-
Transfer to a plate, remove the skins and split the almonds in two by squeezing them
- Sprinkle on the vinegar
- Dry the almonds using a dehydrator. Spread them out and make sure they are not on top of each other. Set at 40 C for 30 minutes. Alternatively spread them out on tea towels and use an electric fan for around 1.5 hours
-
If using the fan, after 1 hour check the almonds. If they are still moist to the touch, dry for a little longer. It is essential that there is no more surface moisture on the beans
-
Once you are confident that the almonds are dry to touch, transfer to a clean bowl
-
Add 1 teaspoon of rice flour and mix through. The purpose of rice flour is to absorb any excess moisture that might still exist on the surface of the beans
-
Add 1 teaspoon of Tempehtation starter and mix thoroughly
-
Transfer to a ziplock bag or use a container. Check the ideas
here
-
Pierce both sides of the bag with a clean satay stick or needle
-
Place the bag on an airy tray as shown in the video. Air circulation is crucial. Flatten the bag and make sure that every corner is filled to stop early black spores forming. Make sure that the batch is no more than 2.5 cm thick as this will help to speed up the fermentation
-
Check the temperature in the room. In the summer when the temperature around 24C, the only thing needed to help the fermentation is a clean blanket or several tea towels. An incubator is not required
-
Leave the bag in a safe place and check again in 10 hours
-
When condensation is visible, remove the blanket/tea towels. Leave the batch to ferment on its own
-
Check again in 24 hours. If the spores are visible that's a great sign. Leave for another day
- The tempeh is ready when the whole batch can be lifted in one piece and is covered in white spores. The tempeh texture will be firm, taste nutty but will have no aroma.
No cook method - tempeh using tinned chickpeas and red kidney beans 23 Jun 2020, 10:08 am
Tinned beans tempeh

-
A large strainer
-
An electric fan to help dry the beans
-
Plastic ziplock bags or biodegradable ones
-
A clean satay stick to make holes in the bag (or a large clean needle) - sanitise by soaking in boiling water and leaving to dry for 1 hour
-
A clean cookie tray/oven tray
-
A clean large towel to spread the beans and several tea towels
- An incubator (essential for autumn - winter use), or a clean blanket in the summer (incubator isn't needed when its warm)
-
Remove the water and rinse the beans under the tap
- Transfer to a tray with tea towels, sprinkle some vinegar, work it through and spread the beans out to dry with a help of an electric fan
- After 1 hour with the fan, check the beans. If they are still moist to the touch, dry a little longer. It is essential that there is no more surface moisture on the beans
- Once you are confident that the beans are dry to touch, transfer to a clean bowl
- Add 1 teaspoon of rice flour and mix through. The purpose of rice flour is to absorb any excess moisture still exist on the surface of the beans
- Add 1/2 teaspoon of Tempehtation starter and mix thoroughly
- Transfer to a ziplock bag or use a container. Check the ideas here
- Pierce both sides of the bag with a clean satay stick
- Place the bag on an airy tray as shown in the video. Air circulation is crucial. Flatten the bag and make sure that every corner is filled with beans. Make sure the batch is no more than 2.5 cm thick as this will help to speed up the fermentation
- Check the temperature in the room. In the summer when the temperature around 24C, the only thing needed to help the fermentation is a clean blanket or several tea towels. An incubator is not required. Save some electricity, yippee
- Leave the bag in a safe place and check again in 10 hours
- When condensation is visible, remove the blanket/tea towels. Leave the batch to ferment on its own
- Check again in 24 hours. If the spores are visible that's a great sign. Leave for another day (sugar and salt in the original tin will result in the fermentation taking a day longer than normal)
- The tempeh is ready when the whole batch can be lifted in one piece, smells of mushrooms and is covered in white spores. Well done!
Tips on how to keep your tempeh starter 19 Feb 2020, 8:37 am
Making tempeh without using plastic bags 26 Nov 2019, 4:27 pm


How to make tempeh with peanuts 26 Nov 2019, 4:14 pm
PLEASE NOTE: this tutorial is for colder countries where the temperature in your house is no more than 22C. If your room temperature is above 25C, there is no need to cover the beans with tea towels or electric blanket. Just leave the batch in a safe place. How do I know when the house is around 25C? If I walk around the house in a tank top, or my underwear, or bikini. Heatwave, baby!
In this tutorial I experimented with red peanuts that I purchased from a Chinese Supermarket. If the skinless option is available, I do recommend to get that one. As you can see from the end result at the bottom of the page, the skins stopped the spores fermenting the peanuts.
The peanuts took longer to cook, it took around 45 minutes for the peanuts to soften.

-
300-500 grams of raw peanuts
-
4 tablespoons of 5% acidity white vinegar or apple cider vinegar or juice of a lemon
-
2 grams of
Tempehtation starter
(please use the tempeh starter according to the instruction on the label)
- Clean tap water
- A large pot to boil the peanuts
- A large strainer
- Tea towels to dry the beans
-
An electric fan (optional)
-
Satay stick to make holes in the plastic bag (or a large needle if you have one). Sanitise the stick by pouring hot boiling water on it and leaving to dry for 1 hour
-
Plastic zip lock bags (this can be reused) or biodegradable plastic bags
- A blanket or tea towels to keep the tempeh warm
- Incubator of your choice (check our DIY incubator page for inspiration).

The day before, rinse the peanuts several times and then add boiling water and soak overnight.


After boiling, strain off the water, let the water to drip off and leave to cool for at least half an hour. Try to split more beans by using a potato masher

Once cooled allow for the beans to dry on double tea towels. An electric fan will help to dry them faster. Dry until there is no more surface moisture. As a guidance, when the skins start to curl up, the peanuts are dry

Add Tempehtation Starter , mix through evenly.

Transfer to zip lock bags. Perforate both sides using the satay stick at a distance about 1cm. Ensure thickness no more than 2.5cm.

Place the packed peanuts on a clean tray and wrap it around with a thick blanket (as you can see, I use 3 tea towels). Put in the incubator of your choice (check our
DIY incubator page
for inspiration). The incubator temperature I have set for the tempeh to ferment was 30C. Leave them undisturbed.

After 24-36 hours I didn't check for condensation but only switched off the incubator once the temperature inside reached 34C . I left them to ferment for a further 24 hours and the results can be seen above.
The tempeh texture was firm but a little crumbly due to peanut skins. I should have removed all the skins prior to fermenting. Taste very nutty but no aroma.

How to make tempeh with green lentils 22 Nov 2019, 12:48 pm
PLEASE NOTE: this tutorial is for colder countries where the temperature in your house is no more than 22C. If your room temperature is above 25C, there is no need to cover the beans with tea towels or electric blanket. Just leave the batch in a safe place. How do I know when the house is around 25C? If I walk around the house in a tank top, or my underwear, or bikini. Heatwave, baby!
In this tutorial I continue my mission to demonstrate that it is possible to make tempeh with any beans. On this occasion I used green lentils and there is no need to soak overnight. I only boiled the lentils for 20 minutes.
This tempeh fermented faster than both yellow split peas and soybeans because the kernels are smaller and there is no need to split the lentils.

-
500 grams of green lentils (can be found in supermarkets or local shops)
-
4 tablespoons of 5% acidity white vinegar or apple cider vinegar or juice of a lemon
-
2 grams of
Tempehtation starter
(please use the tempeh starter according to the instruction on the label)
-
Clean tap water
- 1 tablespoon of rice flour
- A large pot to boil the lentils
- A large strainer
- Tea towels to dry the beans
-
An electric fan (optional)
-
Satay stick to make holes in the plastic bag (or a large needle if you have one). Sanitise the stick by pouring hot boiling water on it and leaving to dry for 1 hour
-
Plastic zip lock bags (this can be reused) or biodegradable plastic bags

Prior to cooking, rinse under the tap several times and add fresh clean water. Add the vinegar and boil in high heat for 20 minutes.

After boiling, strain off the water, let the water to drip off and leave to cool for at least half an hour.

Once cooled allow for the beans to dry on double tea towels. An electric fan will help to dry them faster. Dry until there is no more surface moisture. As a guidance, it took 1 hour to dry the lentils using 40 watt fan. I spread and turned the lentils over several times to ensure they dry evenly.

Add rice flour and mix through evenly. Rice flour will help absorb any excess moisture.

Add Tempehtation Starter , mix through evenly. Please use the tempeh starter according to the instruction on the label.

Transfer to zip lock bags. Perforate using the satay stick at a distance about 1cm. Ensure thickness no more than 2.5cm.
Place the packed beans on a clean tray and wrap it around with a thick blanket (it is -4C in Scotland). Put in the incubator of your choice (check our
DIY incubator page
for inspiration). The incubator temperature I have set for the tempeh to ferment was 27C. Leave them undisturbed.

After 24-30 hours some tiny condensation will appear . The white mycelium are visible. Remove the towels carefully and leave undisturbed at a room temperature.

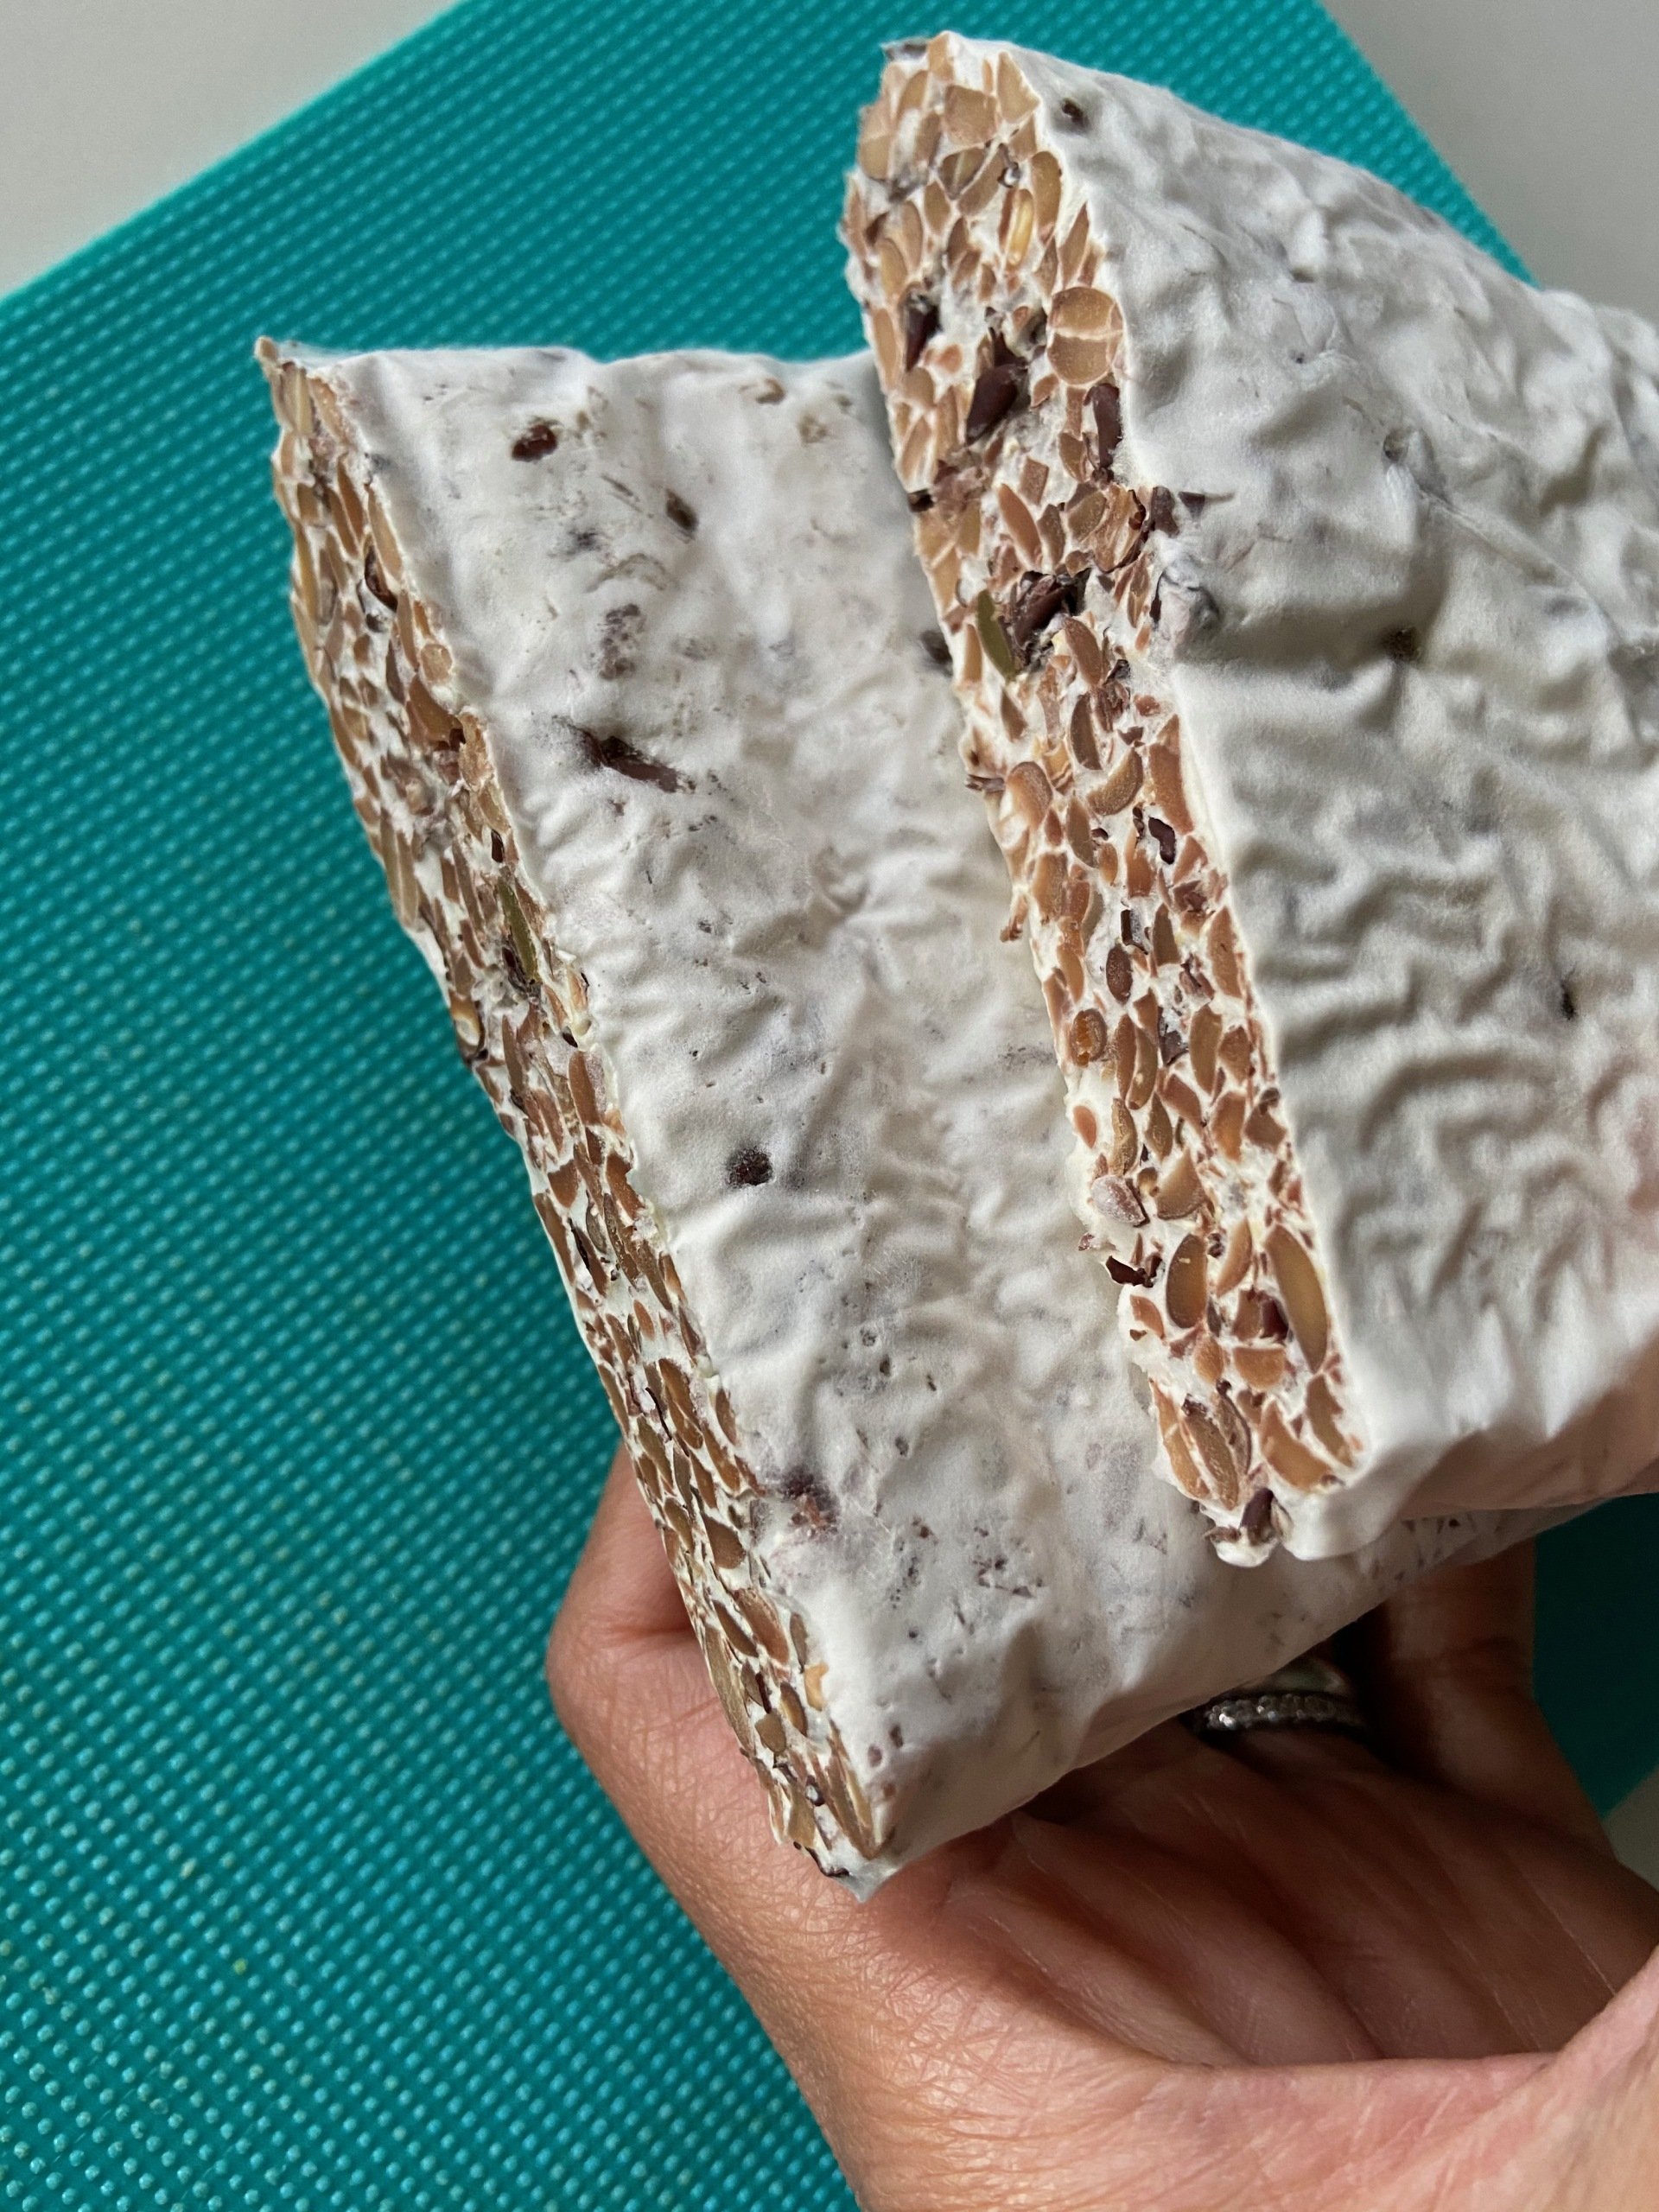
Green lentils tempeh is done when the surface is completely covered in white mycelium. the whole process took 3 days. I had to take the tempeh out for a photo in the garden, it was a dark autumn morning.
The tempeh texture was firm and solid similar to soybeans tempeh. There was no aroma but it was delicious!

How to make edamame beans tempeh 1 Nov 2019, 11:27 am

Tempeh from popcorn, is it possible? No 30 Oct 2019, 10:20 am
Well, let me test this and will let you know the results


Black soya beans tempeh 29 Oct 2019, 6:48 pm
And how to seal a plain plastic bag using candlelight

How to make tempeh with split chickpeas and green lentils 28 Feb 2019, 8:07 am
PLEASE NOTE: this tutorial is for colder countries where the temperature in your house is no more than 22C. If your room temperature is above 27C, there is no need to cover the beans with tea towels or electric blanket. Just leave the batch in a safe place. How do I know when the house is around 27C? If I walk around the house in a tank top, or my underwear, or bikini. Heatwave, baby!
A lot of people have asked me on how to make chickpeas tempeh but I wasn't keen on dehulling chickpeas for hours.
Then I found chana dal in the local supermarket, which mean split chickpeas (according to Google). I also have a bag of green lentils in the cupboard so I did a tutorial below.
As the beans were already split I found this tempeh quite easy to make.
The whole process took 3 days in the winter and it was so worth it.
Please use the tempeh starter according to the instruction on the label.
Equipment required:
-
A clean container to soak the lentils and chickpeas (ensure no trace of oils)
-
A large strainer
-
A large pot to cook the beans
-
An electric fan to help dry the beans
-
Plastic ziplock bags or biodegradable ones
-
A clean satay stick to make holes in the bag (or a large clean needle) - sanitise by soaking in boiling water and leaving to dry for 1 hour
-
A clean cookie tray/oven tray
-
A clean large towel to spread the beans and several tea towels
-
An incubator (essential for autumn - winter use)
Ingredients:
-
150 grams of chana dal (split chickpeas) and 150 grams of green lentils
-
5 tablespoons of white vinegar or apple cider vinegar or juice of a lemon
-
1 tablespoons of rice flour
-
2 grams of Tempehtation starter (please check the packaging, a teaspoon sometimes required)
Please follow the video tutorial below for the step by step instruction. Any question? We are happy to help. Just email us, email address is in the homepage.
How to make tempeh with urid dall chilka 26 Jan 2019, 5:05 pm
PLEASE NOTE: this tutorial is for colder countries where the temperature in your house is no more than 22C. If your room temperature is above 27C, there is no need to cover the beans with tea towels or electric blanket. Just leave the batch in a safe place. How do I know when the house is around 27C? If I walk around the house in a tank top, or my underwear, or bikini. Heatwave, baby!
In this tutorial I continue my mission to demonstrate that it is possible to make tempeh with any beans. On this occasion I used urid dall chilka.
This tempeh fermented faster than both yellow split peas and soybeans because the kernels are smaller. As the beans were already split I found this tempeh quite easy to make.

-
500 grams of urid dall chilka (black matpe beans - can be found in Asian grocers)
-
5 tablespoons of 5% acidity white vinegar or apple cider vinegar or juice of a lemon
-
1/2 - 1 teaspoon of
Tempehtation starter
(please check the instruction on the label)
-
Clean tap water
- A large pot to soak and boil the beans
- A large strainer
- Tea towels to dry the beans
-
An electric fan (optional)
-
Satay stick to make holes in the plastic bag (or a large needle if you have one). Sanitise the stick by pouring hot boiling water on it and leaving to dry for 1 hour
-
Plastic zip lock bags (this can be reused) or biodegradable plastic bags

After rinsing, the beans must be soaked and immerse overnight. Prior to cooking, strain off the water, rinse under the tap several times and replace with fresh clean water.

Add 5 tablespoons of vinegar. Switch on the hob on high and when the beans start to boil, switch on the timer and cook for 8 minutes. Scoop off and remove the froth out of the pan.

After boiling, strain off the water, let the water to drip off and leave to cool for at least half an hour.

Once cooled allow for the beans to dry on double tea towels. An electric fan will help to dry them faster. Dry until there is no more surface moisture.

Add
Tempehtation starter
and mix through evenly.

The urid dall have expanded from 500 gram to 791 gram.

Transfer to zip lock bags. Perforate using the satay stick at a distance about 1cm. Ensure thickness no more than 2.5cm.

Place the packed beans on a clean tray and wrap it around with 2 clean bath towels. The incubator temperature I have set for the tempeh to ferment was 27C. Leave them undisturbed.

After 24-30 hours some tiny condensation will appear . The white mycelium are visible. Remove the towels carefully and leave undisturbed in a cooler room.

Urid dall chilka tempeh is done when the beans surface is completely covered in white mycelium. the whole process took 3 days. Congratulations!
The tempeh texture was firm and solid similar to soybeans tempeh. The aroma is quite fragrant and mushroomy.

How to make tempeh with scotch broth mix 22 Jan 2019, 5:51 pm
PLEASE NOTE: this tutorial is for colder countries where the temperature in your house is no more than 22C. If your room temperature is above 27C, there is no need to cover the beans with tea towels or electric blanket. Just leave the batch in a safe place. How do I know when the house is around 27C? If I walk around the house in a tank top, or my underwear, or bikini. Heatwave, baby!
This is the first time I have made Scotch Broth Mix tempeh and it was easy to make since there is no requirement to split the beans and spent hours removing the hulls. Scotch Broth mix consist of
Pearl Barley, Yellow Split Peas, Green Split Peas, Blue Peas, Red Split Lentils
.

-
500 grams of broth mix
-
5 tablespoons of 5% acidity white vinegar or apple cider vinegar or juice of a lemon
-
2 grams of
Tempehtation starter
(please check the instruction on the label)
-
Clean tap water
-
A large pot to soak and boil the broth mix
- A large strainer
- Satay stick to make holes in the plastic bag (or a large needle if you have one). Sanitise the stick by pouring hot boiling water on it and leaving to dry for 1 hour
- Tea towels
-
An electric fan
-
Plastic zip lock bags (this can be reused) or biodegradable plastic bags

After rinsing, the beans must be soaked and immerse overnight. Prior to cooking, strain off the water, rinse under the tap several times and replace with fresh clean water.

Add 5 tablespoons of vinegar. Cook on high and when the beans start to boil switch on the timer for 15 minutes (if using induction and gas hob. 20 minutes for electric hob). Scoop off and remove the froth out of the pan.

After boiling, strain off the water, let the water to drip off and leave to cool for at least half an hour.
Once cooled allow for the broth mix to dry on double tea towels. An electric fan will help to dry them faster. Dry until there is no more surface moisture.

Add Tempehtation starter and mix through evenly.

Transfer to zip lock bags. Perforate using the satay stick at a distance about 1cm. Ensure thickness no more than 2.5cm.

The broth mix have expanded from 500 gram to 840 gram.

Place the packed beans on a clean tray and wrap it around with 2 clean bath towels. The Incubator temperature I have set for the broth mix tempeh was 27C. Leave the mix undisturbed.

After 24-30 hours some tiny condensation will appear . Remove the towels carefully and leave undisturbed in the same room.

Scotch broth mix tempeh is done when the beans surface is completely covered in white mycelium. the whole process took 3.5 days. Congratulations!
I am now going to marinade it in soy sauce and garlic, pan fry and make some Vietnamese spring rolls with peanut sauce dip.

How to make tempeh with black beans 22 Jan 2019, 3:02 pm
PLEASE NOTE: this tutorial is for colder countries where the temperature in your house is no more than 22C. If your room temperature is above 27C, there is no need to cover the beans with tea towels or electric blanket. Just leave the batch in a safe place. How do I know when the house is around 27C? If I walk around the house in a tank top, or my underwear, or bikini. Heatwave, baby!
I love making black beans tempeh as it is easier to make since there is no requirement to split the beans and spent hours removing the hulls.

-
500 grams of black beans
-
5 tablespoons of 5% acidity white vinegar or apple cider vinegar or a tablespoon of lemon juice
-
2 grams - 3 grams of
Tempehtation starter
(please check the instruction on the label)
-
Clean tap water
-
A large pot to soak and boil the beans
- A strainer
- Clean utensils
- Satay stick to make holes in the plastic bag (or a large needle if you have one). Sanitise the stick by pouring hot boiling water on it and leaving to dry for 1 hour
-
Clean dark tea towels and a thick blanket
-
Plastic zip lock bag (this can be reused) or biodegradable plastic bags

After rinsing, the beans must be soaked and immerse overnight.

Prior to cooking, strain off the water, rinse under the tap several times and replace with fresh clean water.

Add 5 tablespoons of vinegar. Switch on the hob and as soon as the water starts to boil, switch the timer
and cook for further 6 minutes (if using an induction hob or gas). If using electric hob, put the timer on 10 minutes. Scoop off and remove the froth out of the pan.

Strain off the water, let the water to drip off and leave to cool for at least half an hour.

Once cooled transfer to dark tea towels. The beans may stain the worktop and cooking equipment therefore please be careful and choose a dark tea towel. Drying the beans is unnecessary.

Add 3 grams of Tempehtation starter and mix through evenly.

Transfer to zip lock bags. Ensure that the bags is not too thick at maximum of 2cm if you are a beginner. Once the tempeh making technique is mastered you can experiment with thicker batch.

Perforate using the satay stick at a distance about 1cm.

The beans have expanded from 500 gram to 897 gram.

Place the packed beans on a clean tray and wrap it around with 2 clean thick bath towels. The incubator temperature I need for black beans tempeh was 27C. Leave the beans undisturbed.

After 24-30 hours some tiny condensation and tiny white spores will appear . Remove the towels carefully and leave undisturbed in the same room.

Black beans tempeh is done when the beans surface is completely covered in white mycelium. the whole process took 4 days in the winter. The contrasting colour of black beans and white mycelium is stunning. Congratulations!

How to make tempeh with mung beans 13 Jan 2019, 2:27 pm
PLEASE NOTE: this tutorial is for colder countries where the temperature in your house is no more than 22C. If your room temperature is above 27C, there is no need to cover the beans with tea towels or electric blanket. Just leave the batch in a safe place. How do I know when the house is around 25C? If I walk around the house in a tank top and the windows are open.
Mung beans can be purchased in Chinese supermarkets, health stores or online. It is easier to make mung beans tempeh as there is no requirement to split the beans and spent hours removing the hulls.

-
500 grams of soaked or small sprouted mung beans
-
5 tablespoons of 5% acidity white vinegar or apple cider vinegar or juice of a lemon
-
2 grams of
Tempehtation starter
(please check the instruction on the product label)
-
Clean tap water
-
A large pot to soak and boil the beans
- Satay stick to make holes in the plastic bag (or a large needle if you have one). Sanitise the stick by pouring hot boiling water on it and leaving to dry for 1 hour
- Tea towels, thick blanket and an incubator
-
An electric fan (optional)
- Plastic zip lock bag (this can be reused) or biodegradable plastic bags
- A strainer
- Clean utensils

After rinsing, the beans must be soaked and immerse for over 8 hours. If sprout is desired, after the initial 8-hour soak, rinse and transfer to a clean jar or bowl then cover with a cloth. it will take about 24-36 hours for tiny sprouts to appear.

Prior to cooking, strain off the water and replace with fresh clean water.

Cook from the point of boiling for 8 minutes (if using an induction hob). Alternatively , steam for 20 minutes or if using InstantPot, steam for 5 minutes.

Strain off the water and leave to cool.

Allow to dry on double tea towels. Dry until there is no more surface moisture.

Add 2 grams of Tempehtation starter and mix through evenly.

Transfer to zip lock bags. Perforate using the satay stick at a distance about 1cm. Ensure thickness no more than 2.5cm.

The beans have expanded from 500 gram to 900 gram.

Place the packed beans on a clean tray and wrap it around with 2 clean thick bath towels (it was -2C here). Ensure that the minimum room temperature is at 19-20C. I used an electric blanket as an incubator with temperature set at 27C. Leave the beans undisturbed.

After 24-30 hours some tiny condensation will appear. Remove the towels carefully and leave undisturbed in a cooler room.

Here they are looking beautiful. Mung beans tempeh is done when the beans surface is completely covered in white mycelium. Congratulations!

How to make tempeh with split soybeans - updated 10 Jan 2019, 1:45 pm
Once upon a time I was a very busy girl and the thought of making traditional soybeans tempeh truly killed my appetite. So I found a shortcut by using a corn grinder than can be found on Amazon or eBay. This gadget saved me 2 hours of dehulling by hand. Hallelujah!


PLEASE NOTE: This tutorial is for colder countries where the temperature in your house is no more than 22C. If your room temperature is above 27C, there is no need to cover the beans with tea towels or electric blanket. Just leave the batch in a safe place.
How do I know when the house is around 27C? If I walk around the house in a tank top, or my underwear, or bikini. Heatwave, baby!
Equipment required:
-
A corn grinder/flour maker to grind soybeans (can be purchased on Amazon or eBay)
-
A clean container to soak the soybeans (ensure no trace of oils)
-
A tea strainer to scoop soybean hulls
-
A large strainer
-
A large pot to cook the beans
-
An electric fan
-
Plastic ziplock bags or biodegradable ones
-
A clean satay stick to make holes in the bag (or a large clean needle) - sanitise this by soaking in boiling water and leaving to dry for 1 hour
-
A clean cookie tray/oven tray
-
A clean large towel and several tea towels
- An incubator

Ingredients:
-
1kg of cracked soybeans
- 5 tablespoons of white vinegar or apple cider vinegar or juice of a lemon
- 2 tablespoons of rice flour
- 3 grams or a heaped teaspoon of Tempehtation starter

Once the beans have been cracked and split, shake the beans container and the dry hulls should move to the top. Soak the beans overnight (minimum of 6 hours) The beans will expand and the hulls will float to the top. Stir gently and scoop them up. This is the most exhausting step of this tutorial, but hang in there because the result will be worth it.

Pour out the beans into a strainer and rinse the beans until the water runs clear. Remove any hulls that are visible. Don't worry if a few hulls remain attached.

Put the beans into a pan with enough water to cover them. Add the 5 tablespoons of vinegar and cook for 20 minutes (if using induction or gas hob) or 30 minutes if using other hobs. As you can see from the above picture, I have scooped up further hulls from the pan.

This is the result after boiling 20 to 30 minutes. Most hulls have been removed.

Drain off the water in a strainer and leave the beans to cool.

Use an electric fan to dry the beans. Turn the beans roughly every 20 minutes to ensure that they dry evenly. Drying may take up to 2 hours. Remove any visible hulls and then add the rice flour and mix thoroughly.

Sprinkle Tempehtation starter evenly to reduce the risk of spoilage and to increase the speed of fermentation.

Transfer the beans into the ziplock bags. Fill them up, seal the bag and then perforate using the clean satay stick at a distance of about 1cm. This will allow the spores to breathe and thrive. Press the bag flat with the thickness no more than 2.5cm.

Place the packed beans on a clean tray and wrap it inside a large thick towel. Ensure that the minimum room temperature is at 19-20C. I set my incubator temperature (an electric blanket) at 27C. If the temperature inside your incubator exceed 32C and unsteady then the tempeh might be ruined. Therefore try to keep the incubator temperature between 27C-31C and steady.

After 20 hours, some tiny condensation will appear. Great news! Remove the towel and leave the beans in a safe place undisturbed.

Hello beautiful! After 36 hours the soybean tempeh is ready. Store in the fridge for 3 days, freeze or cook straight away. Congratulations!

How to make tempeh with yellow split peas 9 Jan 2019, 10:50 am

PLEASE NOTE: this tutorial is for colder countries where the temperature in your house is no more than 22C. If your room temperature is above 25C, there is no need to cover the beans with tea towels or electric blanket. Just leave the batch in a safe place.
How do I know when the house is around 25C? If I walk around the house in a tank top, or my underwear, or bikini. Heatwave, baby!
I prefer to make yellow split peas (YSP) tempeh as it is easier to buy the ingredients in the supermarket or local shops. It is also easier to make as there is no requirement to split the beans and spent hours removing the hulls.
For beginner tempeh makers, I recommend learning the craft using yellow split peas. After mastering this you can move on to soybeans and other beans. A good friend of mine even said that YSP tempeh is more fragrant and softer than traditional soybean tempeh.
Let's start with the ingredients:

-
500 grams of yellow split peas
-
5 tablespoons of 5% acidity white vinegar or apple cider vinegar or the juice of a lemon
-
2 grams of
Tempehtation starter
(please use the instruction on the product label)
-
Clean tap water
-
A large pot to soak and boil the peas
- A large strainer
- Satay stick to make holes in the plastic bag (or a large needle if you have one). Sanitise the stick by pouring hot boiling water on it and leaving to dry for 1 hour
- Tea towels
-
An electric fan (optional)
-
Plastic zip lock bag (this can be reused) or biodegradable bags

Soak the YSP overnight (minimum of 6 hours)
Prior to cooking, strain off the water, rinse and replace with fresh clean water.

Add 5 tablespoons of vinegar. Switch on the hob and as soon as the beans start to boil, switch on the timer and cook for 15-20 minutes.

Once boiled, strain off the water and leave to cool.

Allow for the YSP to dry on double tea towels. An electric fan will help to dry them faster. Dry until there is no more surface moisture.

Once the YSP are cooled and dry to the touch, sprinkle Tempehtation starter then mix thoroughly. If they aren't mixed evenly, they may fail to ferment properly.

Use the sanitised satay stick to perforate the plastic bag at a distance of 1cm - 1.5cm apart. Seal and press it flat. Use a rolling pin if that helps.

Place the packed YSP on a clean tray (I use a cookie tray) and wrap it in a thick towel or several tea towels. Make sure the minimum temperature in the room is at 20C. The incubator temperature is steady at 27C. If the temperature of the incubator is up and down the tempeh might not ferment.

Once small condensation is visible remove the tea towels and leave the tempeh to ferment.

After 24 hours of condensation the bag should be filled completely with white mycelium. The entire contents should be solid and smell of fragrant sweet mushrooms. Congratulations!
Dirty tempeh fries 8 Jan 2019, 7:51 pm

Our favourite homemade junk food
We love cooking this snack, which only takes 30 minutes and is packed with protein. Cook the potatoes and tempeh as you would with normal fries and add any toppings you like. We deep fry the tempeh because we like both the chips and tempeh to be crispy.
Use whatever sauce you like, We love dipping the new Hellmann's Baconnaise and Sriracha mayo. There is always a chilli sauce in our cupboard to add a kick!
Lets get cooking!
Ingredients
Potatoes and sweet potatoes
300 grams of tempeh, cut into French fries size
Salt and pepper
Oil spray for the potatoes
Sunflower oil to fry the tempeh
Jalapeños and any other pickles that you like
Mayo and Sriracha sauce
We deep fry the tempeh until brown and crispy for around 7 minutes. Mix them together with the fries, pickles and drizzle with mayo and Sriracha. Enjoy!