Add your feed to SetSticker.com! Promote your sites and attract more customers. It costs only 100 EUROS per YEAR.
Pleasant surprises on every page! Discover new articles, displayed randomly throughout the site. Interesting content, always a click away
Tom Markiewicz
Thoughts on technology, investing, marketing, and entrepreneurship.Productivity Tip: Using Amazon Alexa to add todos hands-free 21 Jun 2020, 12:13 am
Here’s a little productivity hack I’ve come to rely on just about every day to keep me sane — using Amazon Alexa to add a todo to a list wherever you are in the house. Are your hands too occupied to type or write down an idea? This productivity tip has got you covered.
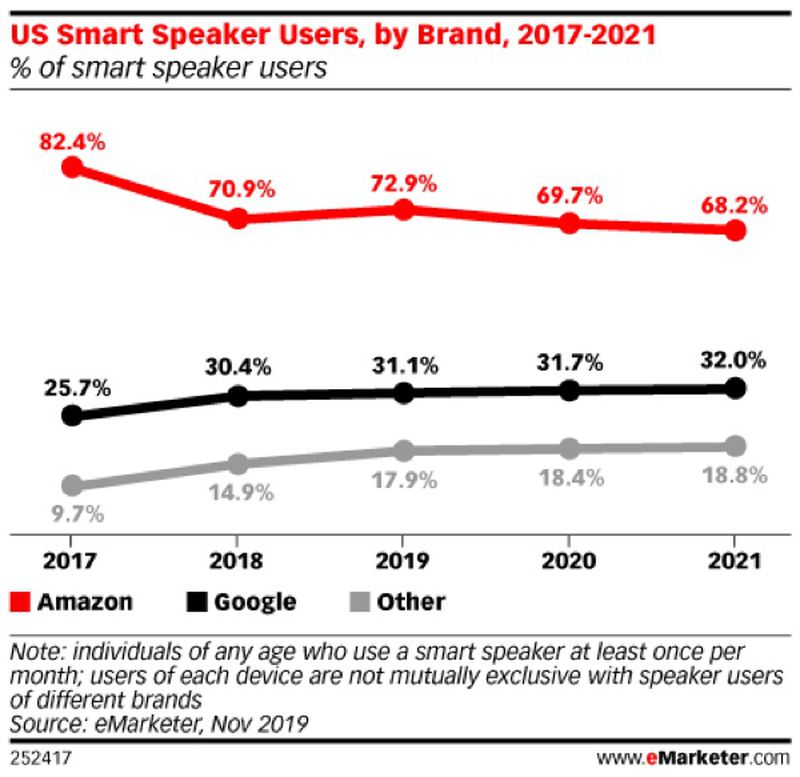
Users of smart speakers like Amazon Echo, Apple HomePod, or Google Home, are expected to grow in 2020 to reach 83.1 million with 70% of the total in the U.S. using an Echo device.
So there’s a good chance if you’re reading this, you have and use a device with Amazon Alexa built-in.
After a few years of aggressive pricing by Amazon, I now have an Echo device in most rooms of my house. I have the original tall, cylindrical Echo speaker in my living room, one in each bedroom (including both home offices), and even one of the new, small Echo Flex devices in my garage.

While many use Alexa to primarily play music (which I also do) or frequently ask it questions, I’ve found one trick using IFTTT to be particularly useful and probably my most used Alexa feature.
If you’re like me, you inevitably have an idea or remember a task that needs to be done when you’re unable to add it to your phone or computer. Or even write it down on a scrap of paper (old school!).
With my current system though, I’m able to simply speak the following and a new todo will be waiting for me in the Things app:
Alexa, add buy more paper towels to my todo list
This simple command takes “buy more paper towels” and sends it to IFTTT. From there, you can configure it to do many things, but I have the text sent to an email address that’s connected to my preferred todo app, Things.
Here’s an overview of the recipe on IFTTT:
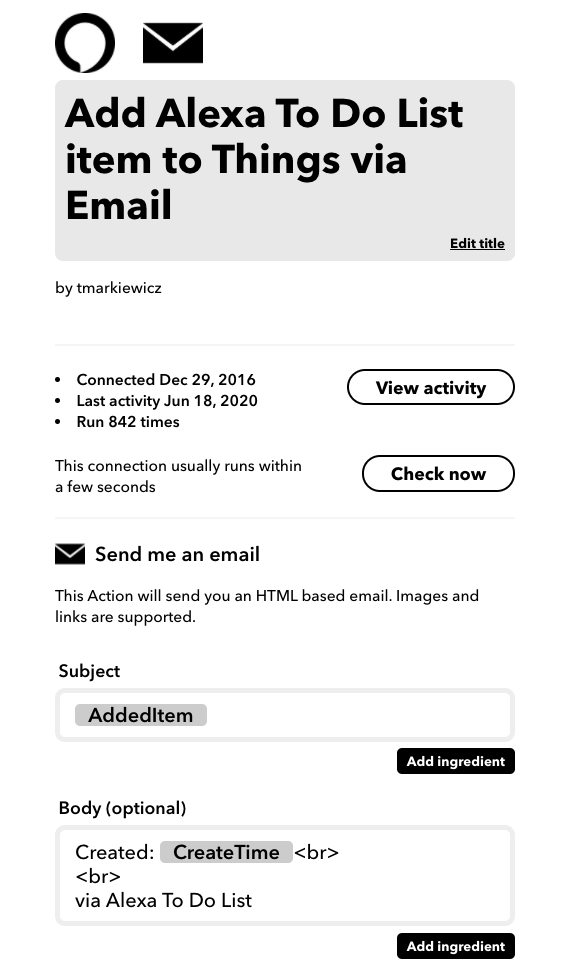
Now, whenever I return to my todo app, I have any task I spoke to Alexa now sitting in my inbox for processing. This guarantees that I don’t forget something timely and have to rely on my memory.
The post Productivity Tip: Using Amazon Alexa to add todos hands-free first appeared on Tom Markiewicz.
How to use Weather Company Data and Netatmo with Ruby 15 Mar 2019, 5:08 pm
While weather insights are critical to many businesses, local weather data on a more personal and practical level can be important as well. Since I recently moved to an area with some pretty extreme weather, I find myself monitoring and measuring the local conditions much more than I used to. And with wind gusts that regularly exceed 50mph in the winter, this isn’t just an academic interest. Safety (both personal and property) is a significant concern.
In addition to the wind, I’m a skier, so I’m always interested in the amount of snow in the forecast. For some reason, this isn’t often displayed in most popular weather apps at a glance, so I was interested in building something simple to track my local weather as well as the forecast tailored to my interests.
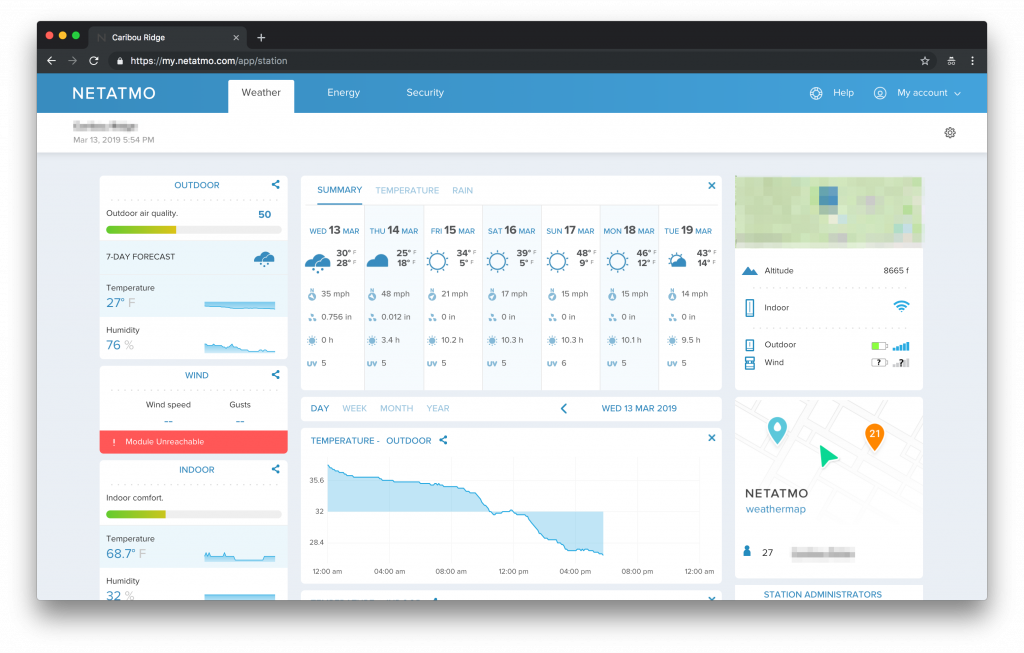
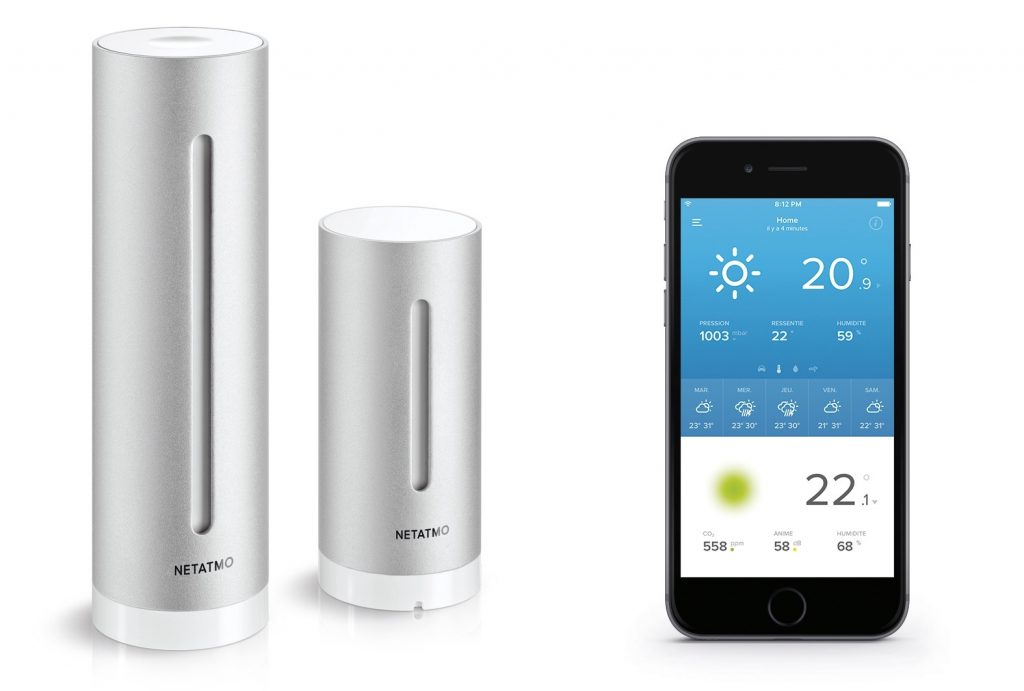
To monitor the weather, a recent addition to my home was the Netatmo Smart Home Weather Station with a wind gauge module. While Netatmo provides an app and web dashboard to view all your data, it’s a bit much at times, especially when there are only a couple measurements I’m interested in monitoring. You can see a demo app of their dashboard here. Additionally, they offer excellent integration with Alexa and IFTTT so that you can incorporate your weather monitoring into a home automation system.
As my neighbor regularly texts me to find out what the station is measuring for the wind gusts on particularly bad evenings (hey, get your own!), I thought it would be interesting to explore my recorded data using the Netatmo API as well as examining at how it corresponds to an accurate weather API with a forecast.
There are numerous popular weather data APIs available for free or low cost, but since IBM owns the Weather Company, I figured this would be a logical place to start and be an interesting way to experiment with their weather data.
IBM bought the Weather Company in 2016 and offers its weather data as an API available through the IBM Cloud. From IBM:
The Weather Company, an IBM Business, delivers personalized, actionable insights to consumers and businesses across the globe by combining the world’s most accurate weather data with industry-leading AI, Internet of Things (IoT) and analytics technologies.
Our solutions provide newscasters, pilots, energy traders, insurance agents, state employees, retail managers and more with insight into weather’s impact on their businesses, helping them make smarter decisions to improve safety, reduce costs and drive revenue.
The Weather Company API provides a ton of data including an hourly forecast, daily forecast, intraday forecast, current conditions, historical data, weather alerts, location services, and almanac services.

Here, I’ll only be using the 3-day forecast, but the API offers a daily forecast for each of the next 3, 5, 7, or 10 days starting from the current day, including forecasts for the daytime and nighttime segments.
As far as pricing, on a free plan you get 10 API calls per minute and then 10,000 calls total per account. So the free plan isn’t free forever, and once you hit the 10,000 call limit, you’ll have to start paying. But this is more than enough for testing, prototypes, and hobby projects.
For this article, I’ll be illustrating how to use Ruby to make access and parse the data from both APIs. In a future article, I’ll examine building a basic dashboard to monitor the data you’re interested in on the web (and in my case stop my neighbor from asking me!).
To follow along with the entire demo though, you’ll need an actual Netatmo device and account as they don’t offer any demo keys, products, or a sandbox.
The full tutorial walkthrough and repo can be found on Github here: https://github.com/tmarkiewicz/weather-ruby and I’ll highlight some of the key steps below.
Initial setup
As you can see from the tutorial repo, I’m using Ruby on a Mac. OS X comes installed with Ruby, but you can check your version using this command:
ruby -vIf you want to upgrade (or install multiple versions of Ruby), I recommend using the Ruby Version Manager (RVM).
The next step is to clone the repo from Github and then run the bundler:
$ git clone https://github.com/tmarkiewicz/weather-ruby
$ cd weather-ruby
Then you’ll need to install the required Ruby gems using the Bundler Ruby gem:
$ gem install bundler
$ bundle install
The tutorial code samples in Ruby can be run from the command line via this syntax:
$ ruby filename.rbThe next two sections outline how to use the tutorial for both Weather Company Data and then Netatmo.
Weather Company
To access the Weather Company Data API, you’ll need an account on the IBM Cloud. My tutorial outlines the process in detail, but the necessary steps are:
- sign up (or sign in) for the IBM Cloud
- add the Weather Company Data as a new service
- select the free plan
- select add credentials, then view the credentials’ JSON
- add these credentials to a .env file in the app directory
As a side note, there’s a great guide to using environment variables in Ruby here. In the tutorial, I also use this Ruby gem: https://github.com/bkeepers/dotenv
The next step is to make a test API call. I like to always start with curl or the Postman app to test any API credentials, the construction of the API endpoint, and of course the results:
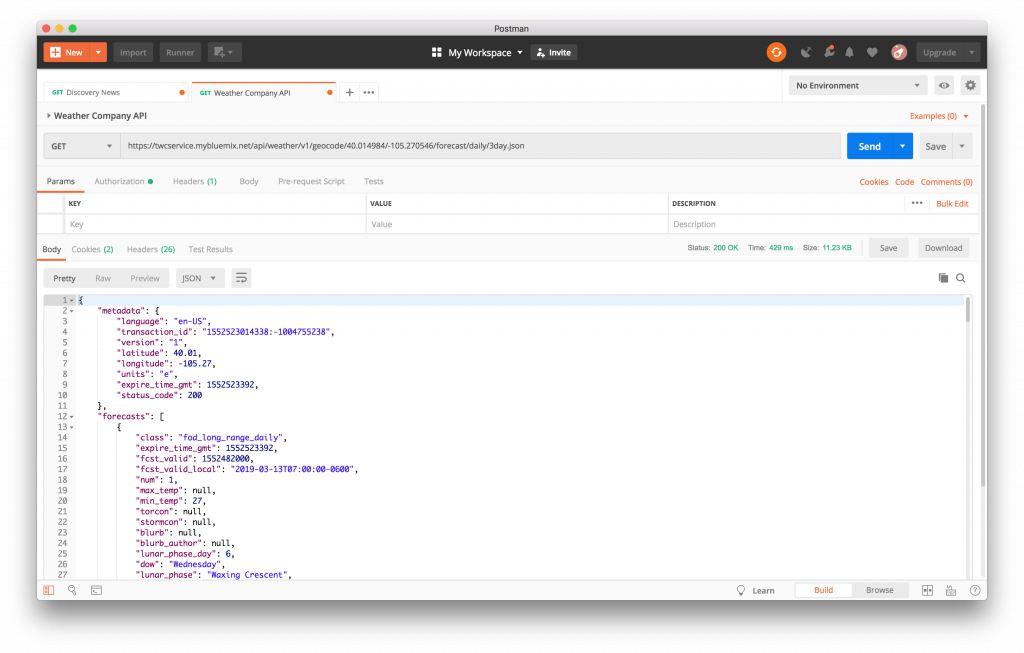 From the Weather Company Data API docs, we can build the URL to make a request to retrieve the 3-day forecast for a specific latitude and longitude like this:
https://twcservice.mybluemix.net/api/weather/v1/geocode/40.014984/-105.270546/forecast/daily/3day.json
In the URL above, replace the latitude/longitude with those of the location you’d like to retrieve weather data. An excellent site to find your latitude and longitude can be found at LatLong.net.
Now that we have all the requirements, we can run the main file from the command line:
$ ruby weather-company.rbAnd the output will look like this:
Forecast for Friday, February 22, 2019:
Periods of snow. Lows overnight in the upper teens.
1 to 3 inches of snow expected.
Snow this evening will give way to lingering snow showers late. Low 19F. Winds light and variable. Chance of snow 80%. Snow accumulating 1 to 3 inches.
Netatmo
As I mentioned above, this part of the tutorial is only available if you already have one or more Netatmo devices. If you’re looking at a full featured weather station with API access, I highly recommend their system as it’s pretty affordable for all the features provided.
That said, you can still follow along with the remainder of this demo and if/when you get a Netatmo device you’ll know where to go for some step-by-step instructions.
One caveat on the data from Netatmo devices: they unfortunately only send measurements to the servers every ten minutes. From the Netatmo API docs:
Do not try to pull data every minute. Netatmo Weather Station sends its measures to the server every ten minutes. Get the last measures from all the devices of one user with the Getstationsdata method.
So while I’d much rather have some data much more frequently (wind speed and gusts come to mind), we have to work with what the company gives us in this case. Inconvenient for building a weather app, but not a dealbreaker.
As with the Weather Company section, the full steps for setting up the Netatmo API are in the Github repo, but the basic steps are as follows:
- if you already haven’t, create a user account with Netatmo
- sign up for a developer account
- create a new application
- copy the credentials for the new app
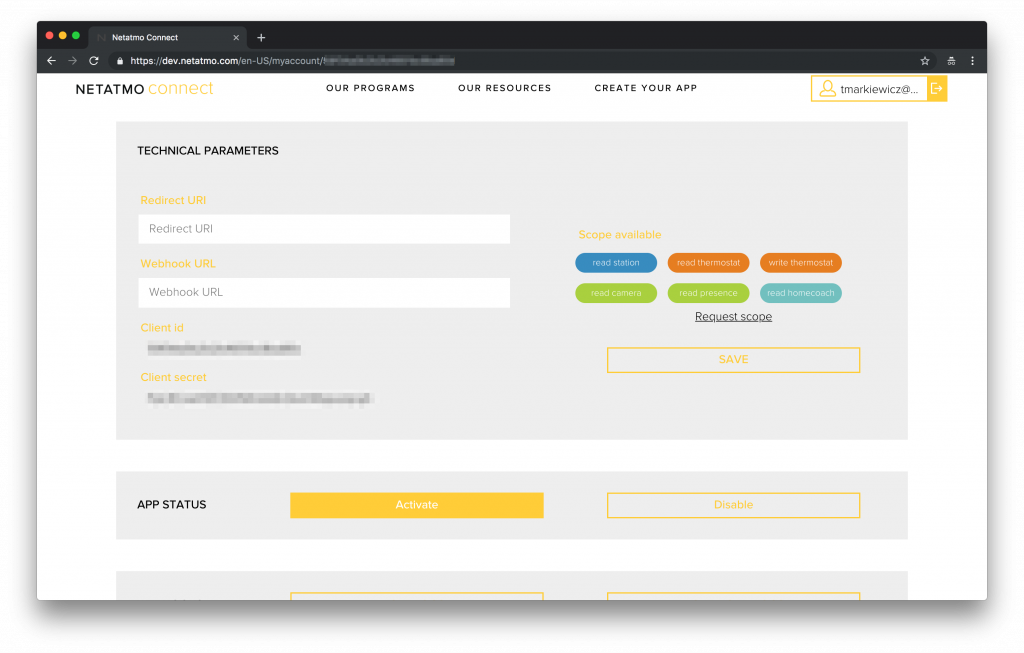
Once you’ve added the client id and client secret credentials to the .env file, you can then run the Netatmo file from the command line:
$ ruby netatmo.rb
The output will look like this:
Time: 2019-03-12 14:19:50 -0600
Temperature: 50 deg F
Humidity: 45%
And that’s it! A quick and easy to way get access to local weather data and forecasts.
Summary
While this is an introductory tutorial on to how to access weather data via the Weather Company and Netatmo, it’s not accessible outside running locally on your machine. In a future article, I’ll show how to quickly take this data and deploy it to an actual application. Once that’s done, my neighbor will be happy and possibly stop texting me for wind updates!
The post How to use Weather Company Data and Netatmo with Ruby first appeared on Tom Markiewicz.
Build a cross-platform mobile app using React Native 6 Mar 2019, 1:29 am
As part of my developer advocacy efforts at IBM, I often build and share demos to showcase our products and how developers can integrate them into their own applications.
The IBM Developer site provides a wealth of resources for developers with a focus on code, content, and community. And code patterns are our way of providing full solutions to common problems that developers regularly face in their work. These code patterns “leverage multiple technologies to solve issues that our developer advocates have recognized as common use cases across multiple industries.”
I recently finished a new code pattern that shows how to create a cross-platform mobile application using React Native framework.
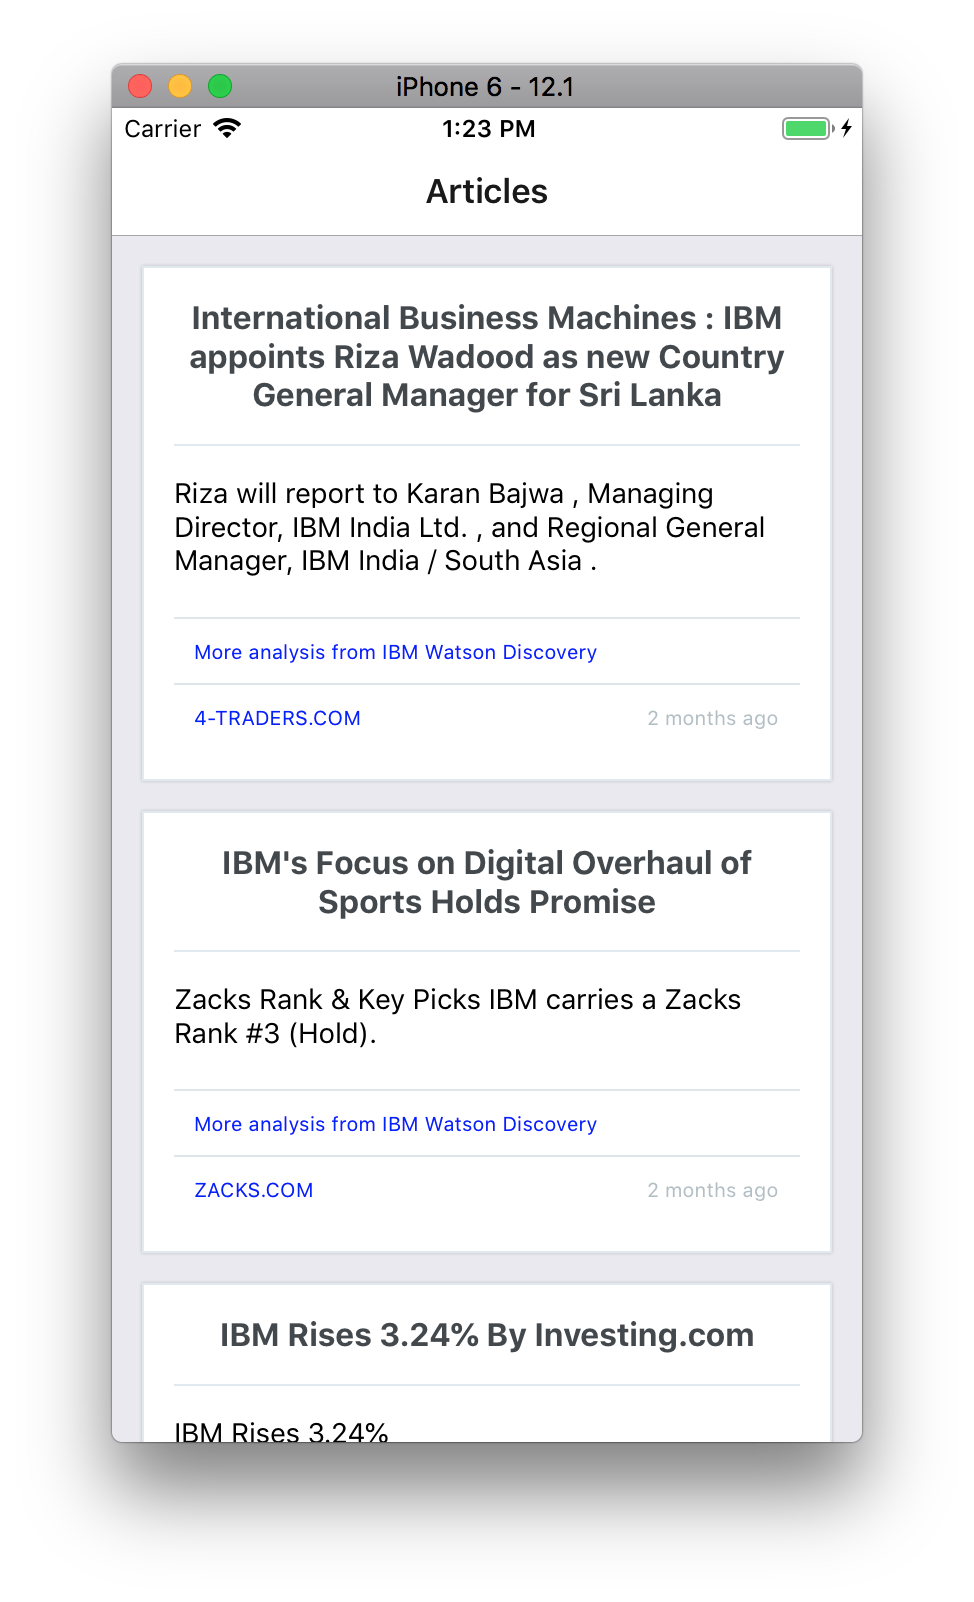
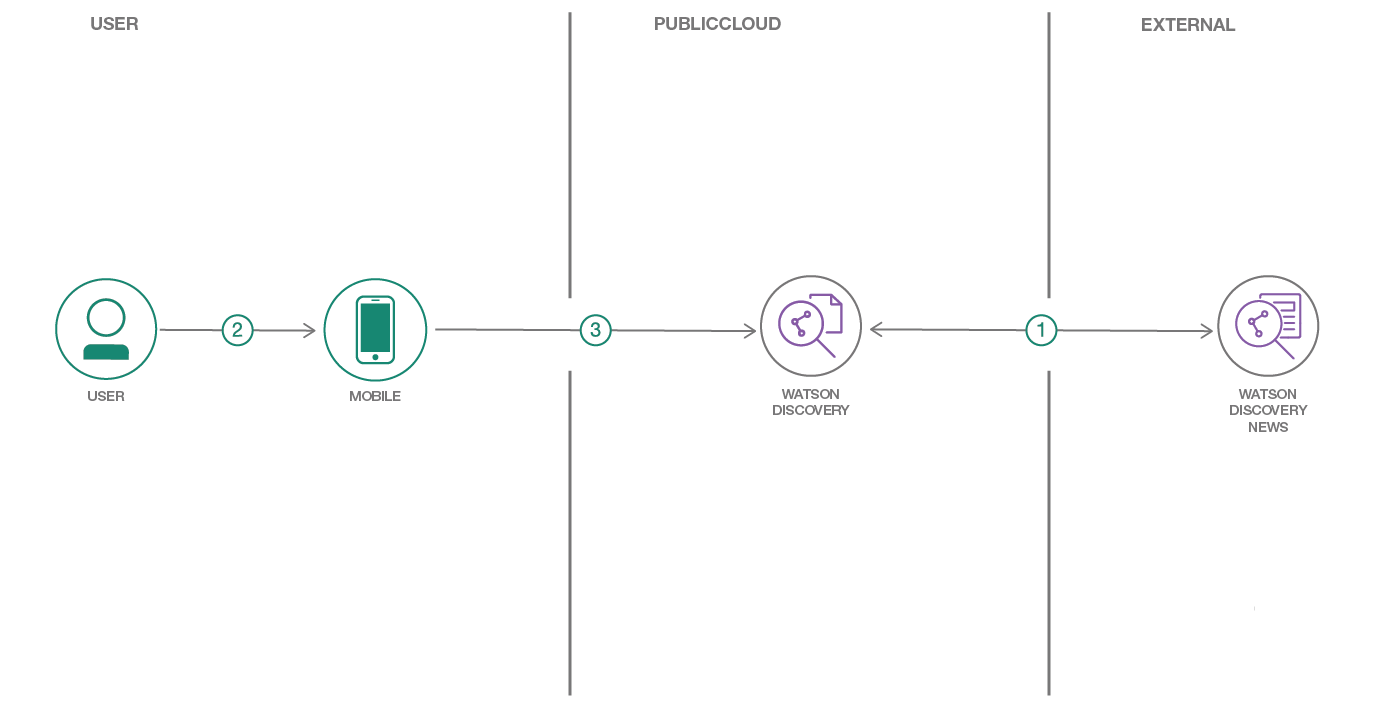
The pattern I built uses Watson Discovery News and React Native to build a cross-platform mobile app that fetches recent news for a specific company. React Native is a JavaScript framework that lets you write mobile apps for iOS and Android. The application uses Watson Discovery News to fetch recent and relevant news articles along with sentiment, keywords, and related concepts. Easily customizable, this demo app provides a convenient starting point to use Watson Discovery in your own React Native applications. Instead of learning Swift, Java, or Kotlin to build native mobile applications, you can quickly create apps using your JavaScript knowledge.
React Native uses the same design as React, letting you compose a rich mobile UI from declarative components. For an excellent overview on React Native and building mobile apps using only JavaScript, take a look at the article Dissecting React Native. If you’re interested in diving deeper into React Native, I highly recommend the Udemy course The Complete React Native and Redux Course by Stephen Grider.
If you’re unfamiliar with the service, IBM Watson Discovery is a cognitive search and content analytics engine for applications to identify patterns, trends, and actionable insights. Using Discovery, developers can extract meta-data from returned content such as concepts, keywords, and sentiment using natural language understanding. Watson Discovery News is an indexed dataset that is pre-enriched with natural language processing (NLP) features such as keywords, entities, semantic roles, sentiment, relations, and category classification. So instead of using two products (Watson Discovery and Natural Language Understanding), a developer can make a single API to get combined results.
It’s easy to get started and try the application, even if you have no JavaScript expertise. Just clone the repo, sign up for a free IBM Cloud account, and then update the Discovery credentials with your own. You can have your own cross-platform mobile news app running in minutes.
You can find the full repo on Github here. If you use this as a starting point for your application, please let me know!
The post Build a cross-platform mobile app using React Native first appeared on Tom Markiewicz.
RubyMotion versus Swift for iOS Development 26 Nov 2018, 8:59 pm
As I worked on the IBM Watson and Apple Core ML partnership, I was inspired to explore more ways to showcase machine learning for developers in different ways. One of my ideas was to look into using RubyMotion with IBM Watson.
If you’re not familiar, RubyMotion lets developers quickly write cross-platform native apps for iOS, Android, and OS X using the Ruby programming language. The applications are statically compiled and then call into the native platform APIs.
As a Rubyist, when RubyMotion was first released in 2012, I was pretty excited. I had wanted to explore developing apps for iOS, but Objective-C was not clicking for me, and it can be a challenging language to learn. So when Swift arrived, this fundamentally changed the equation as it was now much easier to get started developing for iOS. Swift for many developers was much easier to use while still as powerful.
The rapid advancement of Swift as the primary language for iOS development has significantly reduced the need as well as the appeal to write iOS applications in Ruby. At this point, it seems the main benefit would be a write-once approach to get iOS and Android support. However, at this point, there are much more popular and widely supported cross-platform mobile development options such as React Native (using JavaScript).
However, the biggest issue I saw from the beginning is that to use the various APIs for each operating system, the developer still had to read and understand the APIs (written in the respective languages of Objective-C, Swift, or Java). So while you could write most of your code in Ruby, you’re not insulated from learning and understanding the APIs in their native language. Thus I’ve never been convinced of the actual overall savings at that point for RubyMotion other than a technological curiosity.
Also, if you do a Google search for RubyMotion, you’re not going to find many recent results returned. So while this may look like it’s an opportunity to create tutorials and other content, I think the more significant reason is that RubyMotion was built when only Objective-C was an option for iOS development. Now that that Swift is becoming the primary iOS development language, the need for alternatives is significantly diminished.
Unless there are some significant changes to RubyMotion (it did come under new ownership relatively recently), I’m not optimistic about its gaining any popularity among Ruby developers.
I hope I’m wrong as I enjoy programming in Ruby, but I’ll be looking more to React Native for cross-platform mobile development.
The post RubyMotion versus Swift for iOS Development first appeared on Tom Markiewicz.
Video: Machine Learning on iOS, Integrating IBM Watson with Core ML at AltConf 15 Nov 2018, 10:33 pm
Earlier this year I attended AltConf in San Jose, a community-driven and supported event held alongside Apple’s WWDC. IBM sponsored the event and offered numerous workshops to attendees. In addition to assisting with the workshops and manning the booth, I had a talk accepted on Machine Learning on iOS: Integrating IBM Watson with Core ML.
Here’s the recording of the talk I gave with Devin Conley, IBM’s lead engineer on the project:
The first half of the session I presented an overview of machine learning, Apple’s Core ML, IBM Watson, and the partnership between Apple and IBM. In the second part, Devin covered the architecture of the integration, a live demo, and some additional case studies.
The post Video: Machine Learning on iOS, Integrating IBM Watson with Core ML at AltConf first appeared on Tom Markiewicz.
Altconf 2018 – Machine Learning on iOS: Integrating IBM Watson with Core ML 5 Jun 2018, 10:30 pm
This Wednesday I’ll be speaking at AltConf on Machine Learning on iOS: Integrating IBM Watson with Core ML.
Here’s the abstract I submitted:
Apple recently announced a partnership with IBM to integrate Core ML with Watson, allowing visual recognition to run locally on iOS devices. The ability to use machine learning while offline opens up a wide range of applications and use cases. Geared toward beginners (both in Swift and machine learning), this session will focus on providing an overview of machine learning and Core ML, how to implement IBM Watson with Core ML, and techniques for continuous learning and model training. Additionally, we’ll cover the benefits of using machine learning locally and what’s in store for the future.
If you’re not familiar, AltConf is a “community-driven and supported event, held in downtown San Jose alongside Apple’s WWDC.” Admission is free, so if you’re in the area and/or attending WWDC, please stop by and give me any feedback! Once the videos are posted, I’ll share the link.
The post Altconf 2018 – Machine Learning on iOS: Integrating IBM Watson with Core ML first appeared on Tom Markiewicz.
Getting Started with Artificial Intelligence: A Practical Guide to Building Applications in the Enterprise 9 Feb 2018, 8:57 pm
For the past several months I’ve been co-writing a book that was recently published by O’Reilly. Called Getting Started with Artificial Intelligence: A Practical Guide to Building Enterprise Applications, the book is currently offered by IBM as a free download.
Written with Josh Zheng to introduce developers and technical managers to using artificial intelligence when building enterprise applications, the Getting Started with Artificial Intelligence book focuses on the practical aspects of implementing AI in the enterprise. From a discussion of the history of AI to specific implementation strategies to a look at the future, the book not only focuses on developers but also provides some background to AI for anyone in business (especially the first and last chapters). While the title of the book states a focus on building enterprise applications, the majority of the content also applies to startups — really any developer looking to get started with AI could benefit from reading this book.
While writing a book, even about a subject you know well, you end up finding some fascinating facts. For example, it was interesting to see some hard numbers on the actual size of the market for artificial intelligence:
Estimates from IDC predict revenue from artificial intelligence will top $47 billion by the year 2020 with a compound annual growth rate (CAGR) of 55.1% over the forecast period, with nearly half of that going to software. Additionally, investment in AI and machine learning companies has increased dramatically—AI startups have raised close to $10 billion in funding.
Similarly, some data on the vast amount of data we’re all generating daily:
There are now more mobile devices than people on the planet and each is collecting data every second on our habits, physical activity, locations traveled, and daily preferences. Daily, we create 2.5 quintillion bytes of data from a wide variety of sources. And it’s coming from everywhere. Just think of all the sources collecting data—IoT sensors in the home, social media posts, pictures, videos, all our purchase transactions, as well as GPS location data monitoring our every move.
Data is even touted as being more important and valuable than oil. For that reason, companies are creating vast repositories of raw data (typically called data lakes) of both historical and real-time data. Being able to apply AI to this enormous quantity of data is a dream of many companies across industries. To do so, you have to pick the right set of tools not only to store the data but also to access the data as efficiently as possible. Current tools are evolving, and the way in which you store and present your data must change accordingly. Failure to do so will leave you and your data behind. To illustrate this point, MIT professor Erik Brynjolfsson performed a study that found firms using data-driven decision making are 5% more productive and profitable than competitors. Additional research shows that organizations using analytics see a payback of $13.01 for every dollar spent.
And finally a bit on the much-discussed impact of AI on jobs:
Although we worry about the loss of jobs from AI, the other side of the coin is that there’s a desperate, immediate need for more engineers and data scientists trained on applying AI, especially in the enterprise. In the US alone, companies are expected to spend more than $650 million on annual salaries on AI jobs in 2017. Additionally, they found that 35% percent of these AI jobs required a PhD and 26% a master’s degree. While not necessarily likely to slow down the technological progress and innovations, this increasing shortage of engineering talent will affect how enterprises build applications. Without the ability to hire or train in-house expertise fast enough, companies will be forced to either outsource these capabilities to third parties (if they themselves are not facing the same shortages) or rely more heavily on SaaS solutions for these skills.
I also learned that writing a book is quite challenging. Compiling and synthesizing your knowledge into easy to understand prose is difficult, though extremely rewarding in the end. Additionally, I now have much more respect for anyone who writes a book, especially fiction as it must be orders of magnitude more arduous.
As far as the content covered in the book, these are the high-level topics:
- an introduction to artificial intelligence (comparing machine and deep learning) with a discussion of avoiding another AI winter
- natural language processing (NLP): components, how to use, and challenges
- chatbots: how to build them and best practices
- computer vision: capabilities, implementation, and usage on mobile devices
- AI data pipeline: preparation, sourcing, storage, and discovery
- looking forward: challenges, trends, and opportunities as well as social implications
Throughout the book, there’s a consistent focus on the practical aspects of implementing AI for developers.

In addition to the book itself, two additional pieces of content support and elaborate on the topics we address. The first is a video podcast interview discussing developing successful AI apps for the enterprise filmed at the O’Reilly AI Conference last September. The second is a webcast on NLP I presented titled “Using natural language processing to build applications in the enterprise”. The webcast covers an overview and fundamentals of NLP, a discussion of real-world examples of using NLP in the enterprise, practical tips on implementing NLP, and a live demo of the IBM Watson Natural Language Understanding service.
As I mentioned earlier, IBM is currently offering the book as a free download. So grab a copy and if you have any questions about the book or its content, feel free to reach out.
The post Getting Started with Artificial Intelligence: A Practical Guide to Building Applications in the Enterprise first appeared on Tom Markiewicz.
How to Create an API for Your Application, Part 1 19 Jul 2017, 6:56 pm
Despite being the lingua franca of the internet, APIs remain wildly inconsistent in both their structure and documentation for developers. While the promise of APIs has largely been fulfilled, their actual usage for developers day-to-day often remains frustrating. Since an API in and of itself is just the mechanism for a service to offer access (both internally and externally), there are no specific rules around its implementation.
In order to provide some much-needed consistency, multiple options for API guidelines have been created. So just what is an API specification?
Nordic APIs has a great article describing in detail the differences between an API specification, documentation, and definition. Check out their article for a much more in-depth discussion, but basically a specification describes the overall behavior of the API and how it links to other APIs. Documentation for the API provides examples, a detailed reference, and the specific API functions. Finally, while the specification and documentation are geared toward humans, the API definition is more for machine-readability.
So what does this mean for developers? While it’s easy to get down into the weeds, at a high level I think it’s important to at least understand specifications and the options available. An analogy I’ve seen for API specifications are house blueprints. You wouldn’t start building a home without a blueprint and an API is essentially the same logic. Understand and document in advance what you’re building so everyone involved remains on the same page before, during, and after creating the API.
Some of the advantages of using an API specification include:
– can be machine readable, providing the ability for automated code generation
– built-in documentation – you’re writing the docs as you go
– uniformity
– catch problems early on in development
– easier to test
And some disadvantages include:
– the specs can be overly verbose and complicated
– depending on developer preferences, they can actually be less readable
– each spec has industry backing which influences the overall direction
There are three main API specifications: Swagger (OpenAPI), RAML, and API Blueprint and each has an industry sponsor (SmartBear, MuleSoft, and Apiary respectively). All three are open source, offer code generation tools, and have active developer ecosystems. The following is a quick look at some of their differences.
Swagger
– largest community and developer ecosystem
– supported by large corporations like Google, Microsoft, and IBM via the Open API Initiative
– the format is JSON
– easy to use tools to generate nice looking online documentation
– a possible negative is developer focus, meaning they’ll be the only ones creating the documentation (as opposed to other stakeholders)
RAML
– the format is YAML
– very succinct/concise
– balances human readable with machine readable
– good for quick prototyping, but may break down with large documentation as nested YAML
API Blueprint
– the format is Markdown, so very human readable
– focused on “collaboration between project stakeholders, developers, and customers at any point in the API lifecycle”
– built for a “design-first philosophy”
All three provide tools and support for building out robust APIs. In order to choose between them, I’d look at a couple factors when you’re considering a selection. First, do you like the language they use? What do you feel most comfortable working in? If you can’t stand writing YAML, then you’d probably want to avoid RAML. That recommendation sounds like common sense, but these types of personal preferences really matter long term. Second, try to think again as to what you’ll need to do with the API you create. Will you have a requirement to automatically generate SDK code from the specification? Does your API documentation need a nice looking UI to publish on the web? Taking account of these considerations from the beginning can help point you in the right direction for a specification choice.
I’ll leave it out of this discussion, but there are also numerous API frameworks and platforms that provide infrastructure benefits for your API. I’ve never used any of them personally yet, but here’s a list of the more popular ones to jump start your research: IBM API Connect, Apiary, Apigee (now Google), Mulesoft, and Mashery.
In the next two articles of this series, I’ll discuss Swagger in more detail as my preference of the three main specifications, how to use it as an initial part of building your API, and how to create a Ruby SDK automatically from a Swagger specification.
The post How to Create an API for Your Application, Part 1 first appeared on Tom Markiewicz.
Nvidia on AI everywhere 11 Jul 2017, 11:14 pm
Analogous to Marc Andreessen’s “software is eating the world”, Nvidia’s CEO Jensen Huang on the impact of AI:
“AI is eating software,” Huang continued. “The way to think about it is that AI is just the modern way of doing software. In the future, we’re not going to see software that is not going to continue to learn over time, and be able to perceive and reason, and plan actions and that continues to improve as we use it. These machine-learning approaches, these artificial intelligence-based approaches, will define how software is developed in the future. Just about every startup company does software these days, and even non-startup companies do their own software. Similarly, every startup in the future will have AI.”
The entire article is a good read and gives some insight into what the leader of the largest provider of GPUs is thinking about the future.
The post Nvidia on AI everywhere first appeared on Tom Markiewicz.
Apple Watch as Battery Enhancer 6 Jun 2015, 4:13 pm
A possible hidden feature of the Apple Watch:
Depending on how well Apple manages the Bluetooth link with the iPhone, the Apple Watch could then effectively function as a wearable spare battery pack for iPhone users if it ends up re-routing enough usage away from the primary mobile device to an auxiliary wearable.
If that’s the case, Apple’s 2015 party trick could be more slender iPhones with battery life that appears improved thanks to a portion of mobile usage being re-routed to the Apple Watch while simultaneously making more money from its user-base.
I’ve only had my Apple Watch for a few days, so I’m not sure this is the case. A full review is forthcoming though.
The post Apple Watch as Battery Enhancer first appeared on Tom Markiewicz.