Add your feed to SetSticker.com! Promote your sites and attract more customers. It costs only 100 EUROS per YEAR.
Pleasant surprises on every page! Discover new articles, displayed randomly throughout the site. Interesting content, always a click away
Vegetarian Moroccan Stew 13 Sep 2014, 4:00 am
Serves 6 as a main dish.
Spice Mixture
- 1 teaspoon ground cinnamon
- 1 teaspoon ground cumin
- 1 teaspoon kosher salt
- ½ teaspoon ground ginger
- ¼ teaspoon ground cloves
- ¼ teaspoon ground nutmeg
- ¼ teaspoon ground turmeric
- ⅛ teaspoon curry powder
Stew Vegetables
- 1 tablespoon butter
- 1 sweet onion, chopped
- 2 cups finely shredded kale
- 4 (14 ounce) cans organic vegetable broth
- 1 (15 ounce) can garbanzo beans, drained
- 1 (14.5 ounce) can diced tomatoes, undrained
- 3 large potatoes, peeled and diced
- 2 sweet potatoes, peeled and diced
- 4 large carrots, chopped
- 1 cup dried lentils, rinsed
- ½ cup chopped dried apricots
- 1 tablespoon honey
- 1 teaspoon ground black pepper, to taste
- 1 tablespoon cornstarch (optional)
- 1 tablespoon water (optional)
Directions
- Combine cinnamon, cumin, salt, ginger, cloves, nutmeg, turmeric, and curry powder in a large bowl.
- Melt butter in a large pot over medium heat. Cook the onion in the butter until soft and just beginning to brown, 5 to 10 minutes.
- Stir in kale and spice mixture; cook until kale begins to wilt and spices are fragrant, about 2 minutes.
- Pour the vegetable broth into the pot. Stir garbanzo beans, tomatoes, potatoes, sweet potatoes, carrots, lentils, apricots, and honey, into the broth; bring to boil, reduce heat to low, and simmer until vegetables and lentils are cooked and tender, about 30 minutes. Season stew with black pepper.
- Dissolve cornstarch in water; stir into stew and simmer thickened, about 5 minutes.
Chicken Enchiladas with Red Chili Sauce 28 Aug 2014, 4:00 am
Noam’s notes: This is from the May 2003 issue of Cook’s Illustrated. This recipe takes about 90 minutes from start to finish, but it is not that difficult. The end result tasted great.
Makes 10 enchiladas, serving 4-5 as a main dish
Ingredients: Sauce and Filling
- 1 ½ tablespoons vegetable or corn oil
- 1 medium onion, chopped fine (about 1 cup)
- 3 medium garlic cloves, minced or pressed through a garlic press (about 1 tablespoons)
- 3 tablespoons chili powder
- 2 teaspoons ground coriander
- 2 teaspoons ground cumin
- ½ teaspoon salt
- 2 teaspoons sugar
- 12 oz boneless, skinless chicken thighs, trimmed of excess fat and cut into ¼” strips
- 2 cans (8 ounces each) tomato sauce
- ¾ cup water
- ½ cup coarsely chopped fresh cilantro leaves
- 2 oz pickled jalapeños, drained
- 8 oz sharp cheddar cheese, grated (2 cups)
Ingredients: Tortillas and Toppings
- 10 six-inch corn tortillas
- Vegetable or corn oil cooking spray
- 3 ounces grated sharp cheddar cheese
- ¾ cup sour cream
- 1 avocado, diced medium
- 2 limes, quartered
Directions: Sauce and Filling
- Heat oil in medium saucepan over medium-high heat until hot and shimmering (~2 mins).
- Add onion and cook, stiring occasionally, until softened and beginning to brown (~5 mins).
- Add garlic, chili powder, coriander, cumin, salt, and sugar. Stir for 30 seconds.
- Add chicken and stir constantly until coated with spices, about 30 seconds.
- Add tomato sauce and water. Stir to separate the chicken pieces and bring to a simmer.
- Reduce to medium-low heat and simmer for eight minutes, stirring occasionally, until the chicen is cooked through.
- Use slotted spoon to remove the onions and chicken. Place on a plate and freeze for 10 minutes to cool, then combine with cilantro and cheese in medium bowl and set aside.
Directions: Assembly
- Adjust oven racks to upper and lower middle positions and heat oven to 300 degrees.
- Coat bottom of 13x9” baking disk with sauce.
- Spread out tortillas on two baking sheets. Spray on both sides with oil. Bake for 4 mins.
- Spread tortillas on countertop. Increase oven temperature to 400 degrees.
- Place ⅓ cup of filling down the center of each tortilla.
- Roll each tortilla tightly by hand and place in baking dish, side by side seam-side down.
- Pour remaining sauce over top of tortillas, using spoon back to coat each tortilla.
- Sprinkle grated cheese over the enchillads.
- Cover baking dish with foil. Bake on lower-middle rack for 20-25 minutes. Uncover and serve immediately, with avocado, lime, and sour cream.
2014 WSOP Schedule 14 Feb 2014, 5:00 am
 |
The 2014 WSOP Schedule has finally been announced, with 65 bracelet events this year. The WSOP kicks off on May 27th, with both the casino employee’s event and the $25,000 Mixed Max No-Limit Hold’em, and finishes with the $10,000 No Limit Holdem Main Event starting on July 5th.
As I did last year, I’ve created an iCal calendar of the WSOP event schedule. For easy reference, the entries include links to the event structure sheets.
The calendar entries start at the beginning of the event and end when the event registrations close. I have assumed that the event registrations end after the second break as they did previously, for a total duration of four hours and forty minutes (e.g. four 60 minute levels and two 20 minute breaks).
Enjoy, - Noam
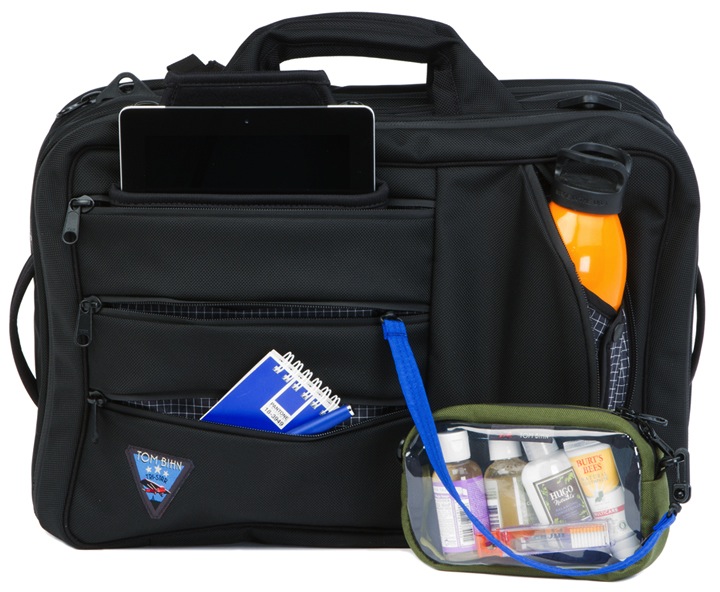
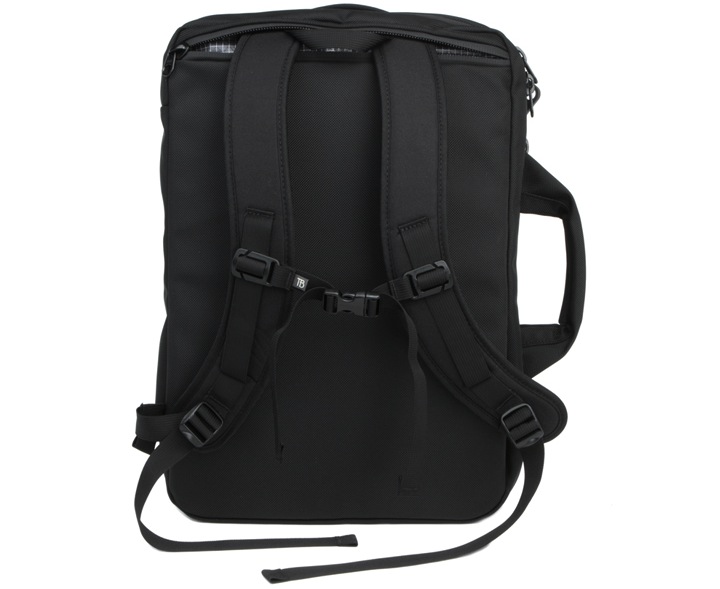
Review: Tom Bihn Empire Builder 28 Sep 2013, 4:00 am
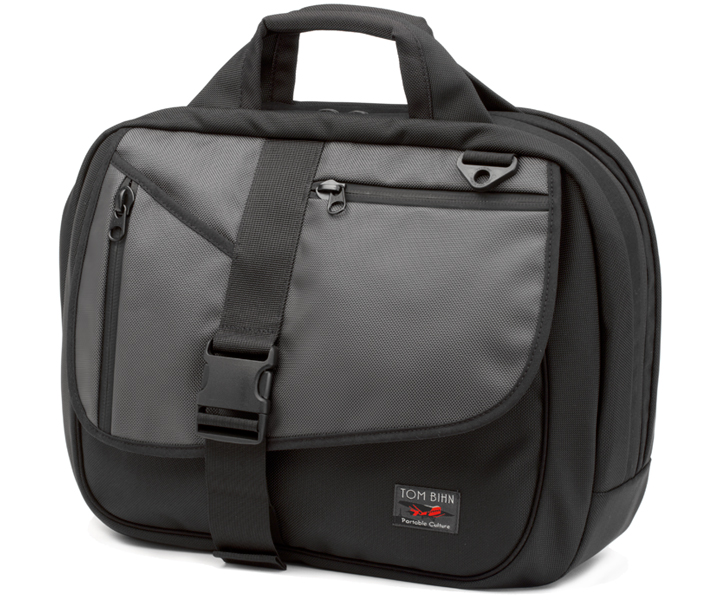 |
The Empire Builder was my first foray into Tom Bihn products. I bought the Empire Builder when I was still using a Brookstone four-wheel spinner suitcase and wanted a second bag to bring along that could slip over the suitcase’s handle.
The Empire Builder is a relatively large bag. It has a volume of 22.5 liters, which is 2/3s the size of my Tom Bihn Tri-Star carry-on bag, and measures 18.25” x 12.75” x 7”. I wasn’t sure if I wanted a bag as big as the Empire Builder once it arrived so I then ordered the Zephyr, which is a smaller version of the Empire Builder.
In the end I decided to keep the Empire Builder because it had the added flexibility of being useful as my only bag for a couple of days trip.
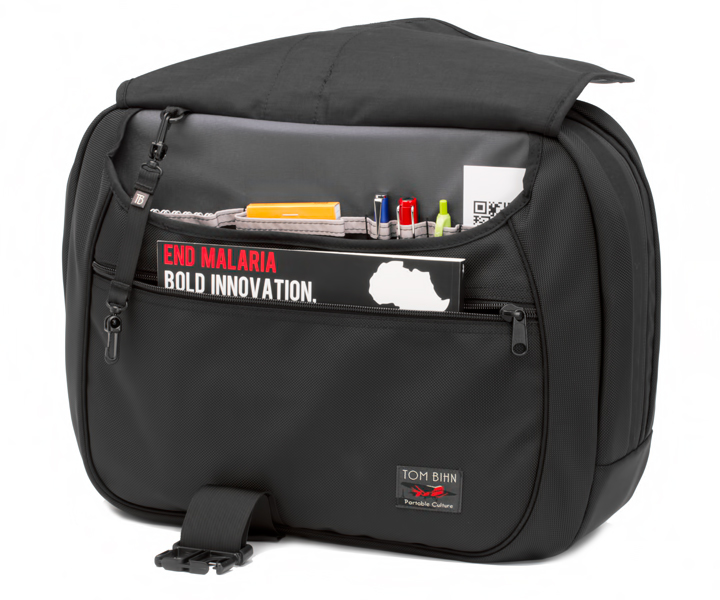 |
The Empire builder has three small pockets on the flap, which I used to store my earphones and any travel documentation I needed such as my passport and boarding passes. Behind the flat is the main organized area of the bag. There are small pockets sized for cards, small notebooks, and pens along the top of the section, and then there is both a deep open pocket and a long zippered pocket. I could easily fit all of my cables and other electronic odds and ends in the two pockets, with enough room leftover for either my iPad or my toiletry bag.
There are two plastic O-rings sewn in to this organized area. The O-rings can be used to attach a variety of Tom Bihn accessories, either directly or using an 8” or 16” key strap. I use several of the smaller sized accessories to keep things organized, along with a pair of Tumi pouches which also have O-rings attached to them. There is another O-ring sewn into the zippered pocket as well.
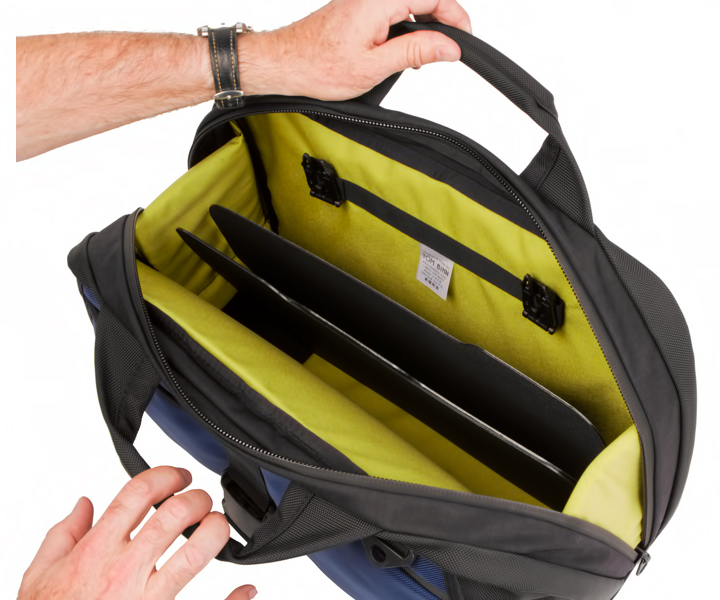 |
The main compartment of the Empire Builder will swallow most anything you throw at it. It comes with two plastic dividers to hold folders in place, but I removed those pretty quickly. Since I don’t use a Tom Bihn laptop case, I also removed the Annex Clips as they are only useful if you want to secure one of their laptop cases inside the bag. I could easily fit my 13” Macbook Air in a Waterfield Design Laptop SleeveCase, with plenty of room leftover for my iPad and some magazines. If I was using it as an overnight bag, I would put my laptop, clothing, and toiletry bag in the main compartment. The iPad would shift to the deep front pocket, and the magazines would shift to the back pocket.
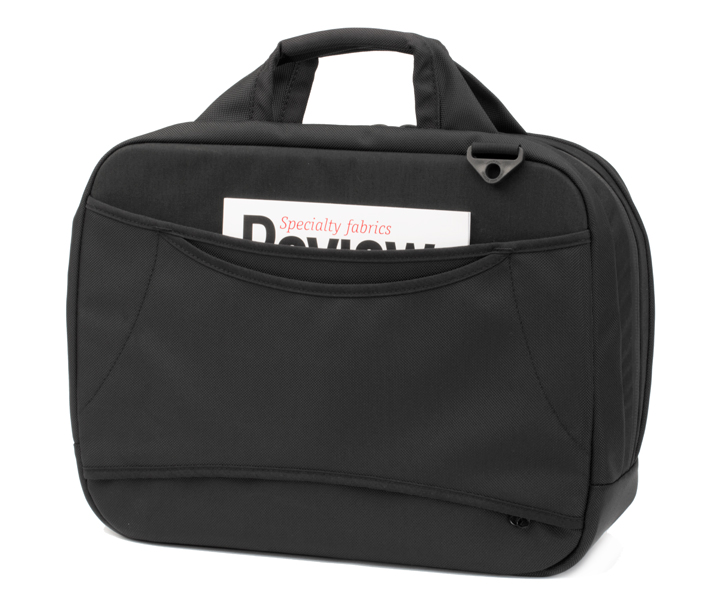 |
The back of the Empire Builder has two pockets. The larger pocket can hold a few magazines or a newspaper. The smaller pocket serves two functions. You can close the zippered bottom to use it as a pocket to hold other paperwork, or you can open the zipper and slide it over the handles of a wheeled suitcase.
In my experience, it worked well as a pocket but it was just ok over the handles of my Brookstone suitcase. The opening is large enough that the Empire Builder can shift around a bit too much, and closing the zippers up only offered a temporary relief. It probably works better on suitcases with wider handles than the Brookstone to go around.
While you can carry the Empire Builder by bringing the two handles on the top together, I recommend using Tom Bihn’s Absolute Shoulder Strap. There are two attachment points for the strap on the top of the bag, and the strap is very comfortable to use on either one shoulder or across your body. I found that the strap usually ended up sitting in a way that required me to pick it up and move it out-of-the-way to open the bag, but that was a minor inconvenience.
While I was still using my Brookstone suitcase, I was extremely happy with the Empire Builder. It worked well as a second bag to put at my feet, and it could be used by itself for a short trip. Eventually I realized that I no longer wanted to use a wheeled suitcase, and bought Tom Bihn’s Tri-Star carry-on bag instead. The Empire Builder is too big to use as a second bag to the Tri-Star, so it now permanently lives in my closet. Even when I take an overnight trip, I grab the Tri-Star instead of the Empire Builder as I like the ability to carry it as a backpack if I need to walk long distances.
Ultimately I have no issues at all with the Empire Builder and I would recommend it to anyone looking for a bag like it. My needs have changed, and as a result it is no longer the right bag for me. The reason I haven’t yet found it a good home is that I can’t yet bring myself to let it go.
Review: Primo Oval XL 6 Apr 2013, 4:00 am
![]()
My experience with grills was limited growing up and the first time I used one myself was in college. Our dorm had an annual outdoor BBQ, using a large two foot by five foot charcoal grill. Each year the grill was started by laying out a copious amount of quick-start briquettes and then dousing it all in lighter fluid.
Needless to say this wasn’t the safest exercise, and I remember my friend Paul getting a bit singed one year trying to light the fire. Even once the grill was lit there was no temperature control, so everything ended up well done and with the familiar flavor of lighter fluid.
After college I was introduced to more standard charcoal grills, such as the prototypical Weber kettle grill. These grills have reasonable temperature control through strategically placing the charcoal and then controlling the air vents, but they still take a lot of time to man and ended up with lots of ash cleanup at the end.
Choosing a Ceramic Grill
A former neighbor of mine has a Kamado Grill, but I hadn’t initially been thinking about getting a grill like that. It looked like it had a relatively small cooking area and seemed to take a long time for him to cook.
When I started to search for different grill options, I was reminded of my neighbor’s grill and stumbled into the world of ceramic charcoal grills. As I read more about them, they seemed too good to be true. Ceramic charcoal grills have all of the benefits of charcoal cooking, but are relatively easy to control and resulted in little ash. I learned that the relatively long cooks my neighbor did were actually a feature… Ceramic grills are capable of 800-1000 degree thin-crust pizza, 500 degree steaks, or, in my neighbor’s case, 225 degree slow cooked BBQ.
The traditional Japanese Kamado grill is what all modern ceramic grills are based on. These are built-in clay ovens that were fired with either charcoal or wood. The first Kamado-style grills were brought to the US in the 1960s, and several manufacturers still focus on the traditional round Kamado shape.
The Primo Oval XL
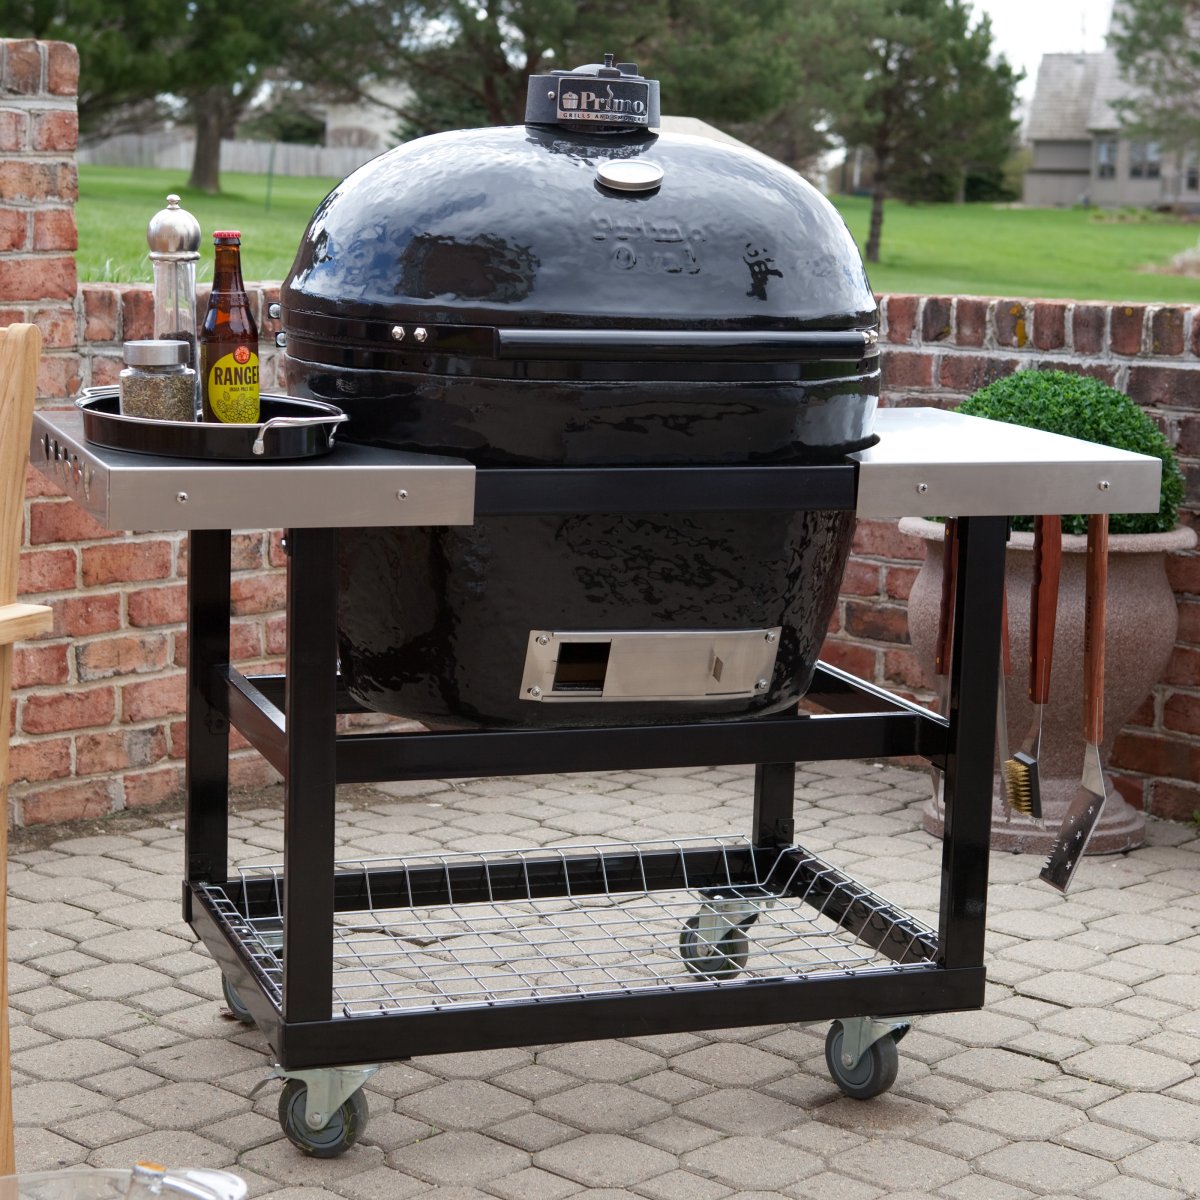
Primo Oval XL in Stainless Steel table |
Primo Grills make a line of ceramic grills with a slight twist from the traditional kamado-style grill… The cooktop is oval. While a subtle difference, the impact is dramatic. The shape results in two key differences in the usability of the Primo oval grills.
The first difference is that there is a large increase in usable cooking surface without either increasing the weight of the unit substantially or altering the overall design. For example the BGE XL size has a slightly larger main grill size of 452 sq-in, but the flatter lid doesn’t allow for a full second cooking rack as the Primo Oval XL has.
The second difference is that it is much easier to do offset cooking. The Primo grills can split their firebox, allowing the fire to be set on one side and the food to be placed on the other. On the Primo Oval XL one can easily fit two pork butts on the main cooking surface in the offset configuration, while still leaving room on the optional second cooking rack.
After realizing the advantages of the Primo Oval XL, I visited a local dealer to see it in person and decided to buy one.
Lighting the fire in the Primo
The one thing to know about cooking on a ceramic charcoal grill is that you will void the warranty if you use lighter fluid, either directly or in the form of quick-start briquettes. The ceramic will soak up the flavor of the lighter fluid and you will forever more be tasting lighter fluid in your food.
The good news is that it is entirely unnecessary to use lighter fluid in a ceramic grill. Standard lump charcoal, which is only a little harder to find than the ubiquitous quick-start briquettes, is extremely easy to light. The key thing to understand is that you don’t need or want all of the charcoals to be going at once. The temperature would be far too high for most of your needs.
There are several ways to start the fire. Some people like to take a handful of charcoal and use a charcoal chimney to light those. They then put the lit coals on top of the bed of charcoal that they put in the grill. Others like to use a propone or MAPP gas torch to light a few spots in the grill. I go an even simpler route… I rip off a couple of paper towels, dip them in vegetable oil, and light them once I’ve placed each of them under a piece of charcoal. My method will take maybe 5-10 minutes longer to get up to temperature, but it has served me well.
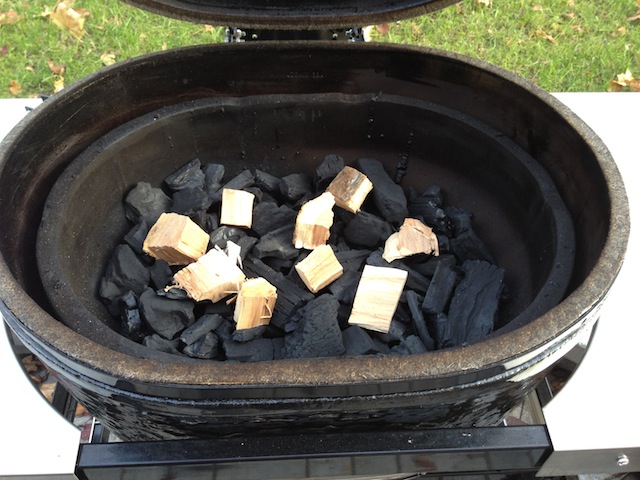
Charcoal and smoking wood ready to be lit |
Cooking on the Primo
While I do occasionally use the entire surface area of the Primo, I much more frequently take advantage of the split firebox to do indirect cooking. Below you can see an example of one of these offset cooks. I have removed half of the main grill surface, put in the firebox divider, and added half of the top rack as well to allow me to comfortably grill two 6.5 pound brisket flats.
Although the offset setup only allows me to use half of the firebox, that amount of charcoal can easily allow me to run for the 12-18 hours I’ll need for a long slow cook. In fact, I typically use a method which runs the grill even cooler over night to intentionally lengthen the cook. There isn’t a difference in the end product, but starting earlier means I can time things to end for dinner while not having to change my sleep schedule at all.
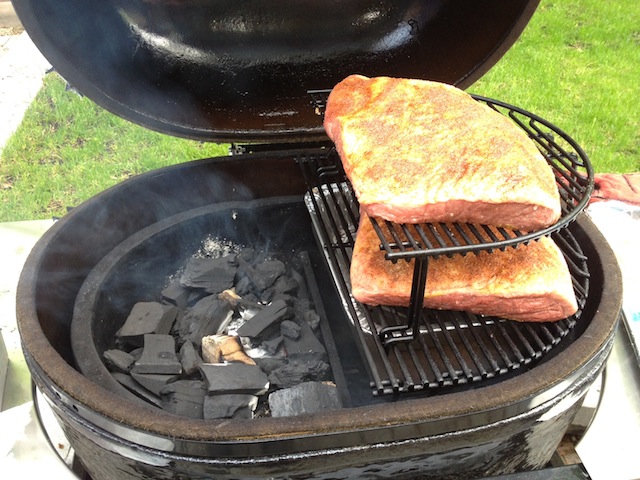
Offset cooking on the Primo Oval XL |
Temperature Control
Temperature control on the Primo Oval XL is very simple. There is a vent at the bottom that lets air in and a vent at the top that lets air out. You control the temperature by controlling these vents, which ultimately changes the amount of oxygen that gets to the coals. It takes very little airflow to get to normal slow cooking temperatures… 180-250F. For that temperature range, the top vent is open approximately 1/16th of an inch and the bottom vent is open maybe 1/4 of an inch.
The tricky part in learning how to adjust the temperature in a Primo grill is having patience. It takes a long time for you to see the results of your actions, so it is very easy to oversteer. It will typically take 15 minutes to see the full impact of a change you make. Once you get the hang of it, it is pretty easy to dial into a particular temperature range.
Over a long period of time, and a typical brisket cook will last 12-18 hours for me, changes in the wind or charcoal burning patterns can result in slow shifts in the temperature range on the grill. Originally I monitored the grill using a remote thermometer. On a long cook I’d tend to go out 2-3 times to make small adjustments to the grill.
After I was confident that I had mastered temperature control in long cooks, I decided to make my life easier and got a BBQ Guru temperature controller. The controller has a temperature sensor that sits in the grill and a fan connected to the lower vent. The controller drives the fan just enough to maintain the proper grill temperature. It is important that the controller learns the dynamics of your grill, and the BBQ Guru does a great job of that on the Primo. With the BBQ Guru controller looking after things, I can confidently leave the grill going while I sleep or go out to run errands.
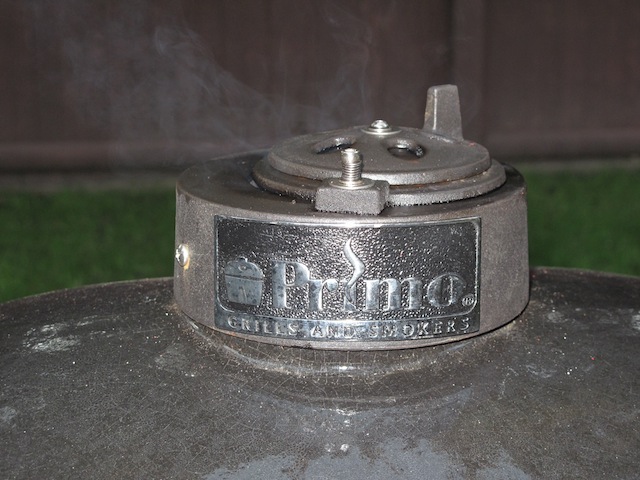
Typical vent settings for slow cooked BBQ |
Summary
Overall I couldn’t be happier with my purchase of the Primo Oval XL grill. When I originally planned to purchase a grill, the picture I had in my mind was having people over and cooking hamburgers and steaks. While I do occasionally cook hamburgers and steaks, the Primo has opened up a whole new world of BBQ to me. I’m much more likely to be slow cooking a brisket or pork shoulder than I am grilling steaks.
It isn’t that the Primo doesn’t do an amazing job on normal grill food, because it does. In fact, my wife often chides me when I order a hamburger at restaurants as they just can’t hold a candle to the wood smoked flavor and sear I can get on the Primo.
The reality is that doing slow cooked BBQ is just too simple to not do it. A typical cook will take at most 10 minutes to prepare the meat, 15-30 minutes to get the grill ready, and then in 12-18 hours I have a fantastic meal for my friends and family to enjoy.
Since a picture is worth a thousand words, how about a few pictures showing what is possible with the Primo Oval XL… Enjoy!
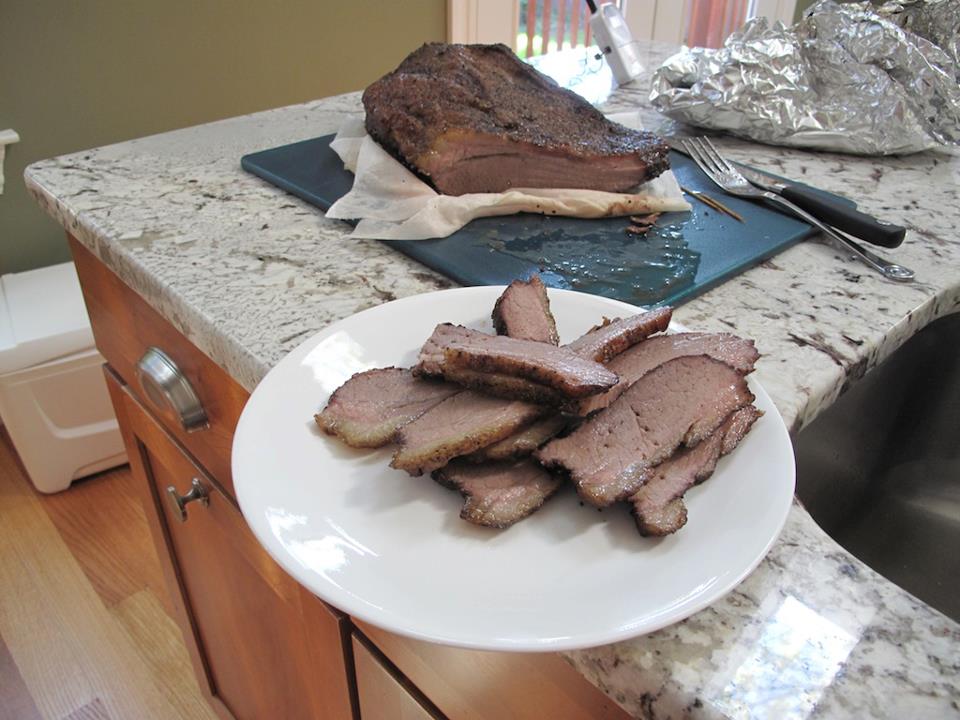
Sliced brisket hot off the grill |
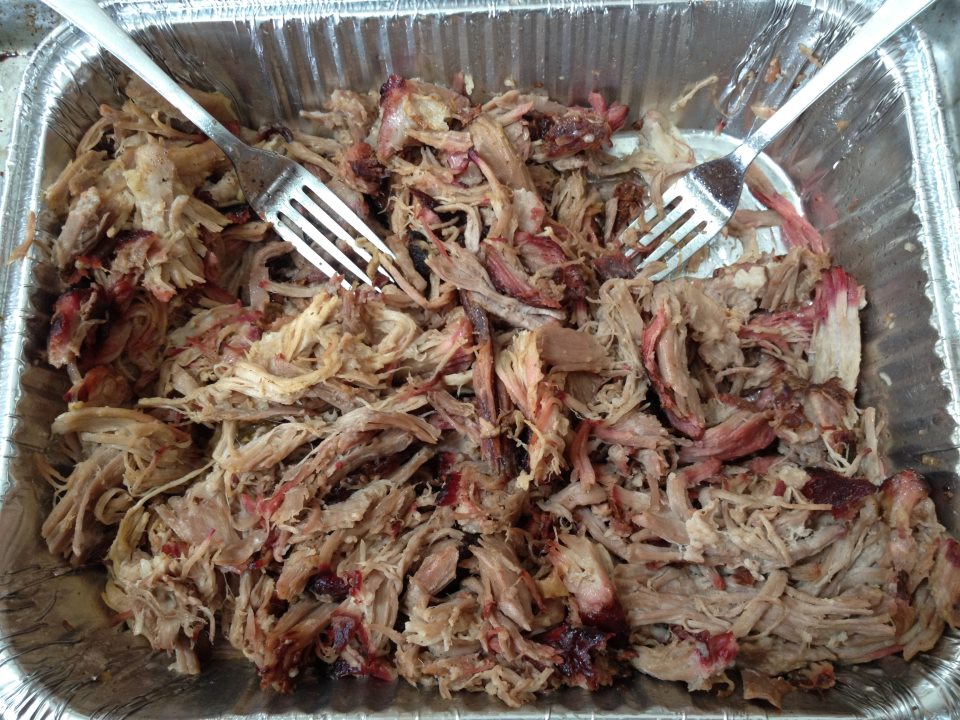
Juicy pulled pork |
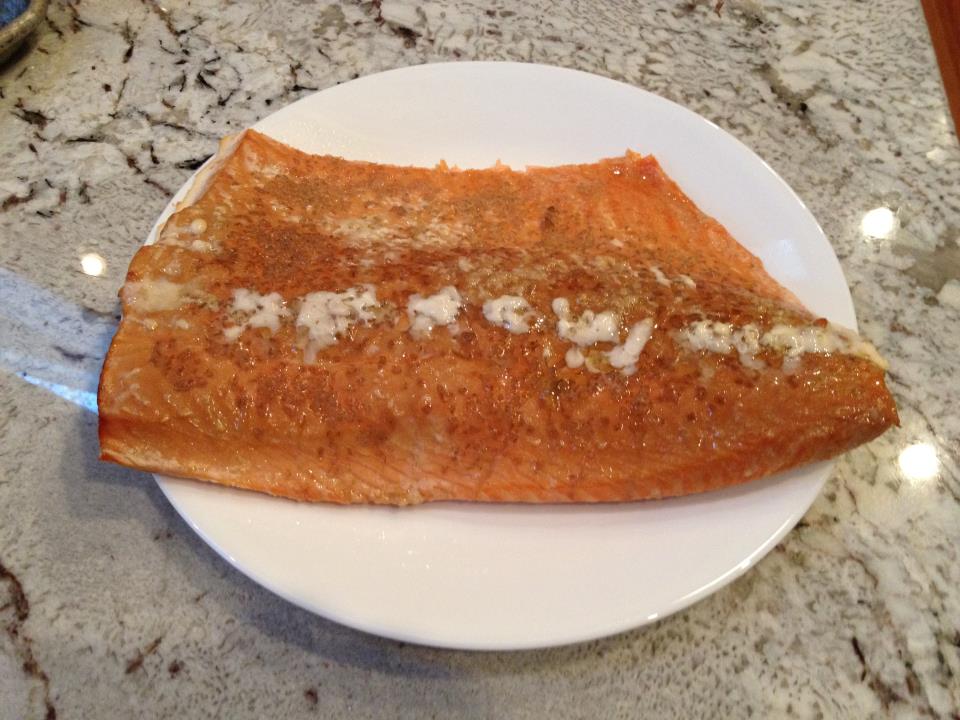
Applewood BBQ'd salmon with bamboo infused sea salt |
Beef. It's what's for dinner. |
2013 WSOP Schedule - Now with Structure Sheets 30 Mar 2013, 4:00 am
 |
Just a quick note…
I’ve updated the iCal calendar I created of the 2013 WSOP schedule with links to each event’s structure sheet. That will allow you to easily get to the structure sheet of the event you are playing by looking up the event in your calendar.
Enjoy, - Noam
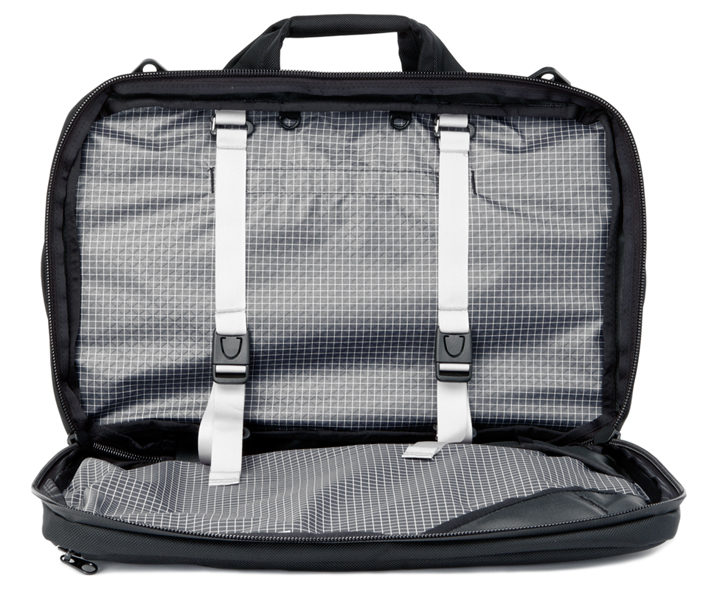
Review: Tom Bihn Synapse 6 Mar 2013, 5:00 am
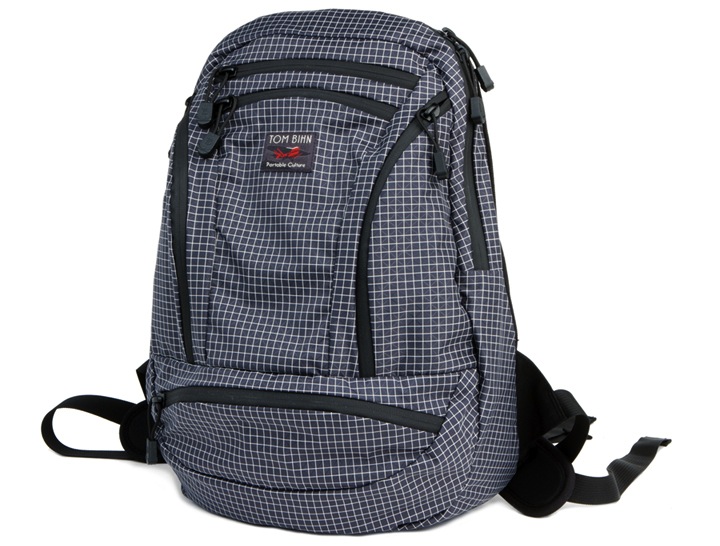 |
I purchased the Synapse with the hope of using it as both an under-the-seat bag on long flights and a day pack when I’m at my destination. When I unpacked the Synapse, I was surprised at just how small it was. However like all Tom Bihn bags, every feature has been carefully designed and the end result is that the Synapse doesn’t need to be larger to hold everything I wanted.
There are five exterior zippered pockets on the front and sides of the Synapse, and one main pocket which has an internal pouch as well. The Synapse has a good balance between the size and quantity of organizational compartments, and I wouldn’t want to change the layout of the compartments at all.
The side pockets are mirror images of each other, but they have slightly different features inside. The left side pocket features three pen/pencil holders, while the right pocket has an Ultrasuede inner pocket to hold a smart phone or pair of glasses. Both side pockets have O-rings sewn in near the top. Tom Bihn sells a variety of accessories which attach to the o-rings either directly or using their 8” or 16” key straps.
The top-most center pocket is deep enough to store a 1-liter water bottle. Since Tom designed the bag to hold a water bottle in this pocket, the space in the other pockets is not affected when you fill it up. Just below that pocket is a small pocket you could use to hold change, keys, or a small wallet. I wish Tom had decided to put an O-ring in this pocket as well, as it would be a convenient place to strap on your keys.
The pocket along the bottom of the bag is surprising large. I could easily fit my two Tumi utility pouches with all of my electronic odds and ends, along with the charger for my laptop. There is an O-ring sewn into this pocket as well.
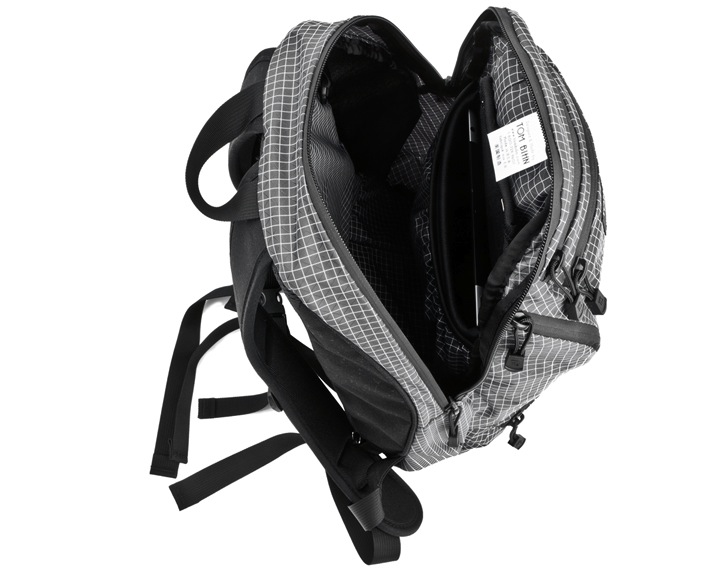 Interior of the Synapse's main pocket |
The main pocket in the Synapse is fairly spacious for such a small bag. The pocket is wider at the bottom and narrower at the top, which follows the contour of the bag. The internal pouch is a little odd as it isn’t large enough to easily fit a laptop in a protective case, but it is too loose to hold smaller items in place well.
I did a test fitting of all the items I’d want to pack into the Synapse for a long flight:
- Two Tumi pouches filled with cables and electronics odds and ends
- 13” Macbook Pro with Retina in a Waterfield Design Laptop SleeveCase
- Apple iPad
- Charger for the Macbook
- A few Tom Bihn accessory wallets and pouches
- A water bottle
As you pack a Tom Bihn bag, you begin to really understand the careful thought that went into the design. It was easy to find good places for everything I was packing. The water bottle went into the top center pocket, the Tumi pouches were attached with 8” key straps to the O-ring in the bottom pocket, and the accessory wallets and pouches where attached to the O-rings in the side pockets.
I put the charger for the Macbook at the bottom of the main compartment and the 13” Macbook Pro with Retina in a Waterfield Design Laptop SleeveCase barely fit into the pouch inside the main pocket. There was enough space left in the main pocket that I could have also put in my Eagle Creek toiletry bag and a change of clothes for an overnight trip.
One advantage to this configuration is that my Tom Bihn Tri-Star travel bag was much lighter. While I would normally travel with the Synapse packed inside the Tri-Star, I could see using the Synapse with my electronics as I packed above and only putting my clothes and toiletries in the Tri-Star. I could easily do a two or three-week trip with that setup.
After I unpacked the Synapse, I test fit it inside the Tri-Star. When it was empty, the Synapse easily fit into any of the Tri-Star’s compartments. I’d probably keep my laptop and iPad in it if I planned to pull it out for a long flight, and the Synapse fit fine with those inside the Tri-Star’s center compartment.
I bought the Steel Dyneema version of the Synapse, which meant it weighs a svelte 1.5 pounds, or 15% lighter than the alternative 1000 denier Cordura fabric. This was the first bag I’ve seen with the Dyneema exterior, and I like it a lot. It is smoother than Cordura, but it feels like it will hold up perfectly fine in normal use. The Dyneema is also less bulky, so that might be important to you if you sometimes want to carry it in another bag like me.
 The rear of the Synapse with padded backpack straps and an adjustable sternum strap. |
It might seem as if the Synapse was a perfect fit for my needs, but I ended up returning the Synapse. When I packed the Synapse with all of my items, I put the Synapse on my back. While I could see using it for personal trips, I couldn’t see myself using it to carry into a business meeting. I have no problem bringing a backpack with me, but the Synapse looked too small for my frame.
Tom Bihn has a generous return policy for exactly this situation. They encourage you to pack it with the items you plan to travel with and try it out inside your home. They give you up to 60-days to return any unused bag for a full refund, and in my experience they are lenient on this if you tell them in advance that you need more time for some reason.
Tom and team have announced that there is a larger version of the Synapse in the works, and I plan to try it out when it comes out. The only details they have given is that the new Synapse will be approximately 20” long versus 18.5” for the existing Synapse. The Synapse fit everything I possibly wanted to put into it quite well, so a slightly longer and wider version that fits better on me would be a winner. The new larger Synapse will not replace the existing Synapse in the product line, so it will be additional option for potential buyers.
Review: Eagle Creek Pack-It Quick Trip 1 Mar 2013, 5:00 am
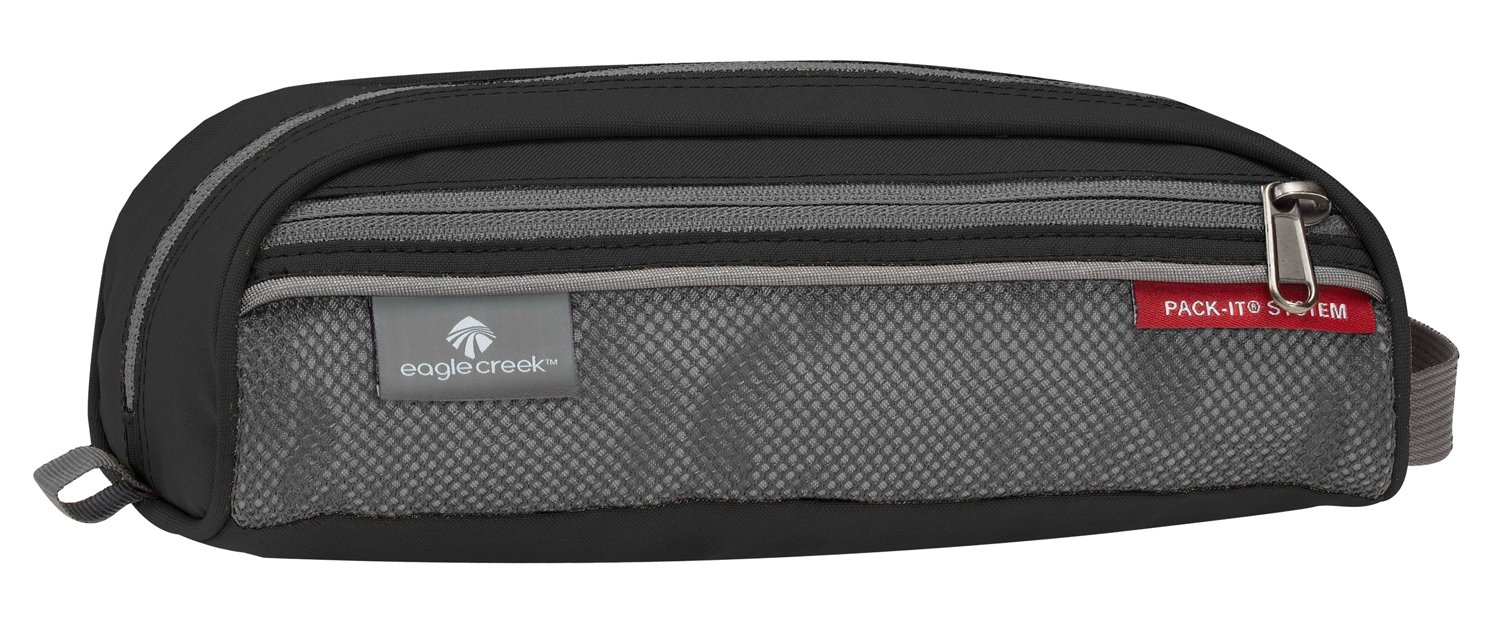
|
As I focus on becoming more efficient about the items I pack for my trip, I have started to revisit what I’m using to pack things in. My toiletry bag was a relatively large unorganized bag and I decided that I should try to find something that is a better match for my needs.
In particular, I wanted something that is:
- Sized for the items I want to carry
- Lightweight
- Designed with multiple pockets to separate items
The Eagle Creek Pack-It Quick Trip toiletry bag looked to be a good match for my needs. The Quick Trip is smaller than my old toiletry bag and it has two side pockets as well as a large center compartment.
Since I only take a single carry-on bag when I travel, and these days I’m using a Tom Bihn Tri-Star bag which means I’m carrying it on my shoulders or in my hand, the weight of my travel accessories is important to me. As I’ve begun to use it, I find that the Quick Trip is lightweight and compressible but still has enough structure to hold its shape on the countertop.
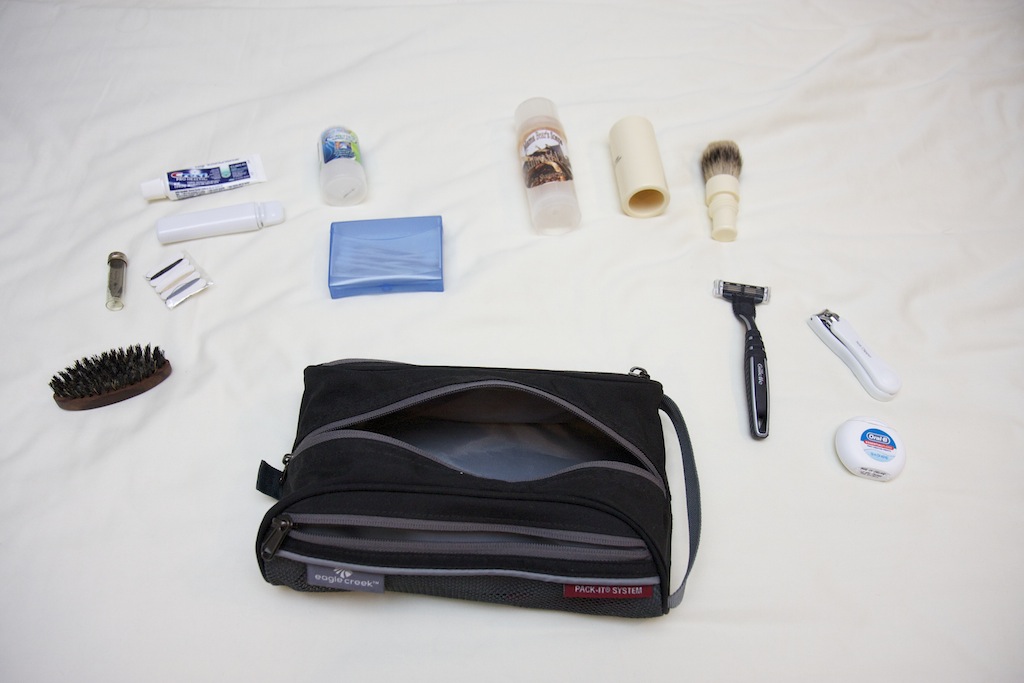 Everything ready to get loaded into the Eagle Creek Pack-It Quick Trip |
Here you can see everything I bring with me:
- Extremely small hair brush, bought in Munich near the Viktualienmarkt
- Uncle Bill’s tweezers
- Small sewing kit that I picked up from a hotel
- CountyComm travel toothbrush
- Small tube of toothpaste
- Naturally Fresh deodorant crystal stick
- Travel pack of Q-Tips
- Mama Bear Soaps’ shaving stick
- Vulfix Turnback Super Badger travel shaving brush
- Gillette Mach 3 razor
- Nail clipper
- Dental floss
Everything here is permanently kept in my travel bag. While I could use these items for both home and travel, keeping a separate set allows me a few less things to think about when packing.
I don’t carry any liquids with me when I travel aside from the toothpaste, eliminating the need for a 3-1-1 bag. Technically I’m supposed to put the toothpaste in a 3-1-1 bag, but I’ve done at least 20-30 trips both domestically and internationally with the toothpaste inside my carry-on bag and never triggered a bag check.
If I did have to give up the toothpaste, it is easy enough to replace when traveling. I can get another from the airline, if traveling internationally, or the hotel when I arrive at my destination.
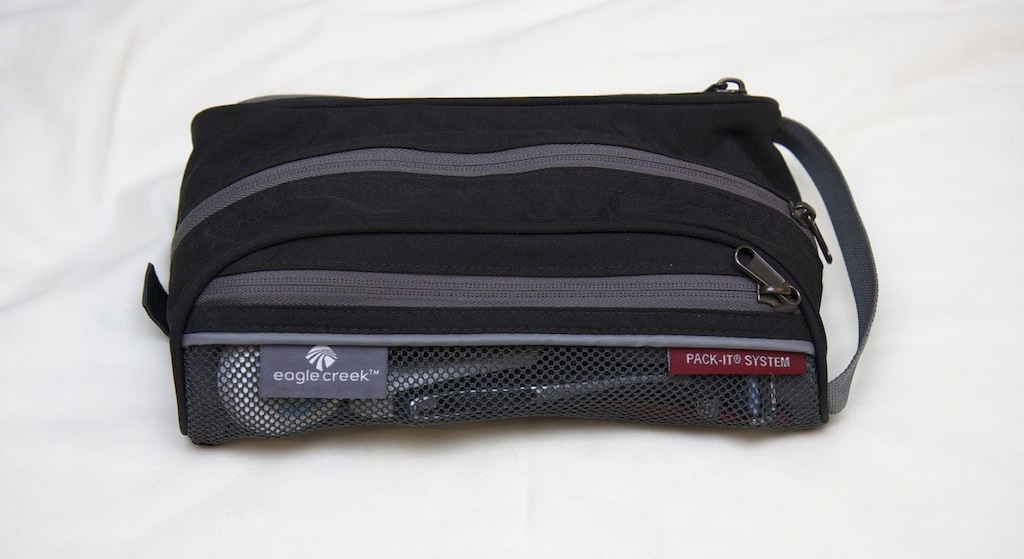 The Eagle Creek Pack-It Quick Trip packed and ready to go on a trip |
All of my toiletries pack well into the Quick Trip with room to spare. I keep the smaller items in one of the outside pockets, the razor (and on longer trips a second backup razor) in the other outside pocket, and the remaining items all in the center compartment. The elongated shape works well in my Tom Bihn Tri-Star travel bag. While I would prefer if the Quick Trip was a little smaller, it compresses down to not take extra room.
Overall I’m quite happy with the Eagle Creek Pack-It Quick Trip and would recommend it to others with similar needs. Eagle Creek also makes a Specter version of the Quick Trip, which uses an ultalightweight fabric and weighs 1 ounce compared to 3 ounces for the regular version. I haven’t seen the Specter version in person, so I can’t comment on if the there is any downside to the lighter version besides a slightly higher cost.
Review: Tom Bihn Tri-Star 25 Feb 2013, 5:00 am
 |
This is the first review in my “What I carry” series. It is appropriate that the Tom Bihn Tri-Star is the first travel accessory I review, because the Tri-Star is my go-to bag for traveling. It is an extremely versatile carry-on bag, with a tremendous amount of room and great organization. The Tri-Star allows me to focus on everything other than my baggage when I travel.
The Tri-Star is available in either a 1050 denier ballistic nylon fabric exterior or a 400 denier Dyneema nylon ripstock fabric. I bought my Tri-Star before the Dyneema exterior was an option, but I’m not at all unhappy with the ballistic nylon exterior. The interior of both bags features a 200 denier Dyneema nylon ripstock fabric. You can choose to have a complementary color on the interior, for example I have steel on the interior and black on the exterior, or you can choose one Tom Bihn’s bright colors to easily see the contents of bag against the interior fabric.
The Tri in Tri-Star is carried through the design in two ways. There are three main compartments in the Tri-Star bag, which are each roughly the same size, and three horizontal zippered pockets on the front of the bag, which all go to the bottom of the bag allowing you to carry a surprising amount in them.
The main compartment closest to the front of the bag zips completely open and has an internal divider roughly 1/3 of the way through the bag that can be zipped or unzipped as needed. I keep this divider zipped, which allows me to conveniently store a few different items without having them shift around. If I’m bringing a second pair of shoes, they will go in the smaller section. If I’m not, I’ll usually put my toiletry bag and a bag which holds some electronics odds and ends in that section. The larger section will then get a packing cube which holds a mix of socks, underwear, and shirts depending on the trip duration.
 The front compartment with the two sizes of packing cubes and an accessory bag attached to one of the two O-rings. The fabric divider is unzipped in this picture. |
Tom Bihn makes packing cubes sized for both the divided sizes and a full-size packing cube which fits in any of the main compartments. I originally used another packing cube in the larger divided section, but the Tom Bihn cube allows me to fit much more clothing into that area than I could before.
One of the great features of Tom Bihn bags is that they sew O-rings into their bags in strategic locations. Tom Bihn sells a variety of accessories which attach to the o-rings either directly or using their 8” or 16” key straps. There are two o-rings in each main compartment and one o-ring in each horizontal pocket on the front. I use the o-rings to attach several accessories throughout the Tri-Star. I would like an o-ring in the horizontal front pocket as well, but I make do without it.
I have two Tumi pouches which I use to hold my cables and electronics odds and ends. I keep the accessories I regularly use in one pouch and I use the other pouch to hold travel power adapters, so I only bring that along when I travel internationally.
The Tumi pouches have metal o-rings that allow me to attach them to the Tri-Star using the 8” or 16” key straps. The pouches are attached to the o-rings in the front compartment and can either sit on top or alongside the other items I place in the compartment, depending on how full it is. Having them attached allows me to easily access them in the overhead bin without worrying about them dropping on top of someone.
I also have two Tom Bihn Organizer Wallets. I use one to hold a home-made First aid kit and I use the other to hold some lounge access and credit cards I only use when I’m traveling. One of these lives in one of the front zippered pockets and the other lives inside the front main compartment with the two Tumi pouches. I also have a Tom Bihn Mini Clear Organizer Pouch which I use to hold business cards and a Tom Bihn Dyneema Mini Organizer Pouch that I use to hold my Ultimate Ears TripleFi 10vi earphones.
 The back compartment features two compression straps to hold down clothing. |
The compartment on the other side of the bag also zips entirely open. This compartment features two compression straps to keep clothing or other items in place. I usually use an 18-inch Eagle Creek Pack-It folder to hold my shirts, and then use the compression straps to hold the folder, a pair of athletic shorts, and an extra pair of pants. On a one-week trip, there is still enough room in this section that I can put a fleece jacket if I decide I want to bring one with me.
The center compartment only zips open a few inches down either side of the bag. There are two Annex clips in this compartment, which work with Tom Bihn’s line of laptop cases to keep a laptop secured. This is a nice design feature, but I removed the Annex clips from the bag since I don’t use a Tom Bihn’s laptop case. The clips are easy to reattach if I decide to use them in the future.
I use the center compartment to hold my 13” Macbook Pro with Retina in a Waterfield Design Laptop SleeveCase, along with my iPad, a couple of magazines, my laptop power block, and my toiletry bag (if it isn’t in the front compartment). A larger 15” or 17” laptop would easily fit in this compartment as well.
 The four zippered pockets on the front of the bag. |
The front of the Tri-Star has four pockets. Three horizontal zippered pockets on the left hand side and one vertical zippered pocket on the right hand side. As noted above, each of these pockets has an o-ring sewn in to attach accessories.
I use the smallest horizontal pocket to hold a small roll of gaffers tape, some zip ties, and a Maratac AAA flashlight attached to the O-ring with an 8” Tom Bihn Key Strap. I use the middle horizontal pocket to hold the organizer pouch with my business cards, and the largest pocket is usually kept empty to hold receipts, boarding passes, and other papers I collect during my travels.
The vertical pocket has fabric segments which snap together, allowing you to carry a water bottle in the pocket when it is open. You can also unsnap the fabric segments and use the pocket to hold other odds and ends. I keep the organizer pouch with my earphones in this pocket to allow me to quickly access them when I get on the plane.
 Fold-away backpack straps on the rear of the bag add a great carrying option to the Tri-Star. |
When the Tri-Star is fully packed, there are three ways to carry it. There are a pair of handles on the top of the bag, which are comfortable to use as long as the packed weight is no more than 10-15 pounds. There are also a pair of attachment points on the top of the bag to allow you to add a Tom Bihn Absolute Shoulder Strap to the Tri-Star. The Absolute Shoulder Strap can be used to carry the Tri-Star on either one shoulder or across your body. I find it comfortable for up to 15-20 pounds of packed weight.
The last option is a pair of backpack straps that zip into a pocket on the very back of the bag. These straps are permanently attached at the top of their zippered pocket and clip into hidden attachment points on the sides of the back. The backpack straps feature a horizontal sternum strap and a removable waist strap. The backpack straps are padded and are very comfortable. This is how you will want to carry your bag for long distances or if you pack a particularly heavy load in your bag.
I usually pack the bag around 15-20 pounds and I alternate between carrying it with the handles and using the backpack straps. I don’t usually use the Absolute Shoulder Strap with the Tri-Star because I find it much more comfortable with the backpack straps, as it balances the bag on my shoulders and allows me to have both hands free.
Since I’ve switched to the Tri-Star last year, I haven’t missed my wheeled suitcase. There is no situation where I prefer a wheeled bag to using the Tri-Star, and I’ve had many situations where it is easier to use the Tri-Star than a wheeled bag. My worst wheeled bag experiences have been going down escalators with a spinner suitcase that barely fits on the treads, and trying to wheel the same suitcase on thick carpets in the Las Vegas hotels. There are no comparable situations with the Tri-Star and it is always a delight to carry.
The "What I carry" series 24 Feb 2013, 12:00 pm
I’ve flown between 100,000 and 120,000 miles a year for the past four years between my personal and business travel. Needless to say, I’ve spent a lot of time focusing on what I bring with me (e.g. my packing list) and what I bring it in (e.g. bags, packing aids, etc).
The last time I checked a bag during my business trips was over two years ago, and that includes many one-week trips and a couple of two-week trips. It wasn’t too difficult for me to reduce down to one bag, but it will take some effort if you like to have a completely different outfit for every day. For example, I will only take a couple of pairs of pants for a week-long trip, but I know some people wouldn’t want to do that.
There are many benefits to not checking a bag. The obvious benefit is that I greatly reduce the risk of losing my baggage if the baggage is with me in the cabin when I travel. Less obvious is the time saved by not waiting for baggage to come out at the baggage carousel, which is time I’d rather use to get home and see my family or to settle into the hotel room.
Of course, many people are now beginning to limit the amount they bring with them due to new airline fees for checked and carry-on baggage. I fly enough that my status with the airlines usually lets me check at one or two bags for free, but I love the convenience of traveling with only a carry-on bag.
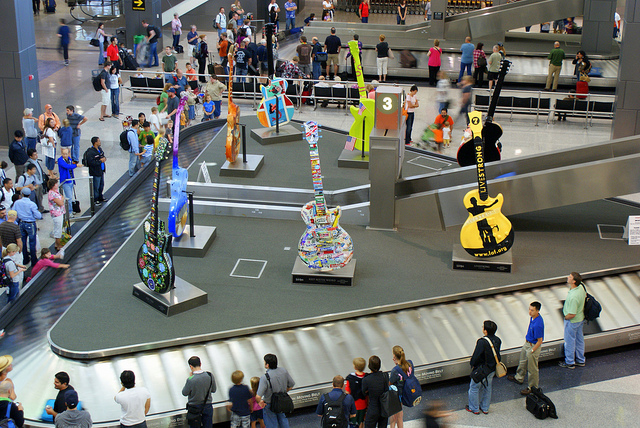 Waiting for your bag while I'm on my way... Photo by flickr user: xfile001 |
There are many great resources on one-bagging travel and how to think about what you need versus what you want. Two great resources are OneBag.com, which focuses on the process of getting down to one bag, and One Bag, One World, which focuses on gear reviews and the one bagging lifestyle.
Given these great resources I’m not going to go over the one-bagging method or lifestyle, but instead focus on the products I’ve tried out. Most of these products are ones I use today, but a few will be products I tried out and decided didn’t work for me. I will update this post as I add reviews for the items in this list.
I will focus on bags and other packing-related items:
As well as some non-packing items that I always bring with me:
- First Aid kit
- Maratac AAA Flashlight
- CountyComm tools