Add your feed to SetSticker.com! Promote your sites and attract more customers. It costs only 100 EUROS per YEAR.
Pleasant surprises on every page! Discover new articles, displayed randomly throughout the site. Interesting content, always a click away
Geoff Samuel
Animation & Mocap Tools and SolutionsPyC3D 4 Jan 2024, 11:32 pm
PyC3D is a cross platform python library which is capable of reading .C3D files for Motion Capture with data classes for inspecting the data.
The library is able to read all the sample files on www.c3d.org but I’m always interesting in expanding the compatibility so if you encounter a file which the library is unable to read, please sent it to info@GeoffSamuel.com so I can extend the library.
Its completely open source, and can be found at:
Service-Based Remote Pi Recording 10 Aug 2020, 3:30 pm
In the last 3 posts, I’ve gone over building a remote Pi video capture tool, allowing users to view and control the PiCamera on a Raspberry Pi. If you haven’t checked them out yet, you can find them:
Now that we have this great platform, we’re going to extend it by building the start of a service type architect into it where we can search the local network to discover these Remote Raspberry Pi’s and then allow for an easy connection to them.
The reason I’m calling it a service-based architect is that this is the base that can be extended out to contain multiple services, one of which being Pi Camera service.
How this will work is by having the client broadcast out a signal via UDP seeking what devices are out there. This signal is read by the Raspberry Pi’s and a response is generated with the IP, Address and sent back to the requesting IP Address.
We’re going to use the existing code infrastructure to do most of the heavy lifting, the first stage is to add the new broadcast port and some new broadcast commands to the NetworkCommands in consts.py.
class NetworkCommands(object):
	"""
	Enums for Network commands
	"""
	BROADCAST_PORT = 9897
	DATA_PORT = 9898
	...
	# Broadcast Commands
	SERVICES_BROADCAST = 98
	SERVICES_BROADCAST_RESPONSE = 99
At the core of this architecture is a Qt drive UDP socket, which we can wrap in a new Services Connector class which ultimately can be used for both the server and client sides.
There are a couple of interesting points about using Qt driven UDP broadcasts which need to be accounted for in the design.
The first is that a UDP broadcast will get picked up by itself if the socket is listening to all broadcasts. We can work around this by getting, and caching, all the known IP addresses for the local computer when we start up the socket and filter against any incoming data packet from one of these addresses.
class ServicesConnector(QtCore.QObject):
    """
    Services Connector, able to search for other services and send data to allow for them to be connceted

    Signals:
        serviceFound (str, str): Emits when a service is found, sending its IP address and hostname
        serviceRemoved (str, str): Emits when a service is no longer connectable, sending its IP address and hostname
        searchingForServicesStarted (): Emits when the searching for services has started
        searchingForServicesFinished (): Emits when the searching for services has finished
    """
    serviceFound = QtCore.Signal(object, object)
    serviceRemoved = QtCore.Signal(object, object)
    searchingForServicesStarted = QtCore.Signal()
    searchingForServicesFinished = QtCore.Signal()

    def __init__(self):
        """
        Constructor
        """
        self._hostName = socket.gethostname()

        self._searchForServicesMutex = QtCore.QMutex()
        self._searchForServicesFoundList = []

        self._connectableClients = []
        self._readData = {}

        # Get the local IP's of the machine so we can ignore these broadcasts from itself
        self._localIps = []
        for address in QtNetwork.QNetworkInterface.allAddresses():
            if address.protocol() == QtNetwork.QAbstractSocket.IPv4Protocol:
                self._localIps.append(address)

        if len(self._localIps) == 0:
            raise ValueError("Unable to detect any local IP Address")

        super(ServicesConnector, self).__init__()
        self._serviceSocket = QtNetwork.QUdpSocket()
        self._serviceSocket.bind(consts.NetworkCommands.BROADCAST_PORT, QtNetwork.QUdpSocket.ShareAddress);
        self._serviceSocket.readyRead.connect(self._handleServiceFinderRead)
    def _handleServiceFinderRead(self):
        """
        Handle reading data off the UDP socket when data is available.
        """
        while (self._serviceSocket.hasPendingDatagrams() is True):
            datagram, address, _ = self._serviceSocket.readDatagram(999)

            # Disreguard if its from its self
            if address in self._localIps:
                continue

            # Append to the currently read data
            currentData = self._readData.get(address, QtCore.QByteArray())
            currentData.append(datagram)
            while True:
                # Decode and parse
                result = consts.NetworkParser.decodeMessage(currentData)
                if result is None:
                    break
                self._parseData(result, address)
            self._readData[address] = currentData

    def _parseData(self, message, address):
        """
        Parse the messages sent from the services

        args:
            data (consts.NetworkCommands, list of objects): Tuple of consts.NetworkCommands and list
                                                            of args
        """
        commandIdx, args = message
        if commandIdx == consts.NetworkCommands.SERVICES_BROADCAST_RESPONSE:
            self._searchForServicesFoundList.append((address.toString(), args[0],))
        elif commandIdx == consts.NetworkCommands.SERVICES_BROADCAST:
            self._sendBroadcastResponse(address)

    def _sendBroadcastResponse(self, address):
        """
        Sends the correct broadcast response
        """
        data = consts.NetworkParser.encodeMessage(consts.NetworkCommands.SERVICES_BROADCAST_RESPONSE, [self._hostName])
        self._serviceSocket.writeDatagram(data, address, consts.NetworkCommands.BROADCAST_PORT)
The second is the async nature of sending and receiving data using Qt sockets means that we need to be aware that there needs to be a window for services to reply before working out when to send signals out to either add or remove services. Using a QMutex to lock the operation and utilize the QEventLoop to block the main loop whilst still processing QEvents (See my article Holding for the Applause (Signal) for more information on that), we can create this window for services to reply back. Bookending the search functionality with a start and stop signal can let any GUI know that the search operation has started and disabled the triggering UI and when the operation has finished re-enabling the UI.
    def searchForServices(self):
        """
        Start searching for services.
        This method will emit the searchingForServicesStarted at the stand and searchingForServicesFinished
        at the end.
        Found services are emitted using the serviceFound signal, and services no longer found are
        emitted with the serviceRemoved signal.
        """
        self.searchingForServicesStarted.emit()

        # Lock the mutex so this isnt being run more than once at a time
        locker = QtCore.QMutexLocker(self._searchForServicesMutex)
        locker.relock()
        self._searchForServicesFoundList = []

        # Send out the broadcast to see whos out there
        data = consts.NetworkParser.encodeMessage(98, [])
        self._serviceSocket.writeDatagram(data, QtNetwork.QHostAddress.Broadcast, consts.NetworkCommands.BROADCAST_PORT)

        # Start a 5 second timer and block, giving the services time to respond back
        eventLoop = QtCore.QEventLoop()
        timer = QtCore.QTimer()
        timer.start(1000 * 5)  # 5 Seconds
        timer.timeout.connect(eventLoop.quit)
        eventLoop.exec_()

        # Check what we got and send out removed or added signals
        for item in self._searchForServicesFoundList:
            ipAddress, niceHostName = item
            if item not in self._connectableClients:
                self._connectableClients.append(item)
                self.serviceFound.emit(ipAddress, niceHostName)
                print "Found {}, {}".format(ipAddress, niceHostName)

        for item in self._connectableClients:
            ipAddress, niceHostName = item
            if item not in self._searchForServicesFoundList:
                self._connectableClients.remove(item)
                self.serviceRemoved.emit(ipAddress, niceHostName)
                print "Lost {}, {}".format(ipAddress, niceHostName)

        # Unlock the search for services mutex
        locker.unlock()
        self.searchingForServicesFinished.emit()
Adding in the service functionality to the remoteCaptureServer, is nothing more complex than adding the services import and adding an instance of the ServicesConnector class to the PiCameraWrapperServer constructor
    def __init__(self, captureInfo=consts.CaptureInfo.VIDEO_1080p_30):
    	"""
    	Constructor
    	"""
    	super(PiCameraWrapperServer, self).__init__()
    	self._servicesConnector = services.ServicesConnector()
The PiCameraWidget needs some small tweaking to make it service based, firstly removing the UI ability to specify the hostname and adding the IP address and hostname into the constructor so they can be passed in by the new service widget.
	def __init__(self, ipAddress, hostname, parent=None):
    	"""
    	Constructor

    	args:
        	ipAddress (str): The IP Address to connect to
        	hostname (str): A nice name to use to for the connection, e.g. a hostname
    	"""
    	super(PiCameraWidget, self).__init__(parent=parent)
    	self._hostname = hostname
    	self._camera = PiCameraWrapperClient(ipAddress)

    	self.setupUi()

	def setupUi(self):
	...
    	# Layouts to Widgets
    	configLayout.addWidget(QtGui.QLabel("Camera to connected to:"), 0, 0)
    	configLayout.addWidget(QtGui.QLabel(self._hostname), 0, 1)

Lastly, we want to make a new UI that will populate a list of services to connect to, the UI would be a simple ListWidget with a refresh button, and be event-driven from a ServicesConnector instance.
class RemoteClientLauncherWidget(QtGui.QWidget):
    """
    Simple Client Interface to find and display all the found services.
    """
    def __init__(self):
        """
        Constructor
        """
        super(RemoteClientLauncherWidget, self).__init__()
        self._cameraWins = {}
        self.setupUi()
        self._servicesConnector = services.ServicesConnector()
        self._servicesConnector.serviceFound.connect(self._handleServicesClientAdded)
        self._servicesConnector.serviceRemoved.connect(self._handleServicesClientRemoved)
        self._servicesConnector.searchingForServicesStarted.connect(self._handleServicesSearchStarted)
        self._servicesConnector.searchingForServicesFinished.connect(self._handleServicesSearchFinished)
        self._servicesConnector.searchForServices()

        self.setWindowTitle("Remote Pi Camera Launcher")

    def setupUi(self):
        """
        Set up the UI
        """
        # Layouts
        layout = QtGui.QVBoxLayout()

        # Widgets
        self._foundServicesWidget = QtGui.QListWidget()
        self._refreshServices = QtGui.QPushButton("Search for services")

        # Layouts to Widgets
        layout.addWidget(self._foundServicesWidget)
        layout.addWidget(self._refreshServices)

        self.setLayout(layout)

        # Signals
        self._refreshServices.pressed.connect(self._handleRefreshServicesButton)
        self._foundServicesWidget.itemDoubleClicked.connect(self._handleServiesWidgetDoubleClick)

    def _handleRefreshServicesButton(self):
        """ Handle the refresh services button"""
        self._servicesConnector.searchForServices()

    def _handleServicesClientAdded(self, ipAddress, niceHostName):
        """ Handle services client finding a new service"""
        newItem = QtGui.QListWidgetItem()
        newItem.setText("{} ({})".format(niceHostName, ipAddress))
        newItem.setData(QtCore.Qt.UserRole, (ipAddress, niceHostName))
        self._foundServicesWidget.addItem(newItem)

    def _handleServicesClientRemoved(self, ipAddress, niceHostName):
        """ Handle services client removing a service"""
        for idx in xrange(self._foundServicesWidget.count()):
            item = self._foundServicesWidget.item(idx)
            if item.data(QtCore.Qt.UserRole) == [ipAddress, niceHostName]:
                self._foundServicesWidget.takeItem(idx)
                del item
                return

    def _handleServicesSearchStarted(self):
        """ Handle services starting to search for services"""
        for wid in [self._refreshServices, self._foundServicesWidget]:
            wid.setEnabled(False)

    def _handleServicesSearchFinished(self):
        """ Handle services finishing the search for services"""
        for wid in [self._refreshServices, self._foundServicesWidget]:
            wid.setEnabled(True)
Hooking into the double click event on the listWidget, we can pass in the IP address and hostname to a new instance of the PiCameraWidget and show it.
    def _handleServiesWidgetDoubleClick(self, item):
    	"""Handle a double click on a service item, will launch and connect to the service"""
    	ipAddress, niceHostName = item.data(QtCore.Qt.UserRole)
    	newWin = PiCameraWidget(ipAddress, niceHostName)
    	self._cameraWins[ipAddress] = newWin
    	newWin.show()
With that complete, we now have the base of a service-based PiCamera tool which will search for camera’s to connect to with an interface to connect to them. By adding code to start the Server on startup of the Pi via the .bashrc file, we can simply plug the Pi in and then search and connect to it via the controlling computer, rather than having to find its IP address to connect to it.
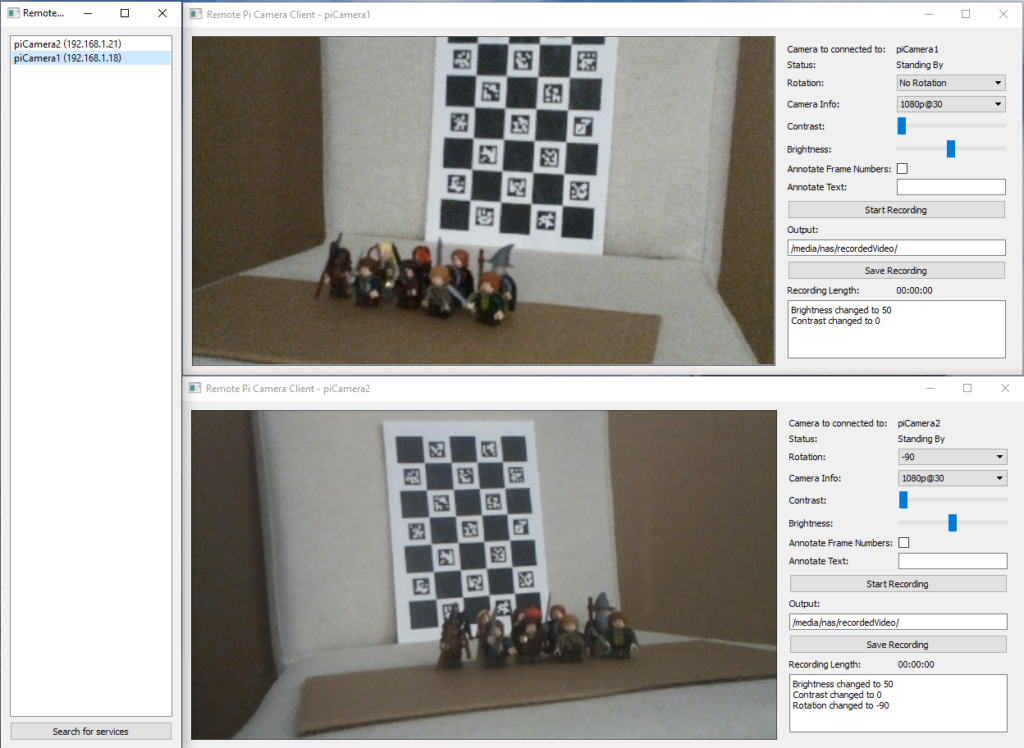
I hope this shows the potential of service-based architecture and how easy it would be to add new cameras to any application utilizing it.
– Geoff
Remotely capturing on the Pi – Part Three 27 Jul 2020, 3:30 pm
In the last part of this 3 part series, we’re going to complete the project by separating the camera logic and the UI with a network interface in between. This approach allows for very seamless interaction between the camera as a server and the UI as a client, whilst keeping everything as signal driven.
For parts 1 and 2, we had a single Python file which contained all the code, but with the move to a network-based approach. It makes sense to split it up into two separate scripts, having one for the server (the camera) and another one for the client (the GUI). There is some overlap between the two so introducing a new consts python file would provide a common base between them for enums and reading & writing the messages packets.
The consts.py file is the ideal place to move some of the enums that we’ve already defined and will start as a great base for the file.
class PiCameraStatus(object):
	"""
	The Status that the PiCamera can be in
	"""
	RECORDING = "Recording"
	STANDING_BY = "Standing By"
	NOT_CONNECTED = "Not Connected"


class CaptureInfo(object):
	"""
	Combos for CaptureInfo such as frame rate and resolutions
	"""
	VIDEO_1080p_30 = (1920, 1080, 30)
	VIDEO_720p_60 = (1280, 720, 60)
	VIDEO_640p_90 = (640, 480, 90)
Let’s extend that with a NetworkCommands enum so that when we’re passing messages back and forth from the client to the server, we know what they are for.
class NetworkCommands(object):
	"""
	Enums for Network commands
	"""
	PORT = 9898

	# Commands
	START_RECORDING = 0
	STOP_RECORDING = 1
	SAVE_RECORDING = 2
	SET_BRIGHTNESS = 3
	SET_CONSTRAST = 4
	SET_ANNOTATE_TEXT = 5
	SET_CAMERA_INFO = 6
	SET_ROTATION = 7
	CLOSE_CAMERA = 8

	# Signals
	SIGNAL_NEW_PREVIEW_FRAME = 20
	SIGNAL_CAMERA_ERROR = 21
	SIGNAL_CAMERA_STATUS_CHANGED = 22
	SIGNAL_CAMERA_BRIGHTNESS_CHANGED = 23
	SIGNAL_CAMERA_CONSTRAST_CHANGED = 24
	SIGNAL_RECORDING_STARTED = 25
	SIGNAL_RECORDING_STOPPED = 26
	SIGNAL_RECORDING_SAVED_START_PROCESSING = 27
	SIGNAL_RECORDING_SAVE_FINISHED_PROCESSING = 28
	SIGNAL_RECORDING_SAVE_ERROR_PROCESSING = 29
The list of network commands is split between methods that might get called to set parameters on the camera (such as the brightness, rotation, and starting recording) and those which are events and would emit signals as a result (new preview frame, camera contrast changed)
Within the consts.py file, we’re also going to make a parser class, which can take a message, which consists of one of the NetworkCommands and a list of args to pass over the wire.
I’ve opted to allow two different types of data types in the NetworkParser, one is standard python types, which would be pickled when serialized, and the other is a QByteArray. The reason I made this choice was due to wanting to be able to send text and numbers across simply, but also allows for an efficient transfer for the preview frame. As the preview frame is read into memory on the camera side as a QImage, the data can be written out to a QByteArray on the C++ side of PySide which is very efficient, rather than converting it to a string, which would then be pickled.
The messages that are sent will also include how big the message is, which will let us know if we have the whole message and can start to parse it, or if there is still more data to receive to decode the message.
Messages are written like this:
Unsigned 32 bit int – Packet Size
Unsigned 8 bit int – NetworkCommand
Unsigned 8 bit int – Number of args in the packet
Unsigned 8 bit int – the type of arg #
If the arg is a byte array:
Unsigned 32 bit int – Size of the array
Data
If the arg is a pickle string:
Data
class NetworkParser(object):
	"""
	Class to deal with the encoding and decoding messages between the client and server
	"""
	_BYTE_ARRAY = 0
	_PICKLE = 1

	@classmethod
	def encodeMessage(cls, commandIndex, listOfArgs):
    	"""
    	Encode a message given the command index and the arguments into a QByteArray

    	args:
        	commandIndex (NetworkCommands): The command index of the message, what its for
        	listOfArgs (list of objects): List of arguments that will be serialised and passed over

    	returns:
        	QByteArray of the constructed messages
    	"""
    	byteArray = QtCore.QByteArray()
    	writer = QtCore.QDataStream(byteArray, QtCore.QIODevice.WriteOnly)
    	writer.writeUInt8(commandIndex)
    	writer.writeUInt8(len(listOfArgs))
    	for item in listOfArgs:
        	if isinstance(item, QtCore.QByteArray):
            	writer.writeUInt8(cls._BYTE_ARRAY)
            	arraySize = item.size()
            	writer.writeUInt32(arraySize)
            	writer.device().write(item)

        	else:
            	writer.writeUInt8(cls._PICKLE)
            	writer.writeQString(pickle.dumps(item))

    	# Size of the whole thing
    	finalArray = QtCore.QByteArray()
    	writer = QtCore.QDataStream(finalArray, QtCore.QIODevice.WriteOnly)
    	writer.writeUInt32(byteArray.length())
    	finalArray.append(byteArray)
    	return finalArray

	@classmethod
	def decodeMessage(cls, currentData):
    	"""
    	Decodee a byte array message into its command index and argument

    	args:
        	currentData (QByteArray): The data to try and read

    	returns:
        	None if the message is incomplete, or a tuple of int (command index) and list of objects
        	as the args
    	"""
    	reader = QtCore.QDataStream(currentData, QtCore.QIODevice.ReadOnly)
    	dataSize = reader.readUInt32()

    	# Check to see if we have enough data
    	if currentData.length() < dataSize + 4:
        	return None

    	# Read the command Index and number of args
    	commandIndex = reader.readUInt8()
    	numberOfArgs = reader.readUInt8()
    	args = []
    	for _ in xrange(numberOfArgs):
        	argType = reader.readUInt8()
        	if argType == cls._BYTE_ARRAY:
            	arraySize = reader.readUInt32()
            	newArray = reader.device().read(arraySize)
            	args.append(newArray)

        	elif argType == cls._PICKLE:
            	pickleStr = reader.readQString()
            	args.append(pickle.loads(pickleStr))

        	else:
            	print "Unable to understand variable type enum '{}'".format(argType)

    	# Remove what we've read from the current data
    	currentData.remove(0, dataSize + 4)
    	return (commandIndex, args,)
With the consts complete, we’re going to make a move the Camera wrapper and Preview Thread code out of the part 2 python file and into the remoteCaptureServer.py. The LivePreviewThread will stay mostly the same, but with one small change. When we get the image string data, we need to reduce the size of it so it’s more efficient on the network. We can do this by using the .scaled method on the QImage
newImage = QtGui.QImage.fromData(self._camera.getPreveiw()).scaled(400, 400, QtCore.Qt.KeepAspectRatio)
The Camera Wrapper does not need all the Qt signals on it anymore, as they will be emitted through the network interface. The code to set up a TCP server with PySide is very minimalist, only needing to listen for connections and handle when new connections are made. Adding this to the constructor would look like this.
class PiCameraWrapperServer(QtCore.QObject):
	"""
	A Network based Qt aware wrapper around the Pi's camera API
	Server side, deals with the PiCamera
	"""

	_TEMP_FILE = os.path.join(tempfile.gettempdir(), "piCamera", "temp.h264")

	def __init__(self, captureInfo=consts.CaptureInfo.VIDEO_1080p_30):
    	"""
    	Constructor
    	"""
    	super(PiCameraWrapperServer, self).__init__()
    	self._tcpServer = QtNetwork.QTcpServer()
    	self._tcpServer.listen(QtNetwork.QHostAddress.AnyIPv6, consts.NetworkCommands.PORT)
    	self._connectedClients = []
    	self._readData = {}

    	# Setup the camera
    	self._camera = picamera.PiCamera()

    	self._setStatus(consts.PiCameraStatus.STANDING_BY)
    	self.setCameraInfo(captureInfo)

    	# Remove any old temp data
    	self._startTime = "00:00:00:00"
    	if os.path.exists(self._TEMP_FILE):
        	os.remove(self._TEMP_FILE)

    	# Setup the preview thread
    	self._livePreivew = LivePreviewThread(self)
    	self._livePreivew.newPreviewFrame.connect(self._handleNewPreviewFrame)
    	self._livePreivew.start()

    	self._tcpServer.newConnection.connect(self._handleNewConnection)

    	print "Server set up, waiting for connections..."
When a new connection is made to the server, it will trigger the newConnection event. We’ll need to set up the signal handlers for it when it disconnects as well as when there is data to be read. It’s also a great place to send out the current properties and status on connect.
	def _handleNewConnection(self):
    	"""
    	Handle a new client connecting to the server
    	"""
    	connection = self._tcpServer.nextPendingConnection()
    	self._readData[connection] = QtCore.QByteArray()
    	connection.readyRead.connect(functools.partial(self._handleConnectionReadReady, connection))
    	connection.disconnected.connect(functools.partial(self._handleConnectionDisconnect, connection))
    	self._connectedClients.append(connection)

    	# Send Status, Brightness and Contrast
    	self._sendCommand(consts.NetworkCommands.SIGNAL_CAMERA_STATUS_CHANGED, [self.status()])
    	self._sendCommand(consts.NetworkCommands.SIGNAL_CAMERA_BRIGHTNESS_CHANGED, [self.brightness()])
    	self._sendCommand(consts.NetworkCommands.SIGNAL_CAMERA_CONSTRAST_CHANGED, [self.contrast()])
When new data is ready to be read on each connection, it gets read into a connection-specific array and it tries to get decoded using the NetworkParser. If we’re able to decode it, then we use the _parseData method to act on the given data.
	def _handleConnectionReadReady(self, connection):
    	"""
    	Handle the reading of data from the given connection, where there is data to be read
    	"""
    	self._readData[connection].append(connection.readAll())
    	while True:
        	result = consts.NetworkParser.decodeMessage(self._readData[connection])
        	if result is None:
            	break
        	self._parseData(result)

	def _parseData(self, data):
    	"""
    	Parse the messages that came from the client

    	args:
        	data (consts.NetworkCommands, list of objects): Tuple of consts.NetworkCommands and list
                                                        	of args
    	"""
    	commandIdx, args = data
    	if commandIdx == consts.NetworkCommands.START_RECORDING:
        	self.startRecording()
    	elif commandIdx == consts.NetworkCommands.STOP_RECORDING:
        	self.stopRecording()
    	elif commandIdx == consts.NetworkCommands.SAVE_RECORDING:
        	self.saveRecording(args[0])
    	elif commandIdx == consts.NetworkCommands.SET_BRIGHTNESS:
        	self.setBrightness(args[0])
    	elif commandIdx == consts.NetworkCommands.SET_CONSTRAST:
        	self.setContrast(args[0])
    	elif commandIdx == consts.NetworkCommands.SET_ANNOTATE_TEXT:
        	text, colour, size, frameNumbers = args
        	self.setAnnotateText(text, colour, size, frameNumbers)
    	elif commandIdx == consts.NetworkCommands.SET_CAMERA_INFO:
        	captureInfo, stopRecording = args
        	self.setCameraInfo(captureInfo, stopRecording)
    	elif commandIdx == consts.NetworkCommands.SET_ROTATION:
        	self.setRotation(args[0])
Lastly, for the server connection work, we need to add a method to generate the messages and send them to the connected clients. Having a simple singular interface for this means that the code to update the clients is very minimal.
	def _sendCommand(self, commandIndex, listOfArgs):
    	"""
    	Send a given command to the client

    	args:
        	commandIndex (consts.NetworkCommands): The command index of the message, what its for
        	listOfArgs (list of objects): List of arguments that will be serialised and passed over
    	"""
    	if len(self._connectedClients) == 0:
        	return

    	package = consts.NetworkParser.encodeMessage(commandIndex, listOfArgs)
    	for connection in self._connectedClients:
        	connection.write(package)
        	if connection.waitForBytesWritten(1000) is False:
            	print "Error sending data to {}".format(connection)
To finish off the Camera server code, we just need to replace the code that was originally emitting signals with code to send them as commands instead. As you can see by the updated
_handleNewPreviewFrame and setBrightness commands, calling the network code is very easy and is not too dissimilar to emitting the signals.
def _handleNewPreviewFrame(self, newFrame):
    	"""
    	handle a new preview frame

    	args:
        	newFrame (QImage): The new preview frame
    	"""
    	byteArray = QtCore.QByteArray()
    	buff = QtCore.QBuffer(byteArray)
    	newFrame.save(buff, "PNG")

    	self._sendCommand(consts.NetworkCommands.SIGNAL_NEW_PREVIEW_FRAME, [byteArray])


	def setBrightness(self, value):
    	"""
    	Set the camera's brightness

    	args:
        	value (int): The camera's brightness
    	"""
    	self._camera.brightness = value
    	self._sendCommand(consts.NetworkCommands.SIGNAL_CAMERA_BRIGHTNESS_CHANGED, [value])
With the server-side done, all that is left is the client-side code. The design I went for was to have a PiCameraWrapperClient class which had all the same methods and signals as the PiCameraWrapper class from part 2, but just sat on top of a TCP socket to the server. This allowed for it to be slotted in with the existing UI code with minimal changes and only required some small tweaks to make work.
The constructor takes in an optional hostname for the camera to connect to, but under the hood, it calls a connectToCamera method. This approach lets the user connect and disconnect to multiple cameras without having to create a new instance of the wrapper for each hostname.
class PiCameraWrapperClient(QtCore.QObject):
	"""
	A Network based Qt aware wrapper around the Pi's camera API
	Client side, deals with the Server

	Signals:
    	cameraStatusChanged (PiCameraStatus): Emitted when the camera's status changes
    	cameraBrightnessChanged (int): Emmited when the camera's brightness is changed
    	cameraContrastChanged (int): Emmited when the camera's contrast is changed
    	recordingStarted (): Emitted when the recording is started
    	recordingStopped (): Emitted when the recording is stopped
    	recordingSavedStartProcessing(): Emitted when the recording is saved, start to transcode
    	recordingSaveFinishedProcessing (str): Emitted when the recording is saved, finished transcode. has final filename
    	recordingSaveErrorProcessing (str): Emitted when the processing of a save file errors out. Has the error text
    	newPreviewFrame (QImage): Emitted with a new Preview Frame
    	networkError (str): Emitted when there is a network error and has the friendly string error
    	cameraError (str): Emitted with any camera error

    	connectedToCamera (): Emitted when connected to camera
    	disconnectedFromCamera (): Emitted when the camera is disconnected
	"""
	cameraStatusChanged = QtCore.Signal(object)
	cameraBrightnessChanged = QtCore.Signal(object)
	cameraContrastChanged = QtCore.Signal(object)
	recordingStarted = QtCore.Signal()
	recordingStopped = QtCore.Signal()
	recordingSavedStartProcessing = QtCore.Signal()
	recordingSaveFinishedProcessing = QtCore.Signal(object)
	recordingSaveErrorProcessing = QtCore.Signal(object)
	newPreviewFrame = QtCore.Signal(object)
	cameraError = QtCore.Signal(object)
	networkError = QtCore.Signal(object)

	connectedToCamera = QtCore.Signal()
	disconnectedFromCamera = QtCore.Signal()

	def __init__(self, hostName=None, captureInfo=consts.CaptureInfo.VIDEO_1080p_30):
    	"""
    	Constructor
    	"""
    	super(PiCameraWrapperClient, self).__init__()
    	self._connection = QtNetwork.QTcpSocket(self)
    	self._connection.disconnected.connect(self._handleCameraDisconnected)
    	self._connection.readyRead.connect(self._handleCameraDataRead)
    	self._readData = QtCore.QByteArray()

    	if hostName is not None:
        	self.connectToCamera(hostName)

	def connectToCamera(self, hostName):
    	"""
    	connect to a camera

    	args:
        	hostName (str): The hostname of the camera to connect to
    	"""
    	self._connection.connectToHost(hostName, consts.NetworkCommands.PORT)
    	if self._connection.waitForConnected(1000):
        	self.connectedToCamera.emit()
    	else:
        	self.networkError.emit(self._connection.errorString())

	def disconnectFromCamera(self):
    	"""
    	disconnect from the camera
    	"""
    	if self._connection.state() == QtNetwork.QTcpSocket.ConnectedState:
        	self._connection.disconnectFromHost()
In the same pattern used for the server-side, the client will read data when it’s ready, decoding the data when enough is read in, and then parsing that data to be actioned.
	def _handleCameraDataRead(self):
    	"""
    	Handle reading data off the connection when data is ready to be read
    	"""
    	self._readData.append(self._connection.readAll())
    	while True:
        	result = consts.NetworkParser.decodeMessage(self._readData)
        	if result is None:
            	break
        	self._parseData(result)

	def _parseData(self, data):
    	"""
    	Parse the messages sent from the camera

    	args:
        	data (consts.NetworkCommands, list of objects): Tuple of consts.NetworkCommands and list
                                                        	of args
    	"""
    	commandIdx, args = data

    	if commandIdx == consts.NetworkCommands.SIGNAL_NEW_PREVIEW_FRAME:
        	self.newPreviewFrame.emit(QtGui.QImage.fromData(args[0]))
    	elif commandIdx == consts.NetworkCommands.SIGNAL_CAMERA_ERROR:
        	self.cameraError.emit(args[0])
    	elif commandIdx == consts.NetworkCommands.SIGNAL_CAMERA_STATUS_CHANGED:
        	self.cameraStatusChanged.emit(args[0])
    	elif commandIdx == consts.NetworkCommands.SIGNAL_CAMERA_BRIGHTNESS_CHANGED:
        	self.cameraBrightnessChanged.emit(args[0])
    	elif commandIdx == consts.NetworkCommands.SIGNAL_CAMERA_CONSTRAST_CHANGED:
        	self.cameraContrastChanged.emit(args[0])
    	elif commandIdx == consts.NetworkCommands.SIGNAL_RECORDING_STARTED:
        	self.recordingStarted.emit()
    	elif commandIdx == consts.NetworkCommands.SIGNAL_RECORDING_STOPPED:
        	self.recordingStopped.emit()
    	elif commandIdx == consts.NetworkCommands.SIGNAL_RECORDING_SAVED_START_PROCESSING:
        	self.recordingSavedStartProcessing.emit()
    	elif commandIdx == consts.NetworkCommands.SIGNAL_RECORDING_SAVE_FINISHED_PROCESSING:
        	self.recordingSaveFinishedProcessing.emit(args[0])
    	elif commandIdx == consts.NetworkCommands.SIGNAL_RECORDING_SAVE_ERROR_PROCESSING:
        	self.recordingSaveErrorProcessing.emit(args[0])
The sending of the commands follows the same pattern, with the setAnnotateText and setContrast methods you can see how that would work.
	def _sendCommand(self, commandIndex, listOfArgs):
    	"""
    	Send a given command to the remote camera

    	args:
        	commandIndex (consts.NetworkCommands): The command index of the message, what its for
        	listOfArgs (list of objects): List of arguments that will be serialised and passed over
    	"""
    	if self._connection.state() == QtNetwork.QTcpSocket.ConnectedState:
        	package = consts.NetworkParser.encodeMessage(commandIndex, listOfArgs)
        	self._connection.write(package)
        	if self._connection.waitForBytesWritten() is False:
            	self.networkError.emit(self._connection.errorString())

	def setContrast(self, value):
    	"""
    	Set the camera's contrast

    	args:
        	value (int): The camera's Contrast
    	"""
    	return self._sendCommand(consts.NetworkCommands.SET_CONSTRAST, [value])

	def setAnnotateText(self, text=None, colour=None, size=None, frameNumbers=None):
    	"""
    	Set the Annotate text for the video and preview

    	kwargs:
        	text (str): The string to add. Empty string to clear the annotate
        	colour (str): String name of the colour background, eg "black"
        	size (int): The size of the text.
        	frameNumbers (bool): If the frame count from the camera should be shown or now
    	"""
    	self._sendCommand(consts.NetworkCommands.SET_ANNOTATE_TEXT, [text, colour, size, frameNumbers])
The Client UI needs a small change to accommodate the change to it being network-based, such as a new hostname edit textbox and connect button. As there are new signals on the PiCamerWrapperClient for network events and errors, hooking them into the current logging system is trivial but very effective.
Running up the server on the Raspberry Pi in a terminal and connecting to it from a windows based client shows that it works seamlessly, as it did when it was being run locally.
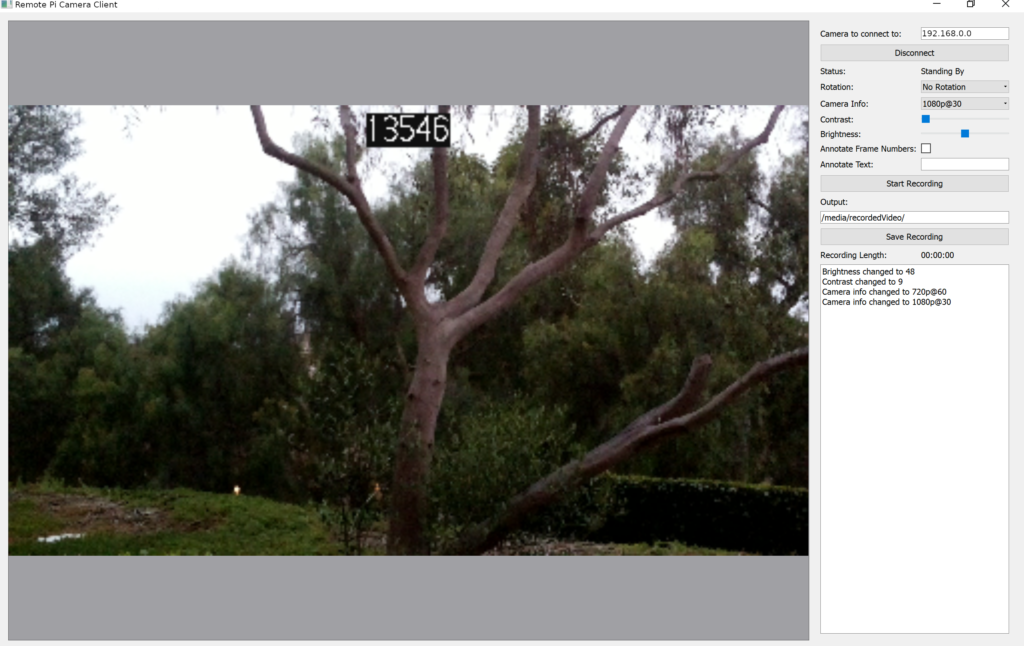
Everything from the rotation, changing the camera info (the resolution and frame rate), brightness, and the annotated text will work as expected, with the only noticeable issue being that the preview image is reduced in quality.
Recording, saving, and transcoding works exactly as it did locally, and currently is using the same system for the output path, but it could be extended to
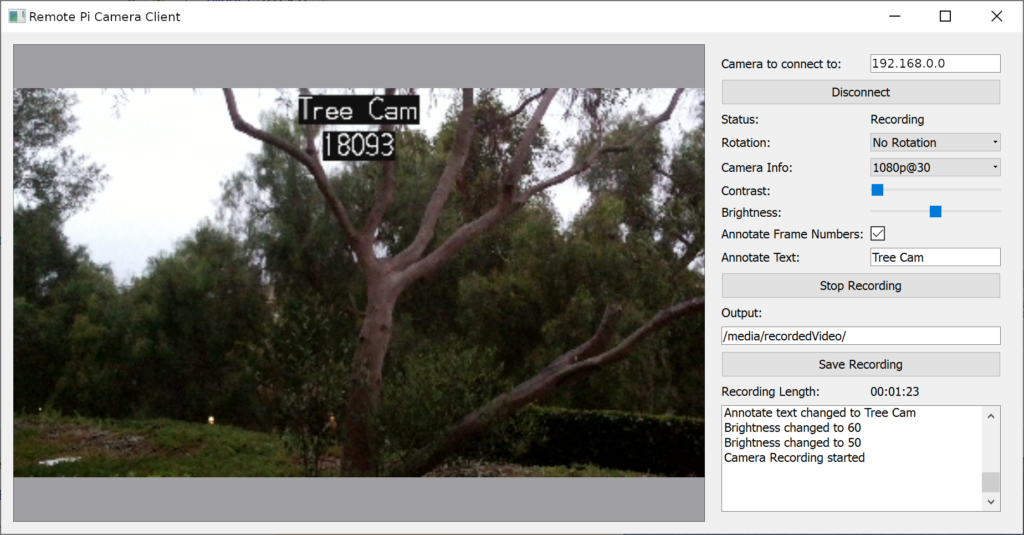
As the camera is a server-based design, it’s possible to connect multiple clients to a single camera to view the preview, trigger recording, and set parameters. It’s also possible to use this design to have multiple clients on a single machine, each one connecting to a different camera for multi-camera projects.
That concludes this 3 part series about building a system to remotely camera videos on a Raspberry Pi using Python and Qt. This is a fantastic base and there’s a wide range of projects that will be using this as a base coming soon, so don’t forget to subscribe to make sure you get notified when these projects go live.
– Geoff
Remotely capturing on the Pi – Part Two 13 Jul 2020, 3:30 pm
In the 2nd part of this 3 part series, we’re going to build upon the functionality from part one, which you can find here. We’re going to add extra logic for recording different resolutions and frame rates, the ability to change the brightness and contrast, and we’re going to top it off with a better way to handle the separate FFMPEG process whilst giving the user more information as to what’s going on.
The first thing we’re going to look at doing is allowing for the changing of the resolution and frame rates. As these two are tied together, I’m opting for a pre-defined config approach as modifying them incorrectly can lead to the camera not recording. Using the Pi Camera encoding chart here, we can define a few set configs which we know work. This includes 1920×1080@30 fps, 1280×720@60 fps and 640×480@90 fps. In code, we can accomplish this with a simple enum.
class CaptureInfo(object):
	"""
	Combos for CaptureInfo such as frame rate and resolutions
	"""
	VIDEO_1080p_30 = (1920, 1080, 30)
	VIDEO_720p_60 = (1280, 720, 60)
	VIDEO_640p_90 = (640, 480, 90)
With these combo’s we need a way to set them on the API, and one great way to do this is by having it as a kwarg on the PiCamera constructor, where it just passes it into a public method to set it. This way we can ensure that the camera is always using one of those configs.
The method to set the camera’s resolution and frame rate is very basic, doing nothing more than unpacking the tuple and setting those values on the camera.
def setCameraInfo(self, captureInfo, stopRecording=True):
    	"""
    	Set the camera's info, such as the frame rate and resolution

    	args:
        	captureInfo (CaptureInfo): The Camera info package to set

    	kwargs:
        	stopRecording (bool): If the recording should be stopped before this change is applied
    	"""
    	if stopRecording is True and self._cameraStatus == PiCameraStatus.RECORDING:
        	self.stopRecording()
    	width, height, rate = captureInfo
    	self._camera.resolution = (width, height)
    	self._camera.framerate = rate
Adjusting the brightness and contrast with the PiCamera library can be done but setting the value of the brightness and contrast attributes. Getter and setter methods were added to wrap them as well to emit the cameraBrightnessChanged and the cameraContrastChanged signals when needed.
In part 1, I opted to use subprocess for the transcoding from h264 to mp4. While this works, it has a few downsides, such as blocking the main thread or not being able to get the output and any errors. A better solution is to use QProcess, as this does not block the main thread and signals are emitted when the process is complete, allowing for us to carry on working with camera and recording data without having to wait for the transcode to finish.
Another small change is the adding of the timecode to the ffmpeg which will stamp the video file with SMPTE. This is somewhat of a hack as the camera runs on its own internal clock and so the timecode is coming from the system clock. Whilst it’s close to the actual timecode, it’s not frame accurate.
    def saveRecording(self, outputPath):
    	"""
    	Save the recording
    	"""
    	if not os.path.exists(self._TEMP_FILE):
        	raise ValueError("No Recording to save!")

    	if not os.path.exists(os.path.dirname(outputPath)):
        	os.mkdir(os.path.dirname(outputPath))

    	proc = QtCore.QProcess()
    	proc.finished.connect(functools.partial(self._handleRecordingTranscodeFinish, proc, outputPath))
    	ffmpegArgs = [
        	"-nostdin", # Make sure that FFMPEG isnt waiting for any user input
        	"-y",  # override file
        	"-framerate", str(self._camera.framerate), # Set the frame rate
        	"-i", self._TEMP_FILE, # Define the input file
        	"-c", "copy", # Tell FFMPEG to copy the memory rather than encode and decode it
        	"-timecode", self._startTime,  # Set the start timecode to chase
        	outputPath] # Output file path
    	proc.start("ffmpeg", ffmpegArgs)
    	self.recordingSavedStartProcessing.emit()

	def _handleRecordingTranscodeFinish(self, process, outputFile, exitCode):
    	"""
    	Handle the saving/processing task finishing and reporting on the outcome

    	args:
        	process (QProcess): The process that was run
        	outputFile (str): The output file path
        	exitCode (int): The exit code of the process
    	"""
    	if exitCode == QtCore.QProcess.NormalExit:
        	self.recordingSaveFinishedProcessing.emit(outputFile)
    	else:
        	errorMsg = "\n".join([
                        	"Error running ffmpeg.",
                        	"StdOutput: {}".format(process.readAllStandardOutput()),
                        	"StdError: {}".format(process.readAllStandardError())
                    	])

        	self.recordingSaveErrorProcessing.emit(errorMsg)
With all the extra logic going on, it makes sense to extent out the signals this class has, allowing for a UI based log to display more information as to whats happening.
class PiCameraWrapper(QtCore.QObject):
	"""
	A Qt aware wrapper around the Pi's camera API

	Signals:
    	cameraStatusChanged (PiCameraStatus): Emitted when the camera's status changes
    	cameraBrightnessChanged (int): Emmited when the camera's brightness is changed
    	cameraContrastChanged (int): Emmited when the camera's contrast is changed
    	recordingStarted (): Emitted when the recording is started
    	recordingStopped (): Emitted when the recording is stopped
    	recordingSavedStartProcessing(): Emitted when the recording is saved, start to transcode
    	recordingSaveFinishedProcessing (str): Emitted when the recording is saved, finished transcode. has final filename
    	recordingSaveErrorProcessing (str): Emitted when the processing of a save file errors out. Has the error text
    	newPreviewFrame (QImage): Emitted with a new Preview Frame
    	cameraError (str): Emitted with any camera error
	"""
	cameraStatusChanged = QtCore.Signal(object)
	cameraBrightnessChanged = QtCore.Signal(object)
	cameraContrastChanged = QtCore.Signal(object)
	recordingStarted = QtCore.Signal()
	recordingStopped = QtCore.Signal()
	recordingSavedStartProcessing = QtCore.Signal()
	recordingSaveFinishedProcessing = QtCore.Signal(object)
	recordingSaveErrorProcessing = QtCore.Signal(object)
	newPreviewFrame = QtCore.Signal(object)
	cameraError = QtCore.Signal(object)
With all these great changes in the wrapper class, we just need to make some small adjustments to the UI interface to expose them, with a drop down for the camera config type, some sliders for the brightness and contrast and a text block for the log information coming from the camera.
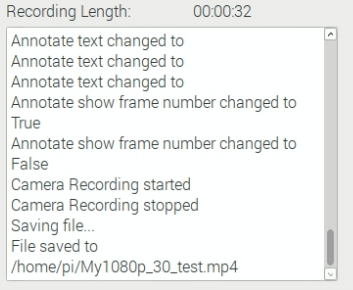
When it comes to hooking up the actions to the log, I find it better for the buttons to edit the camera, which then emits a signal and the log picks up that signal. It adds some extra cycles but it means that the log is only recording what actually changed, rather than what should change, which in my experience can save hours of debugging!
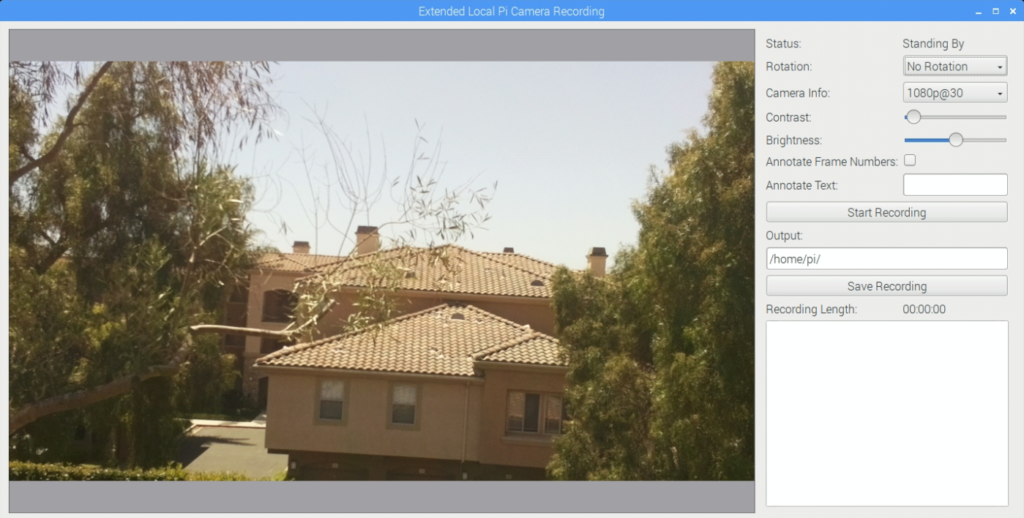
By changing the contrast and brightness sliders, you can see the effect in both the preview image and in the log.
One last addition that I added was a separate QTimer thread that would trigger every 1000ms (1 second) and update the current recording length in seconds each time its run, so the user can see how long its been recording for. In the past i’ve tried multiple ways of accomplishing this, such as recording the start time stamp and calculating the delta, but due to the inaccuracies of the QTimer, there were many instances of it being called before the next second or after, resulting in a very stuttering effect which was offputing and looked like the application had frozen.
In the last part of this 3 part series, we move this all to be network based, showing just how easy it is to use Qt’s networking bases to make this a reality
– Geoff
Remotely capturing on the Pi – Part One 6 Jul 2020, 3:38 pm
In this 3 part series, we’re going to look at utilizing a $10 Raspberry Pi zero as a remote wireless video recorder, perfect for a wide host of applications which I will explore more in my next series.
In the first part, we will go through the initial setup of the Raspberry Pi, creating a simple Qt powered code interface, add in a basic GUI to preview the camera as well as the ability to start, stop and save & transcode the HD video.
Part two is all about using what we’ve done in part one and expanding the functionality, adding in recording time, stamping timecode on transcode, changing frame rates and resolutions.
Finally in part 3 we realize the remote portion with these Pi’s acting as service, streaming the preview as well being remotely controlled from a central server application.
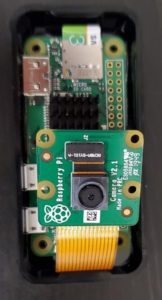
So let’s get into it. Firstly the hardware.
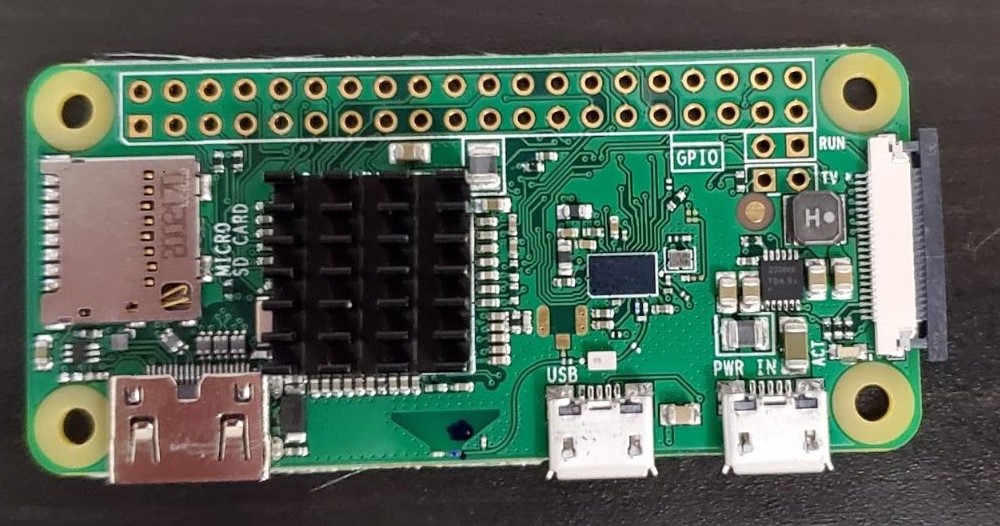
The Raspberry Pi W is a great piece of kit, costly very little and has the on board ability to encode a 1080p stream at 30 fps, which costs about $10 on its own, but more commonly about $30 with a case, heatsink and power supply in a set
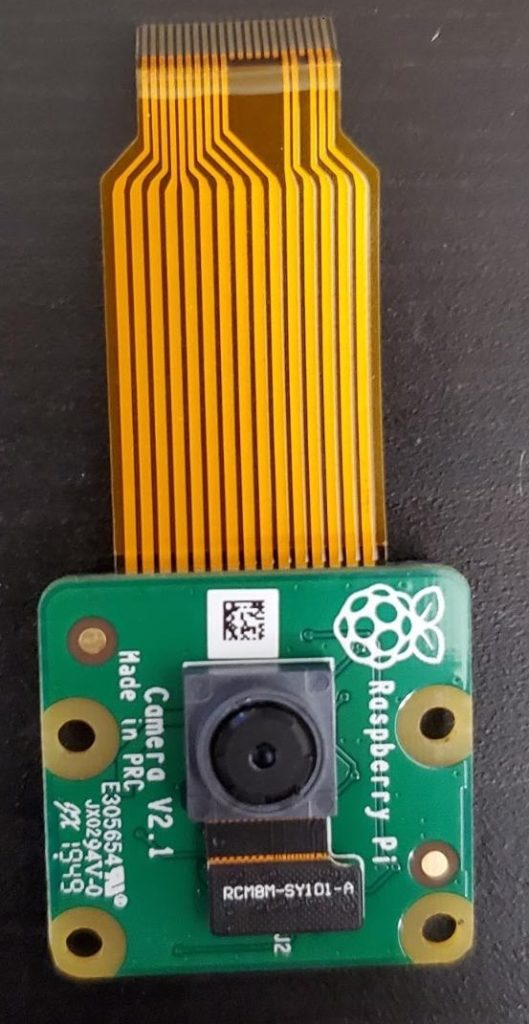
Next up is the PiCamera V2, whilst is possible to use a V1 camera, or even the new HQ camera, the PiCamera V2 is a great piece of kit, costing about $30. The Pi Zero uses a smaller cable to connect the camera than the one it comes with.
A MicroSD card is needed as the internal storage on the Pi, my goto brand is Samsung or Scandisk, and whilst you can use other brands, i’ve found that I’ve un-debuggable problems with cheaper cards.
I would highly recommend using the official Raspberry Pi setup documentations on the setup of the SD card which can be found here.
With the camera plugged in, the SD card inserted, its time to close the case and power it on to start the fun.

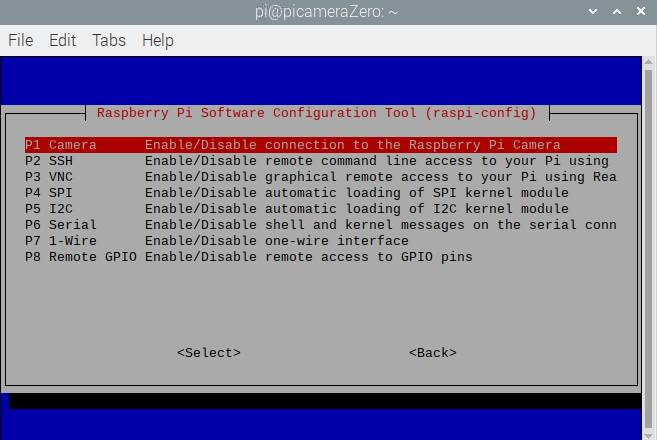
Once the Pi has started up, we need to enable the Pi Camera in the settings, we can do this with this:
sudo raspi-config
And choosing Interface->Camera->Enable from the menu. THis is also a great time to enable VNC, set the hostname, set the boot to autologin to desktop as well as set the resolution to mode 85 (1920×1080). All of which is very helpful if you are wanting to use Pi remotely rather than physically.
The last piece of software that we’ll need for this is PySide for the Python based GUI. We can get this by running:
sudo apt-get install python-pyside
With the setup done and out of the way, we can go-ahead and start coding!
The Python wrapper for the camera is the picamera module. We’ll be using this as our base class, but wrapping it with Qt to allow for callbacks as status changes.
The Camera can be in two states; recording and stopped, so making a Python enum for this allows for us to know the state, particularly useful on the UI interaction side.
class PiCameraStatus(object):
    """
    The Status that the PiCamera can be in
    """
    RECORDING = "Recording"
    STANDING_BY = "Standing By"
One UI element that is needed, is Widget which will show a QPixmap image, centering and resizing the image to the same size of the widget whilst maintaining the aspect ratio. The underlying concept is very straightforward, the paintEvent method is overridden and if a QPixmap is set on the widget, we rescale it the size of the widget and draw it.
The reimplemented sizeHint method is to give the widget some default parameters when it is created.
class ImageWidget(QtGui.QWidget):
    """
    Simple Widget to show a QPixmap image
    """
    def __init__(self, image=None):
        """
        Constructor

        kwargs:
            image (QPixmap): The widget's image
        """
        super(ImageWidget, self).__init__()
        self._image = None
        self.setImage(image)

    def setImage(self, image):
        """
        Set the image for the widget

        args:
            image (QPixmap): The image to show
        """
        self._image = image
        self.repaint()

    def sizeHint(self):
        """
        ReImplemented Method

        The size hint of the widget
        """
        return QtCore.QSize(100, 100)

    def paintEvent(self, event):
        """
        ReImplemented Method

        Draw a gray background and the image centered and re-sized to current widget size
        """
        painter = QtGui.QPainter(self)

        painter.setRenderHint(QtGui.QPainter.Antialiasing)
        painter.fillRect(0, 0, self.width(), self.height(), QtCore.Qt.gray)

        if self._image is not None:
            pixSize = self._image.size()
            pixSize.scale(event.rect().size(), QtCore.Qt.KeepAspectRatio)
            scaledPix = self._image.scaled(pixSize, QtCore.Qt.KeepAspectRatio, QtCore.Qt.SmoothTransformation)
            xOffset = (self.width() - pixSize.width()) / 2.0
            yOffset = (self.height() - pixSize.height()) / 2.0
            painter.drawPixmap(QtCore.QPoint(xOffset, yOffset), scaledPix)

        painter.drawRect(0,0, self.width(), self.height())
        painter.end()
?
Wrapping the PiCamera API to be Qt centric is pretty straightforward. Using QtCore.QObject as a base, we can define any signals that we might want to emit and build the class constructor.
Here we use tempfile to get the temporary file so we can record and only at the end when we want to save it do we need to give it a final filename.
class PiCameraWrapper(QtCore.QObject):
    """
    A Qt aware wrapper around the Pi's camera API

    Signals:
        cameraStatusChanged (PiCameraStatus): Emitted when the camera's status changes
        recordingStarted (): Emitted when the recording is started
        recordingStopped (): Emitted when the recording is stopped
        """
    cameraStatusChanged = QtCore.Signal(object)
    recordingStarted = QtCore.Signal()
    recordingStopped = QtCore.Signal()

    _TEMP_FILE = os.path.join(tempfile.gettempdir(), "piCamera", "temp.h264")

    def __init__(self):
        """
        Constructor
        """
        super(PiCameraWrapper, self).__init__()

        # Setup the camera
        self._camera = picamera.PiCamera()
        self._camera.resolution = (1920, 1080)
        self._camera.framerate = 30
        self._setStatus(PiCameraStatus.STANDING_BY)

        # Remove any old temp data
        if os.path.exists(self._TEMP_FILE):
            os.remove(self._TEMP_FILE)
As the status is a property, we’ll need some methods to get and set it, which is also a great place to emit the cameraStatusChanged signal with the new status.
 def status(self):
        """
        Get the current camera's status

        returns:
            PiCameraStatus
        """
        return self._cameraStatus

    def _setStatus(self, newStatus):
        """
        Set the current camera's status

        args:
            newStatus (PiCameraStatus): The camera's new status
        """
        self._cameraStatus = newStatus
        self.cameraStatusChanged.emit(self._cameraStatus)
To start the recording, there is some house keeping that we need to do to make sure that the temp file folder does exist, creating it if it doesn’t, before passing that into the internal PiCamera’s start_recording method. The last steps of this method just set the camera’s status and emit that the recording has started.
    def startRecording(self):
        """
        Start recording
        """
        if not os.path.exists(os.path.dirname(self._TEMP_FILE)):
            os.mkdir(os.path.dirname(self._TEMP_FILE))
        self._camera.start_recording(self._TEMP_FILE)
        self._setStatus(PiCameraStatus.RECORDING)
        self.recordingStarted.emit()
In a very similar way the stop recording method just calls the internal stop_recording method on the PiCamer before changing the status and emitting that the recording has stopped.
    def stopRecording(self):
        """
        Stop the recording
        """
        self._camera.stop_recording()
        self._setStatus(PiCameraStatus.STANDING_BY)
        self.recordingStopped.emit()
The saveRecording method takes the resulting .h264 file from the PiCamera, stored in the temp directory, and uses FFMPEG to transcode it into .mp4 file using subprocess.
    def saveRecording(self, outputPath):
        """
        Save the recording
        """
        if not os.path.exists(self._TEMP_FILE):
            raise ValueError("No Recording to save!")

        if not os.path.exists(os.path.dirname(outputPath)):
            os.mkdir(os.path.dirname(outputPath))
        cmds = ["ffmpeg",
                "-nostdin", # Make sure that FFMPEG isnt waiting for any user input
                "-y", # override file
                "-framerate", str(self._camera.framerate), # Set the frame rate
                "-i", self._TEMP_FILE, # Define the input file
                "-c", "copy", # Tell FFMPEG to copy the memory rather than encode and decode it
                outputPath] # Output file path
        subprocess.Popen(cmds)
In order to get a current preview of what the camera is seeing, we need a method to get the current camera data off the video buffer. We can do this with the PiCamera’s capture method using the use_video_port arg. Writing that buffer into an BytesIO class, we can then read that data as a QImage class.
    def getPreveiw(self):
        """
        Get the current preview stream as a QImage

        returns:
            QImage of the preview data
        """
        previewData = io.BytesIO()
        self._camera.capture(previewData, "jpeg", use_video_port=True)
        previewData.seek(0)
        return QtGui.QImage.fromData(previewData.read())
Finally on this class we have to add options to close the camera and set the camera rotation as well, which are extremely basic
    def setRotation(self, rotValue):
        """
        Set the camera rotation

        args:
            rotValue (int): Rotation amount, can be either 0, 90, 180, 270
        """
        self._camera.rotation = rotValue

    def closeCamera(self):
        """
        Close the camera
        """
        self._livePreivew.stop()
        self._camera.close()
To really take advantage of the PiCamera being a Qt Object, we need to add a thread in to poll for new frames, emitting them so the top level tool can display them. The general outline of the QThread class is based off an earlier one I wrote for the _SignalBeaconsThread from my last article “Lighting the cross-application signal beacons” but without the thread sleeping.
class LivePreviewThread(QtCore.QThread):
    """
    Thread for polling for new frames from the camera

    signals:
        newPreviewFrame (QImage): The new frame as an QImage
    """
    newPreviewFrame = QtCore.Signal(object)

    def __init__(self, camera):
        """
        Constructor
        """
        super(LivePreviewThread, self).__init__()
        self._camera = camera
        self._isRunning = False
        self._app = None

    def run(self):
        """
        ReImplemented method.

        Main loop logic
        """
        # Hook into the QApplications close event to make sure the thread is stopped with the processed
        if self._app is None:
            self._app = QtCore.QCoreApplication.instance() or QtGui.QApplication.instance()
            self._app.aboutToQuit.connect(self._handleAppClosing)

        # Mark the process as running
        self._isRunning = True

        # Just keep running until we tell it to stop
        while self._isRunning is True:
            newImage = self._camera.getPreveiw()

            # Check the thread is still running
            if self._isRunning is False:
                break

            # Emit the new frame image
            self.newPreviewFrame.emit(newImage)

    def stop(self):
        """
        Stop the thread.
        """
        self._isRunning = False
        self.terminate()

    def _handleAppClosing(self):
        """
        Handle the QApplication closing, making sure that the thread is stopped before the process stops
        """
        self.stop()
The thread instance should live within the Qt PiCamera wrapper, re-emmiting any new frames as part of its code, resulting in a small change to the constructor.
class PiCameraWrapper(QtCore.QObject):
    """
    A Qt aware wrapper around the Pi's camera API

    Signals:
        cameraStatusChanged (PiCameraStatus): Emitted when the camera's status changes
        recordingStarted (): Emitted when the recording is started
        recordingStopped (): Emitted when the recording is stopped
        newPreviewFrame (QImage): Emitted with a new Preview Frame
    """
    cameraStatusChanged = QtCore.Signal(object)
    recordingStarted = QtCore.Signal()
    recordingStopped = QtCore.Signal()
    newPreviewFrame = QtCore.Signal(object)

    _TEMP_FILE = os.path.join(tempfile.gettempdir(), "piCamera", "temp.h264")

    def __init__(self):
        """
        Constructor
        """
        super(PiCameraWrapper, self).__init__()

        # Setup the camera
        self._camera = picamera.PiCamera()
        self._camera.resolution = (1920, 1080)
        self._camera.framerate = 30
        self._setStatus(PiCameraStatus.STANDING_BY)

        # Remove any old temp data
        if os.path.exists(self._TEMP_FILE):
            os.remove(self._TEMP_FILE)

        # Setup the preview thread
        self._livePreivew = LivePreviewThread(self)
        self._livePreivew.newPreviewFrame.connect(self.newPreviewFrame.emit)
        self._livePreivew.start()
With all the pieces moved into place, the last thing to do is to build the final tool interface which will hold all the UI elements and let the user control the camera. The design is simplistic, with slots for the changes on the PiCameraWrapper status updates.
class PiCameraWidget(QtGui.QWidget):
    """
    Main tool window for viewing and controlling the Pi Camera
    """
    def __init__(self, parent=None):
        """
        Constructor
        """
        super(PiCameraWidget, self).__init__(parent=parent)
        self._camera = PiCameraWrapper()

        self.setupUi()

        self._camera.newPreviewFrame.connect(self._handleNewPreviewFrame)
        self._camera.cameraStatusChanged.connect(self._handleCameraStatusChange)
        self._camera.recordingStarted.connect(self._handleCameraStartRecording)
        self._camera.recordingStopped.connect(self._handleCameraStopRecording)

        self.setWindowTitle("Local Pi Camera Recording")

    def setupUi(self):
        """
        Set up the UI
        """
        # Layouts
        layout = QtGui.QHBoxLayout()
        configLayout = QtGui.QGridLayout()

        # Widgets
        self._previewLabel = ImageWidget()
        configPanel = QtGui.QWidget()

        self._rotationCombo = QtGui.QComboBox()
        self._statusLabel = QtGui.QLabel(self._camera.status())
        self._stopRecording = QtGui.QPushButton("Stop Recording")
        self._startRecording = QtGui.QPushButton("Start Recording")
        self._saveRecording = QtGui.QPushButton("Save Recording")
        self._outFileEdit = QtGui.QLineEdit()

        # Configure Widgets
        self._previewLabel.setSizePolicy(QtGui.QSizePolicy.Expanding, QtGui.QSizePolicy.Expanding)
        configPanel.setSizePolicy(QtGui.QSizePolicy.Minimum, QtGui.QSizePolicy.Minimum)
        self._stopRecording.setVisible(False)
        self._rotationCombo.addItem("No Rotation", 0)
        self._rotationCombo.addItem("-90", 270)
        self._rotationCombo.addItem("+90", 90)
        self._rotationCombo.addItem("+180", 180)
        self._outFileEdit.setText(os.path.join(os.path.expanduser("~"), ""))

        # Layouts to Widgets
        configLayout.addWidget(QtGui.QLabel("Status:"), 0, 0)
        configLayout.addWidget(self._statusLabel, 0, 1)
        configLayout.addWidget(QtGui.QLabel("Rotation:"), 1, 0)
        configLayout.addWidget(self._rotationCombo, 1, 1)
        configLayout.addWidget(self._startRecording, 2, 0, 1, 2)
        configLayout.addWidget(self._stopRecording, 3, 0, 1, 2)
        configLayout.addWidget(QtGui.QLabel("Output:"), 4, 0, 1, 2)
        configLayout.addWidget(self._outFileEdit, 5, 0, 1, 2)
        configLayout.addWidget(self._saveRecording, 6, 0, 1, 2)

        layout.addWidget(self._previewLabel)
        layout.addWidget(configPanel)

        configPanel.setLayout(configLayout)
        self.setLayout(layout)

        # Signals
        self._startRecording.pressed.connect(self._handleStartRecording)
        self._stopRecording.pressed.connect(self._handleStopRecording)
        self._saveRecording.pressed.connect(self._handleSaveRecording)
        self._rotationCombo.currentIndexChanged.connect(self._handleRotationChange)

    def _handleCameraStatusChange(self, newStatus):
        """
        Handle the PiCameraWrapper's change of status, pushing the new status to the UI
        """
        self._statusLabel.setText(newStatus)

    def _handleRotationChange(self, newValue):
        """
        Handle the change of rotation, pushing the new value to the camera
        """
        rotValue = self._rotationCombo.itemData(self._rotationCombo.currentIndex(), QtCore.Qt.UserRole)
        self._camera.setRotation(rotValue)

    def _handleNewPreviewFrame(self, newPreviewFrame):
        """
        Handle getting a new preview frame, pushing it to the image viewer widget
        """
        self._previewLabel.setImage(QtGui.QPixmap(newPreviewFrame))

    def _handleCameraStartRecording(self):
        """
        Handle the camera starting recording, updating the UI accordingly
        """
        self._stopRecording.setVisible(True)
        self._startRecording.setVisible(False)

    def _handleCameraStopRecording(self):
        """
        Handle the camera stopping recording, updating the UI accordingly
        """
        self._stopRecording.setVisible(False)
        self._startRecording.setVisible(True)

    def _handleStartRecording(self):
        """
        Handle start button being pressed
        """
        self._camera.startRecording()

    def _handleStopRecording(self):
        """
        Handle the stop button being pressed
        """
        self._camera.stopRecording()

    def _handleSaveRecording(self):
        """
        Handle the save button being pressed
        """
        fileName = self._outFileEdit.text()
        if not fileName.endswith(".mp4"):
            fileName = "{}.mp4".format(fileName)
        try:
            self._camera.saveRecording(fileName)
        except ValueError, error:
            QtGui.QMessageBox.warning(self, "PiRecording", str(error))
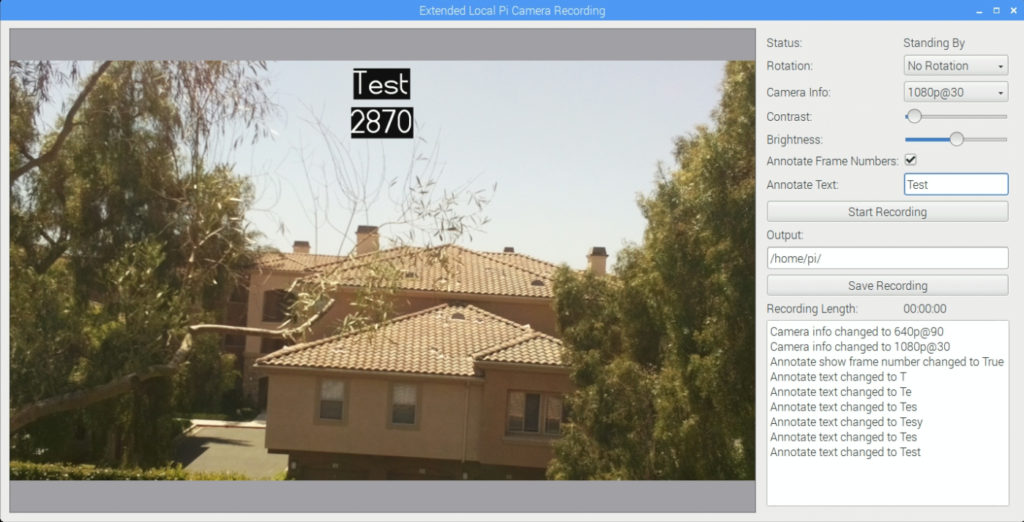
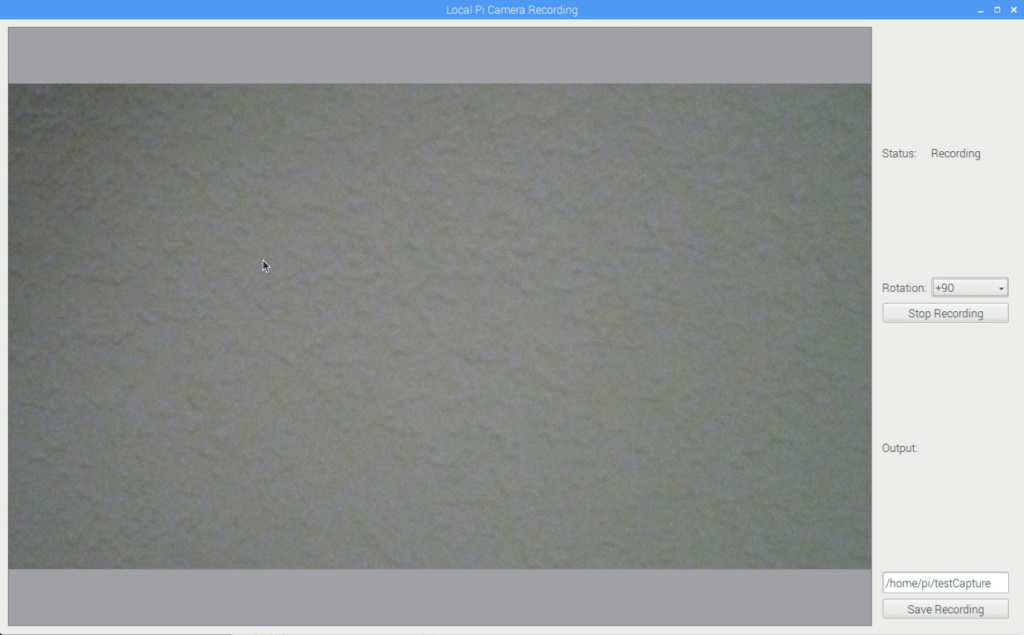
As you can see the tool’s interface is very simple, it gives users the ability to start, stop and save the videos, as well as setting the rotation and being able to preview what is being recorded.
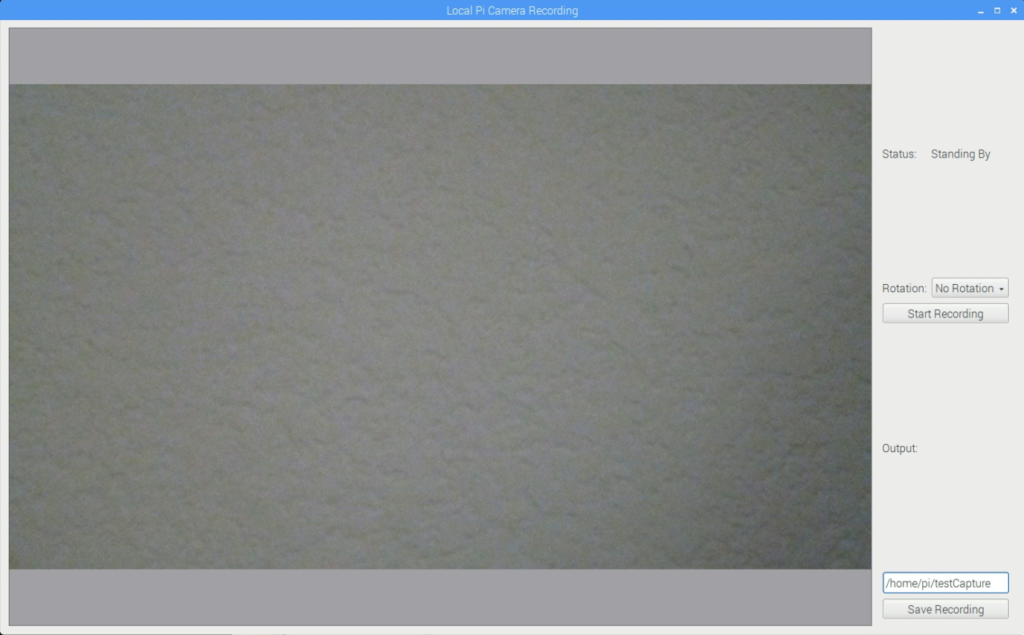
As the status changes from standing by to recording, you can see the status change in the UI
In the next article we’ll extend this with a lot more features to make it a more fully fleshed out tool.
– Geoff
Lighting the cross-application signal beacons 22 Jun 2020, 3:00 pm
The Qt’s signals is a very powerful system that allows for a great flow of data and events between objects and threads. This architecture allowed everything from the value of a spinbox changing to the process finishing to be connected and be acted on.
One limitation is that signals are limited to either a QCoreApplication or QGuiApplication instance, making them very scoped in that regard. What happens if we want to have a tool emit a signal and have another tool respond to that. What happens if we want to work across computers or even networks!
The reality of bringing this concept to life is actually a lot simpler than you might think!
The general concept is to use a database as a middle man, an emitter can add the signal and args to the database and there can be listeners checking that database for new signals that they care about and then just loading and emitting them locally.
A great database choice for this would be MongoDB, as its free, fast to set up, powerfully quick to search, and it’s all document-based, which makes it ideal. Installing it to a machine going through its 3-minute setup is all that is needed for that side of the database work! Sadly Python doe not come packaged with the ability to talk to a MongoDB so it’s necessary to download the require 3rd party lib or just use the following pip command:
$ python -m pip install pymongo
With all the setup done and out of the way, we can start coding!
It makes sense to have a single class for interacting with MongoDB, and it might as well contain methods for both the emitting and listening for signals, so all the logic is in one place. One thing we don’t want is to have this listener class get out of sync, so making everything on a class method and static method means that all operations happen on the same object in memory and we won’t run into issues with multiple instances of the main class.
As the database is document drive, there are no given keys, no column names, it’s important to take these as consts in the code, so we can refer back to them in the code easily, but these could be their own class of keys if multiple things were trying to access the raw data.
class SignalBeacons(QtCore.QObject):

    _SIGNAL_KEY = "SignalName"
    _ARG_LIST_KEY = "ArgList"
    _TIMESTAMP_KEY = "TimeStamp"
One of the great things with MongoDB is that queries to get database and collections will also create them if they don’t exist. To ensure that we dont end up with different databases or collections with slight variations of the spellings, a single static method to get the connection seems like the best way forward
    @staticmethod
    def _getDatabaseConnection():
        """
        Get the database connection
        """
        client = pymongo.MongoClient("mongodb://localhost:27017/")
        databse = client["blogCode"]
        return databse["signals"]
The easiest side to add first would be the emitting side as its fairly straightforward. The process takes in a signal name and a list of args. Qt doesn’t allow keyword args for their signal emits, and whilst it’s technically possible to implement in this system, I’ve opted to respect Qt’s design choice here.
We serialize the list of signal args with Pickle so we can easily load them back up on the other side. This approach is very barebones as a lot of Qt classes are not pickleable, but standard types are, but creating a pickle that’s Qt aware is a topic for another blog!
To complete the signal emitting code, we add in the time in UTC to when the signal was emitted so listeners can make an informed choice to emit on their side or not based on the time.
    @classmethod
    def _addSignalToDatabase(cls, signalName, listOfArgs):
        """
        Emitter Side!

        Add the signal to the database with the given name and list of signal args.
        The args are pickled!

        args:
            signalName (str): The name of the signal to emit
            listOfArgs (list of objects): List of objects to emit with the signal.
        """
        data = {cls._SIGNAL_KEY: signalName,
                cls._ARG_LIST_KEY: pickle.dumps(listOfArgs),
                cls._TIMESTAMP_KEY: datetime.datetime.utcnow(),}
        cls._getDatabaseConnection().insert_one(data)
In order to not have to force developers to convert their args into a list before emitting them, we’re going to expose a public-facing method which will use *args to package them up.
    @classmethod
    def emit(cls, signalName, *args):
        """
        Emitter Side!

        Emit the signal given name signal with the given args
        The args are pickled!

        args:
            signalName (str): The name of the signal to emit
        """
        cls._addSignalToDatabase(signalName, args)
And that’s it for the emitting side. I told you it was the easiest part!!
Now that leaves the more complex side, the listener’s side, which is due to all the moving parts and ensuring that signals are connected functions to signals are executed on the main thread, as signals would be.
On the emitting side we had the “_addSignalToDatabase” method, with the listener side we need to have an equivalent which will take in a list of signal names to look out for as well as a UTC time that was when the listener last checked.
To make sure that we don’t miss out on emitted signals due to time lost due to gaps in getting the UTC current time, we get the latest time of the new signal data and return that, and if there is no new data, we return back the originally given timestamp data, so the next query can use that. With this system in place, there is no way for any signal to not get picked up due to slipping through the cracks.
    @classmethod
    def getEmittedSignals(cls, fromTimeStamp, signalsNames):
        """
        Listener Side!

        Get all the emitted signal data for the given signal names since the given timestamp

        args:
            fromTimeStamp (datetime): The DateTime to use find new signals since
            signalsNames (list of strings): The names of the signal to check for

        return:
            signal data (tuple of str (signalName) and list of objects(args)) and UTC time of the last signal
        """
        # Setup the search query
        query = {
            cls._TIMESTAMP_KEY: {"$gt":fromTimeStamp},
            cls._SIGNAL_KEY: {"$in":signalsNames},
        }
        dbValues = list(cls._getDatabaseConnection().find(query).sort([(cls._TIMESTAMP_KEY, pymongo.ASCENDING)]))

        # If theres no values, just exit out and return with an empty list and the given last time stamp
        if len(dbValues) == 0:
            return [], fromTimeStamp

        # unpickle the data intop a signalName, signalData tuple, extract the last signal emitted timestamp
        signalData = [(data[cls._SIGNAL_KEY], pickle.loads(data[cls._ARG_LIST_KEY])) for data in dbValues]
        lastSignalTime = max([data[cls._TIMESTAMP_KEY] for data in dbValues])
        return signalData, lastSignalTime
The “getEmittedSignal” method works great for getting data, but we need to setup a system to periodically call that method to pick up any new data. My initial approach was to use a QTimer, but there were issues when I introduced an artificial slowdown on the getting data back from the database side which caused the main thread to block and the UI to freeze. This is down to how signals are emitted, their connected methods are run as part of the main thread, which is something we will use to our advantage later.
To work around this, a simple QThread looked to be the best option as the run method within it can just keep checking for new data and sleeping, rather than having to spin up a new QRunnable each time one finishes.
The implementation of this is nothing noteworthy, but one cool thing I did do was to connect the QApplications aboutToQuit method to a handler which stopped the thread. This stopped the thread still existing when the application was closed.
class _SignalBeaconsThread(QtCore.QThread):
    """
    Signal Beacons Thread to handle the task of getting the data so its not blocking the main thread

    signals:
        signalEmitted (str, list of objects): A signal has been emitted. sends the name and args of the signal
    """
    signalEmitted = QtCore.Signal(object, object)

    def __init__(self):
        """
        Constructor
        """
        super(_SignalBeaconsThread, self).__init__()
        self._signalNames = []
        self._lastTime = None
        self._isRunning = False
        self._app = None

    def run(self):
        """
        ReImplemented method.

        Main loop logic
        """
        # Hook into the QApplications close event to make sure the thread is stopped with the processed
        if self._app is None:
            self._app = QtCore.QCoreApplication.instance() or QtGui.QApplication.instance()
            self._app.aboutToQuit.connect(self._handleAppClosing)

        # Mark the process as running
        self._isRunning = True
        self._lastTime = datetime.datetime.utcnow()

        # Just keep running until we tell it to stop
        while self._isRunning is True:
            # Get the new data
            newData, self._lastTime = SignalBeacons.getEmittedSignals(self._lastTime, self._signalNames)

            # Check the thread is still running as the Database call might have taken some time
            if self._isRunning is False:
                break

            # Emit the signals and their data
            for sigName, sigData in newData:
                self.signalEmitted.emit(sigName, sigData)

            # sleep for a second-ish
            self.msleep(1*1000) # 1 second

    def setSignals(self, newSignalList):
        """
        Set the signals that the listener should be looking out for.

        args:
            newSignalList (list of str): List of string names for the signals
        """
        self._signalNames = list(newSignalList)

    def stop(self):
        """
        Stop the listener thread. As its all just read data, we arent too presious about how we stop it
        """
        self._isRunning = False
        self.terminate()

    def _handleAppClosing(self):
        """
        Handle the QApplication closing, making sure that the thread is stopped before the process stops
        """
        self.stop()
To know what signal to connect to and what functions to call when those signals are emitted, a simple connect and disconnect method are needed. Whilst they might look like they are doing a lot, they are not. The general idea is that we add that method the signal list for that signalName, or remove it for the disconnect, and then either start the thread if its the first connected signal, or disconnect if there are no more signals connected. Either way, we pass the new list of signalNames to the thread so it knows what to check for.
    def connectSignal(cls, signalName, funcPointer):
        """
        Listener Side!

        Connect the given function from the given signal
        Will raise ValueError if the signal is already connected

        args:
            signalName (str): The name of the signal to connect to
            funcPointer (function): The function that was assigned to that signal to connect
        """
        # Get the current list of functions for that signal name
        currentFuncs = cls._SIGNALS.get(signalName, [])

        # Dont re-add it if its already connected
        if funcPointer in currentFuncs:
            raise ValueError("Unable to connect signal")

        # Add the fucntion, and if the listener timer isnt running, connect it and start it.
        currentFuncs.append(funcPointer)
        cls._SIGNALS[signalName] = currentFuncs

        # update the thread with the new signal name list
        cls._LISTENER_THREAD.setSignals(cls._SIGNALS.keys())

        if cls._LISTENER_THREAD.isRunning() is False:
            cls._LISTENER_THREAD.start()
            cls._LISTENER_THREAD.signalEmitted.connect(cls._handleSignalEmitted)

    @classmethod
    def disconnectSignal(cls, signalName, funcPointer):
        """
        Listener Side!

        Disconnect the given function from the given signal
        Will raise ValueError if the signal is not connected

        args:
            signalName (str): The name of the signal to disconnect
            funcPointer (function): The function that was assigned to that signal to disconnect
        """
        # Try and get the list of functions for that signal name
        try:
            signalList = cls._SIGNALS[signalName]
        except KeyError:
            raise ValueError("Unable to disconnect signal")

        # Try removing that function from list of functions for that signal name
        try:
            signalList.remove(funcPointer)
        except ValueError:
            raise ValueError("Unable to disconnect signal")

        # If the list of functions for that signal is empty, then remove it from the list of signals
        if len(signalList) == 0:
            cls._SIGNALS.pop(signalName)
            # and if theres no more signals to listen for, stop the timer
            if len(cls._SIGNALS) == 0:
                cls._LISTENER_THREAD.stop()
                cls._LISTENER_THREAD.signalEmitted.disconnect(cls._handleSignalEmitted)

        else:
            # set the reduced list of functions to that signal name
            cls._SIGNALS[signalName] = signalList

        # update the thread with the new signal name list
        cls._LISTENER_THREAD.setSignals(cls._SIGNALS.keys())
The last method in the whole logic is for calling the connected function to the signal. As I mentioned earlier, functions connected to signals are executed in the main thread, which means by simply having a method connected to the “signalEmitted” signal on the thread, we can go through the list of connected signals with that name and just call them. It’s as simple as that!
    @classmethod
    def _handleSignalEmitted(cls, signalName, signalData):
        """
        Listener Side!

        Handle a new signal being emitted from the listener thread.
        """
        # Go through each of the functions with that signal, and trigger them with the given data
        for fntPrt in cls._SIGNALS.get(signalName, []):
            fntPrt(*signalData)
This makes the public interface look something like this for emitting signals:
import beaconsLib
beaconsLib.SignalBeacons.emit("Ping", 1)
beaconsLib.SignalBeacons.emit("SomeSignal", "myArg1", "myArg2", "myArg3")
And the interface for connecting to them as:
import beaconsLib

def _handlePing(num):
    print num

def _handleSomeSignal(arg1, arg2, arg3):
   print "{}, {}, {}".format(arg1, arg2, arg3)

beaconsLib.SignalBeacons.connectSignal("Ping", _handlePing)
beaconsLib.SignalBeacons.connectSignal("SomeSignal", _handleSomeSignal)
As Qt signals are all async, they do require either a QCoreApplication or a QApplication to work, so this implementation also expects there to be one of these running as well to work.
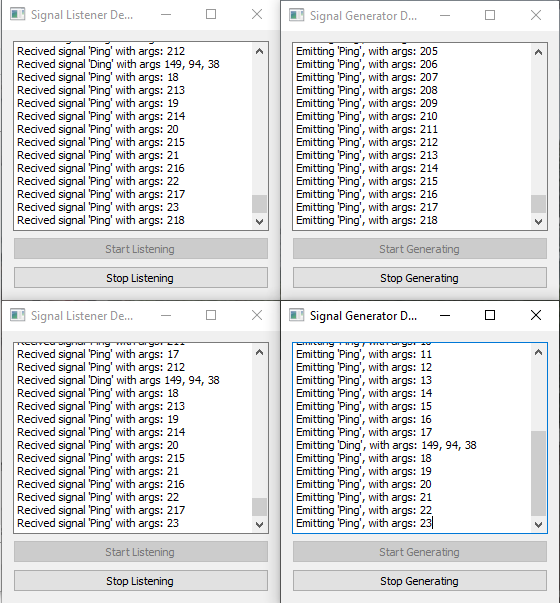
I’ve written a python listener demo and signal generator demo to show off it working, and as per its design, you can connect multiple listeners with no issues, as well as multiple generators.
As a result of my article a few weeks about porting Python to C++, I did look into how this could work in C++, but it seemed to be an uphill battle due to the dynamic and weak type nature of python that this system takes advance of, such as not knowing the types of the objects in the list of args. I would love to find a way to implement this one day!
I hope this given you some ideas about how Qt signals and MongoDB can be used to make processes more globally aware of what’s going on and making everything more responsive and current as a result.
– Geoff
Empowering Visual Studio with Qt 15 Jun 2020, 3:30 pm
In my last blog, I looked at porting a Python PySide App project over to C++ and for that, I used QtCreator as my Integrated development environment (IDE) as it shipped with the Qt build and it worked out the box, setting its self up and allowing me to create a test widget project, build and run it within minutes.
For the last 10+ years, I have, like many many others, have used Microsoft Visual Studio as their goto IDE (for compiled code anyway) and whilst QtCreator certainly works and can do the job, it’s lacking a lot of very helpful features Visual Studio has and just makes when writing and debugging code, increasing productivity and throughput.
Building Qt projects outside of QtCreator and its pipeline and toolchain used to be a real pain as the building of the code requires running the code through the Meta-Object Compiler (moc) which is required to generate the comper code for all the slots and signal systems, there is a very nice article about it by Qt.
Thankfully the Qt Company has created a Visual Studio extension that streamlines the whole process, from creating a new Qt project, importing an existing Qt .pro file, and all the steps around building and compiling.
So lets breakdown how to get, setup, and build a Qt project with Visual Studio 2019.
The first step is just to download Qt from its website at https://www.qt.io/download and get that installed on your computer. It can be quite large, I know there were some issues back in the day on having it on another disk drive, but nowadays you can put it anyway.
During the setup process, it’s going to ask for what you want to install, it’s unlikely that you will use all the different components, so just all of it, so make sure to select MSVC 2019 – 64 Bit if your running Visual Studio 2019 and MSVC 2015 – 64 Bit if you’re using Visual Studio 2017.
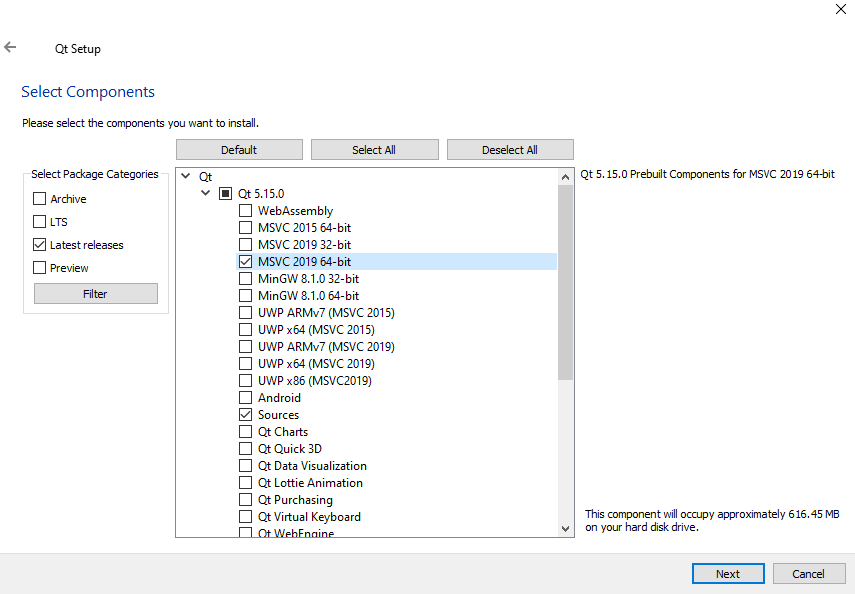
With that installed, I would recommend opening up QtCreator and just creating a dummy project to just make sure everything is set up and working correctly.
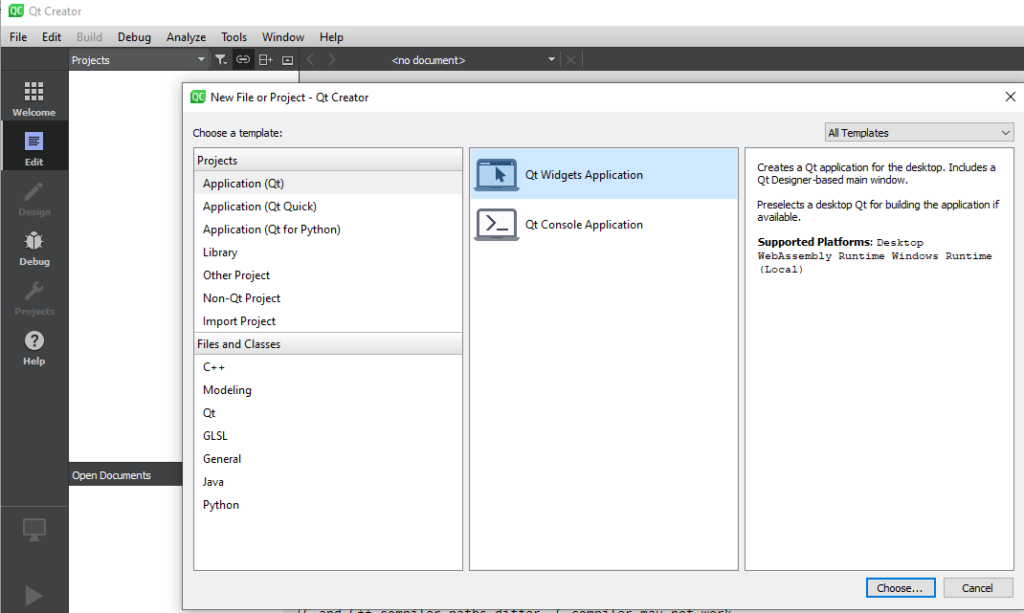
Using the QtWidget Application and house the “Desktop Qt 5.15.0 MSVC2019 64bit” kit in the kit selection screen, you should be able to hit the green play icon and build and run this empty widget application, resulting in a lovely grey window called “MainWindow”
With the Qt install verified and working, let’s move on to Visual Studio.
Make sure to download and install the correct version of the Visual Studio extension for your version:
2019 – https://marketplace.visualstudio.com/items?itemName=TheQtCompany.QtVisualStudioTools2019
2017 – https://marketplace.visualstudio.com/items?itemName=TheQtCompany.QtVisualStudioTools-19123
With that installed (and your computer restarted), launching Visual Studio 2019 has a new menu bar under the “Extensions” menu, and we’ll need to open the Qt Options to ensure it’s all configured correctly before we can build.

Here you can add and remove different Qt versions you intend to build on. Its important to note, that if you have both Visual Studio 2017 and Visual Studio 2019 setup with the Qt extensions, they will share the same Qt Options, so removing one from one, will result it being removed from the other.
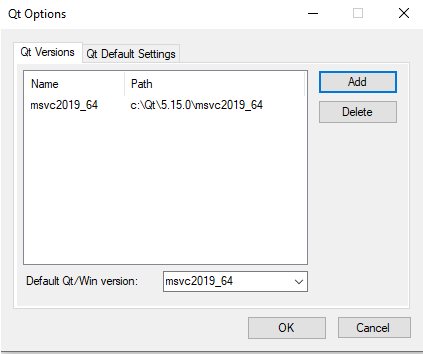
Something that tripped me up for a lot longer than I care to mention, is that it auto-detected the wrong version of Qt, going instead for the “winrt_x64_msvc2019”, which would mean that it’s trying to build on Windows RT, rather than standard Windows. For me, this manifested as a QMake issue.
Now we should be in a position to create a new Qt Widgets Application, checking that the Qt version you set up in the Qt Options is coming through as part of the setup wizard
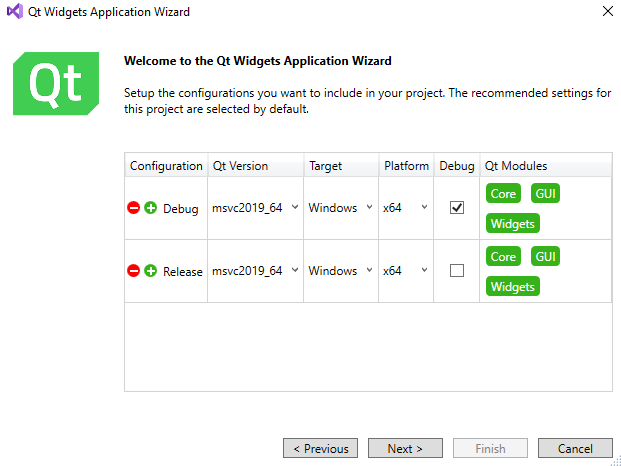
Once that’s all finished, hitting the “Local Windows Debugger” will kick off the compile and Qt toolchain, resulting in another lovely grey window called “QtWidgetsApplication”.
With everything verified as setup and working, you should be able to open the .pro file from my last project into Visual Studios and build it without any issues.
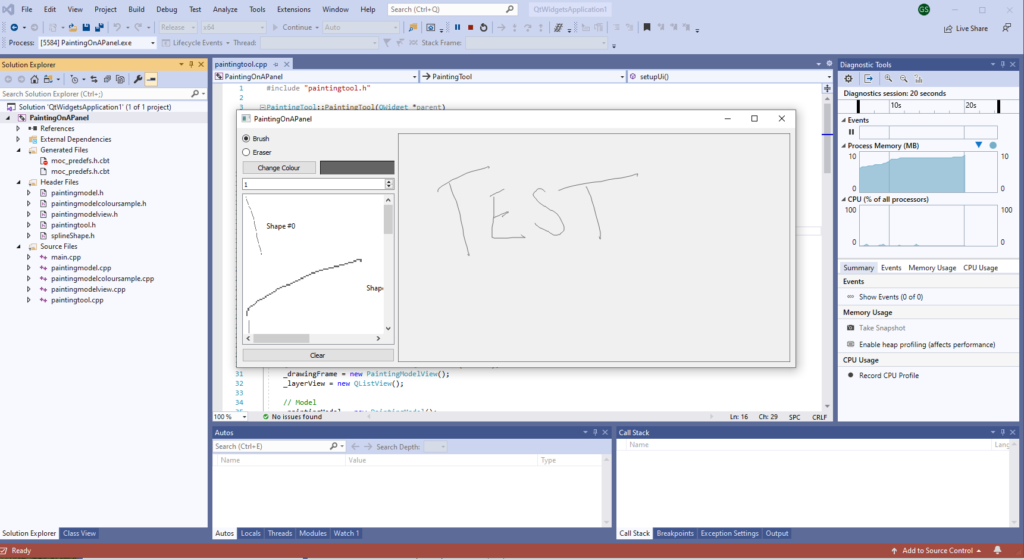
And with that, you are now fully set up to use Qt with Visual Studios for all of your projects, allowing you to develop in the most efficient way possible whilst also allowing you to seamlessly use the most powerful framework around.
Thanks for taking this Visual Studios and Qt journey with me.
– Geoff
Porting Py-Code to C-Code 8 Jun 2020, 4:00 pm
I’ve spent a lot of the last 10 years working very exclusively in Python. It’s a fantastic language, super quick to iterate, debug and develop for. Its drawback is that it is hard to monetize as the source code cannot be encoded properly and can be slow to run.
One of the main pillars that I’ve been using for my Python code has been the use of Qt, exposed by its Python bindings of PySide and PySide2. These bindings are generated from the C++ bindings automatically with only a few tweaks, it got me thinking, how hard would it be to convert a Python Qt-based tool into a C++ Qt-based tool.
It shouldn’t be too hard… right….
I started off like any developer would, by downloading the latest version of Qt from their website, installing and setting it up. Qt comes with its own IDE software, Qt creator, which can be used for C++, Python, and Qt quick projects right out of the box. After creating a new Qt application windows project setting up the kit to run off the visual studio 2017 compilers, it was surprisingly easy to have a blank Qt Main Window up and running.
With the IDE and toolchain confirmed as working, I started to wonder what Python project I should convert C++, I eventually opted to use the paint on a panel (Revisited) project that I released recently as it was mainly a Qt project but it included things from Models, Advance Widgets, standalone classes and plenty of interaction between all of them.
In the Python project everything was in one single file, the Qt widgets, the model, and the main tool, and whilst having everything in a single file is possible to accomplish in C++ I opted to break it out into about 5 header and source files to make it more manageable.
The first ones I tackled what’s the SplineShape class that is stand-alone doesn’t require any Qt widgets and doesn’t inherit from QObject, and with such simple class, this ended up in a single header file. With the exception of the finalizedShape method, all the methods follow their Python counterparts line for line. The finalizedShape method uses Python list comprehension to speed up generating lists whilst is this wasn’t possible in C++ and a QList was utilized for this.
    def finalizeShape(self):
        """
        Mark the shape as final so data can be cached out for use later on
        """
        xVals = [point.x() for point in self._points]
        yVals = [point.y() for point in self._points]
        self._minX = min(xVals) - self._width
        self._maxX = max(xVals) + self._width
        self._minY = min(yVals) - self._width
        self._maxY = max(yVals) + self._width
Python finalizeShape
    /*!
        Mark the shape as final so data can be cached out for use later on
    */
    void finalizeShape(){
        QList<int> xValues = QList<int>();
        QList<int> yValues = QList<int>();

        for (auto const& point : _points) {
            xValues.append(point.x());
            yValues.append(point.y());
        }

        _minX = *std::min_element(xValues.constBegin(), xValues.constEnd()) - _width;
        _maxX = *std::max_element(xValues.constBegin(), xValues.constEnd()) + _width;
        _minY = *std::min_element(yValues.constBegin(), yValues.constEnd()) - _width;
        _maxY = *std::max_element(yValues.constBegin(), yValues.constEnd()) + _width;
    }
C++ finalizeShape
Next up was the PaitningModel class, which similar to the SplineShape class, proved to be very similar with only a few noticeable differences. The first difference is virtual methods for the QAbstractItemModel methods had to match their C++ signatures, whereas the Python is more forgiving in that regard.
The logic being the Python implementation of the erasePoint method used a lot of list comprehension and list slicing to achieve the erasing of the point. This wasn’t practical in the C++ version, so the whole logic was re-written where a nested list of lists of QPoints was created, as we go through each point in the shape, we would check if it was within the erasing threshold if it wasn’t it would be added to the current list, and when a point was detected within the erasing threshold, we incremented the top-level list. After we did a cleanup pass to update or delete the shape and adding more shapes as needed. I feel this implementation is much cleaner than the original Python code, and I would happily backport this logic to Python.
    def erasePoint(self, location):
        """
        Erase a given point using the location and current width. Will split up lines into differnt
        shapes

        args:
            location (QPoint): The position to erase
        """
        newShapeOffset = 0
        for layerIdx, shape in enumerate(list(self._shapes)):
            idxToRemove = [idx for idx, point in enumerate(shape.points()) if QtCore.QLineF(point, location).length() < self._width]
            if len(idxToRemove) == 0:
                continue
            allPoints = shape.points()
            idxToRemove.insert(0, 0)
            idxToRemove.append(len(allPoints))
            for idx, points in enumerate([allPoints[idxToRemove[idx-1]:idxToRemove[idx]] for idx in xrange(1, len(idxToRemove))]):
                if idx == 0:
                    if len(points) == 0:
                        self._shapes.remove(shape)
                        newShapeOffset -= 1
                    else:
                        shape.setPoints(points)
                else:
                    if len(points) > 1:
                        newShape = _SplineShape(shape.colour(), shape.width())
                        newShape.setPoints(points)
                        # insert so it doesnt change the order
                        self._shapes.insert(layerIdx+newShapeOffset, newShape)
                        self.beginInsertRows(self.createIndex(0,0), 0, 1)
                        self.shapeAdded.emit(self._currentShape)
                        self.endInsertRows()
                        newShapeOffset += 1
Python erasePoint
void PaintingModel::erasePoint(QPoint position){
    for(std::size_t layerIdx = 0; layerIdx < _shapes.size(); ++layerIdx){
        SplineShape* shape = &_shapes[layerIdx];

        // Split the shapes up to remove the points to be removed
        QList< QList<QPoint> > newSplinePoints;
        newSplinePoints.push_back(QList<QPoint>());
        for(std::size_t pointIdx = 0; pointIdx < shape->points().size(); ++pointIdx){
            QPoint point = shape->points()[pointIdx];
            if (QLineF(point, position).length() < _width){
                if (newSplinePoints.back().size() != 0){
                    newSplinePoints.push_back(QList<QPoint>());
                }
            }else{
                newSplinePoints.back().push_back(point);
            }
        }
        // All parts of this shape have been removed, delete it!
        if (newSplinePoints.size() == 1 && newSplinePoints.back().size() == 0){

            // check to see if that was the last one, in which case, just clear the model
            if(_shapes.size() == 1){
                clear();
                return;
            }

            // Remove it from the shapes, remove the row and increment back one
            beginRemoveRows(createIndex(0,0), 0, 1);
            _shapes.erase(_shapes.begin()+int(layerIdx));
            layerIdx --;
            endRemoveRows();
            continue;
        }

        // Nothing to be done, its perfect the way it is!
        if (newSplinePoints.size() == 1){
            continue;
        }

        for(std::size_t pointIdx = 0; pointIdx < newSplinePoints.size(); ++pointIdx){
            if(pointIdx == 0){
                shape->setPoints(newSplinePoints[pointIdx]);
            }
            else{
                if (newSplinePoints[pointIdx].size() > 0){
                    SplineShape newShape = SplineShape(shape->colour(), shape->width());
                    newShape.setPoints(newSplinePoints[pointIdx]);
                    _shapes.insert(_shapes.begin() + layerIdx + 1, newShape);
                    beginInsertRows(createIndex(0,0), 0, 1);
                    emit shapeAdded(newShape);
                    endInsertRows();
                    layerIdx ++;
                }
            }

        }

    }
}
C++ erasePoint
Other than those few changes, the rest of the code is the same as its Python source code.
With the Model and SplineShapes done, the next up was the PaintingModelColourSample, and there isn’t much to say about this work, other than it true to its Python counterpart with one small exception. In the Python code, we connect the model’s colourChange signal to the Widgets repaint method. In Python, we can do this as PySide is more lenient about matching method signatures to signal signatures, whereas C++ isn’t, requiring a new method to negotiate the differences.
On to the main event, the PaintingModelView, where the user can create the shapes and they get drawn out into the view. This class follows the same pattern as the PaintingModelColourSample, where it’s extremely true to the Python implementation with just a small addition of a method to negotiate signals.
The PaintingToolEnum class was converted to a real enum and I ended up putting in the header file for the PaintingModelView as that was the lowest level interface that uses it.
Last up is the PaintingTool class to bringing in all the other parts of the project together, which was extremely straightforward and almost identical to the Python version. Having to define the UI elements which will need to be accessed outside the SetupUi method was a little alien, but it makes a lot of sense with a strong typed langue. One issue I did hit which took me a while to debug and work were connecting the thickness QSpinBox’s value changed signal as it wasn’t able to resolve which connection to use.
connect(_thicknessSpinner, QOverload<int>::of(&QSpinBox::valueChanged), this, &PaintingTool::_handleThicknessChange);
I am amazed at how little the code changed from Python to C++ and how easy it was. A lot of the time I lost with the conversion was due to silly issues with using objects rather than pointers and dealing with the limitations of Qt Creator. At one point, it would not compile new code even though it was not reporting any compiler issues and resulted in me chasing my tail until I cleared the cache and rebuilt. I have heard of a Qt plugin for Visual Studio and I’ll be looking to use that in the future.
Ultimately I found this hugely rewarding, not just as a great excuse to use C++, but also that Qt’s similarity provides a perfect bridge between Python and C++ where developers feel more at home and comfortable with it than they would naturally with a different API, and going forward I will be still be using Python for the initial prototyping of code, but porting it into C++ to help refine the bad code design choices that Python allows.
– Geoff
Painting on a panel – Revisited 26 May 2020, 6:59 am
In 2012 I wrote an article about porting a C# project for painting on a panel over to Python and using PyQt. Now in 2020 with over 8 years of experience under my belt, I thought it would be fun to revisit this project and re-write it utilizing all those years of production experience.
The project is rather simple, create a widget where users can draw and have it store the strokes as vectors as well as let users pick the size and colour of the brush.
With my original design, the widget held code for everything, from the drawing to mouse moves to holding the data of the lines.
This seems like a perfect candidate for a Model, with views for the drawing\tool interaction as well as views for the colour and line width. As we’re going with a model it should be easy to add in two extra UI elements, a Shape list, and colour sample widget.
The tool has two modes, brush and erase. If we were expanding this, we might want to make these classes but just having them as enums will work great.
class PaintingToolEnum(object):
    """
    Enum for the different tool modes
    """
    BRUSH = 0
    ERASE = 1
One design element which I’m keeping from the original article is the shape class, which would store information on the colour, width, and the points that make up that shape.
Having a class to hold all the shape information means that there is a pretty good encapsulation of data, which makes it easy to save/load/render and manipulate as a whole rather than keeping it elsewhere without context.
Something to help draw out the shape, later on, is knowing the height and width of the final shape, so having a method to calculate and cache this and the end will stop us from having to calculate that every time we want to draw it.
class _SplineShape(object):
    """
    Internal class to hold info on the spline shapes. Not a real spline, just a line between points
    """
    def __init__(self, colour, width):
        """
        Constructor

        args:
            colour (QColor): The colour of the spline
            width (int): The width of the spline
        """
        super(_SplineShape, self).__init__()
        self._colour = colour
        self._width = width
        self._points = []
        self._minX = -1
        self._maxX = -1
        self._minY = -1
        self._maxY = -1

    def colour(self):
        """
        Get the Colour being used as a QColor
        """
        return self._colour

    def width(self):
        """
        Get the Width as an int
        """
        return self._width

    def points(self):
        """
        Get a list of all the points as a list of QPoint
        """
        return self._points

    def setPoints(self, points):
        """
        Set the points that make up the spline

        args:
            points (list of QPoint): The points that make up the spline
        """
        self._points = points
        self.finalizeShape()

    def addPoint(self, position):
        """
        Add a point to the spline shape

        args:
            position (QPoint): The point to add
        """
        if len(self._points) > 0 :
            if position == self._points[-1]:
                return
        self._points.append(position)

    def finalizeShape(self):
        """
        Mark the shape as final so data can be cached out for use later on
        """
        xVals = [point.x() for point in self._points]
        yVals = [point.y() for point in self._points]
        self._minX = min(xVals) - self._width
        self._maxX = max(xVals) + self._width
        self._minY = min(yVals) - self._width
        self._maxY = max(yVals) + self._width

    def shapeRect(self):
        """
        Get the Rectangle of the shape

        returns:
            QRect of the shape
        """
        return QtCore.QRect(QtCore.QPoint(self._minX, self._minY), QtCore.QPoint(self._maxX, self._maxY))
A pretty big shift in the implementation is the use of a model in the heart of it. This central model will hold all the shapes, be responsible for all the shape logic, and provide signals for events that happen in the model. The idea is that multiple widgets can hook into various parts of the model and are just views on the same centralized data.
With this design we can have two different painting widgets using the same model, which would each other, or with some small changes, show a different view of the data.
Adding in some signals, this will help up hook in the model with the various views, such as the colour swatch, the line size, and the shape view.
class PaintingModel(QtCore.QAbstractItemModel):
    """
    The Model which handles the shapes

    Signals:
        modelReset (): Emits when the model is reset
        widthChange (int): The new line width
        colourChange (QColor): The new colour
        shapeAdded (_SplineShape): Emits when a new shape is added and finalized
    """
    modelReset = QtCore.Signal()
    widthChange = QtCore.Signal(object)
    colourChange = QtCore.Signal(object)
    shapeAdded = QtCore.Signal(object)

    def __init__(self):
        """
        Constructor
        """
        super(PaintingModel, self).__init__()
        self._shapes = []
        self._width = 1
        self._colour = QtGui.QColor(100, 100, 100)
        self._currentShape = None

    def width(self):
        """
        Get the current width for all new shapes as a int
        """
        return self._width

    def setWidth(self, newWidth):
        """
        Set the current width for all new shapes

        args:
            newWidth (int): The line width
        """
        self._width = newWidth
        self.widthChange.emit(newWidth)

    def colour(self):
        """
        Get the current colour for all new shapes as a QColor
        """
        return self._colour

    def setColour(self, newColour):
        """
        Set the current colour for all new shapes

        args:
            newColour (QColor): The line colour
        """
        self._colour = newColour
        self.colourChange.emit(newColour)

    def splineShapes(self):
        """
        Get a list of shapes as _SplineShape instances
        """
        return self._shapes

    def newShape(self, position):
        """
        Start a new shape

        args:
            position (QPoint): The position to start the new shape at
        """
        newShape = _SplineShape(self._colour, self._width)
        newShape.addPoint(position)
        self._shapes.append(newShape)
        self._currentShape = newShape

    def addPointToCurrentShape(self, position):
        """
        Add a new point to the current shape

        args:
            position (QPoint): The new point to add to the shape
        """
        if self._currentShape is not None:
            self._currentShape.addPoint(position)

    def finishCurrentShape(self):
        """
        Mark the current shape as complete
        """
        self._currentShape.finalizeShape()
        self.beginInsertRows(self.createIndex(0,0), 0, 1)
        self.endInsertRows()
        self.shapeAdded.emit(self._currentShape)
        self._currentShape = None

    def clear(self):
        """
        Clear all the shapes. Will trigger the modelReset signal
        """
        self._shapes = []
        self._currentShape = None
        self.modelReset.emit()
Having the model do all the interaction with the data, means that we have a centralized interface for all actions. One task that we want to do is to be able to erase points. With the use of the _SplineShape’s we quickly do a distance check between a given location and a radius to see which points need to be removed.

This is clearly not a good solution as it badly deforms the orginal shape. Instead we need to find out which points need to be removed and use that to split the orginal shape into smaller shapes, as shapes do not connect so there will be a clear gap in the lines.
Another technical hurdle is that we have to preserve the order of the shapes, making sure that any newly created shapes follow the originals location in the list of shapes.
    def erasePoint(self, location):
        """
        Erase a given point using the location and current width. Will split up lines into differnt
        shapes

        args:
            location (QPoint): The position to erase
        """
        newShapeOffset = 0
        for layerIdx, shape in enumerate(list(self._shapes)):
            idxToRemove = [idx for idx, point in enumerate(shape.points()) if QtCore.QLineF(point, location).length() < self._width]
            if len(idxToRemove) == 0:
                continue
            allPoints = shape.points()
            idxToRemove.insert(0, 0)
            idxToRemove.append(len(allPoints))
            for idx, points in enumerate([allPoints[idxToRemove[idx-1]:idxToRemove[idx]] for idx in xrange(1, len(idxToRemove))]):
                if idx == 0:
                    if len(points) == 0:
                        self._shapes.remove(shape)
                        newShapeOffset -= 1
                    else:
                        shape.setPoints(points)
                else:
                    if len(points) > 1:
                        newShape = _SplineShape(shape.colour(), shape.width())
                        newShape.setPoints(points)
                        # insert so it doesnt change the order
                        self._shapes.insert(layerIdx+newShapeOffset, newShape)
                        self.beginInsertRows(self.createIndex(0,0), 0, 1)
                        self.shapeAdded.emit(self._currentShape)
                        self.endInsertRows()
                        newShapeOffset += 1
The reason using a QAbstractItemModel here is that we can use this model with some standard views that Qt provides for some easy displaying of data, such as with the showing of the individual shapes, all being driven through this one model.
To accomplish this, Qt expects us to implement a few methods which we can somewhat mock out of the QAbstractItemModel to get some of the great benefits without needing some of the children and parent items.
Thanks to this we can throw a QListView on top of the model and see each of the shapes, their name and even get a small thumbnail of it.
When going through the design of the _SplineShape class, I mentioned the need of caching the min and max height & width and this is for that purpose. With this information we can create a QPixmap and use a QPainter with it to draw just the shape, so it is really zoomed in rather than have the render the whole space, which makes it hard to see.
For example this is the effect when the shape info is know and accounted for.
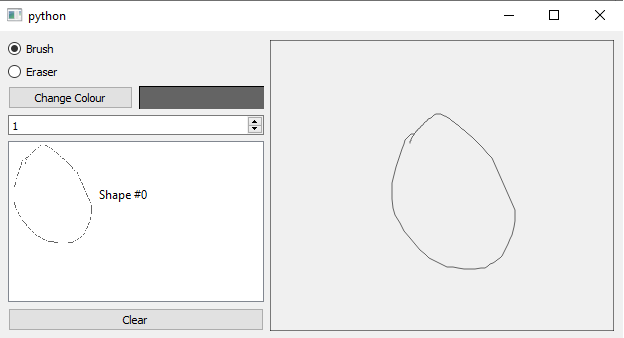
and this is when the whole image has to be drawn. Note that I’ve had to increase the line size to make it visible in the smaller render.
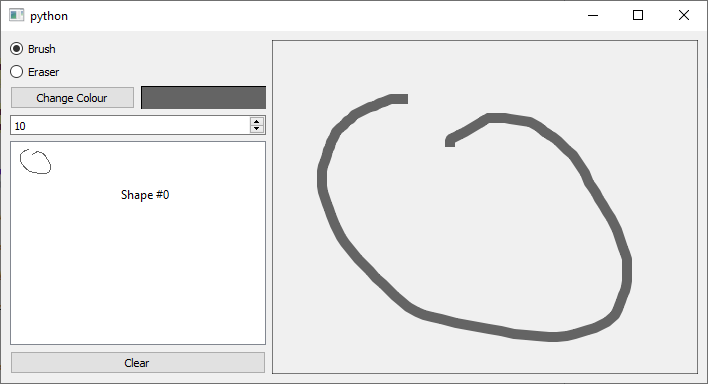
The way that view gets information from the model is through the data method, which uses as index, so the model knows what item its talking about, and the role, which describes what the view is trying to do, be it display text, images, font etc. By using the DisplayRole we can give it a name and with the DecorationRole we can give it a image to display in the view.
    def data(self, index, role=QtCore.Qt.DisplayRole):
        """
        ReImplemented Method

        Get data for the given index of the model given the role
        """
        if not index.isValid():
            return None

        row = index.row()
        if index.column() == 0:
            if role == QtCore.Qt.DisplayRole:
                return "Shape #{}".format(row)

            if role == QtCore.Qt.DecorationRole:
                # Re-Render just this layer
                splineShape = self._shapes[row]
                rect = splineShape.shapeRect()

                img = QtGui.QPixmap(rect.width(), rect.height())

                img.fill(QtCore.Qt.white)
                painter = QtGui.QPainter(img)
                painter.translate(-rect.x(), -rect.y())
                pen = QtGui.QPen(splineShape.colour(), splineShape.width(), QtCore.Qt.SolidLine)
                painter.setPen(pen)
                painter.drawPolyline(splineShape.points())

                del painter
                return img.scaledToHeight(100)
        return None

    def columnCount(self, index=QtCore.QModelIndex()):
        """
        ReImplemented Method

        Get the number of columns in the model
        """
        return 1

    def rowCount(self, index=QtCore.QModelIndex()):
        """
        ReImplemented Method

        Get the number of rows in the model
        """
        return len(self._shapes)

    def index(self, row, column, parent=QtCore.QModelIndex()):
        """
        ReImplemented Method

        Get the index given the row and column. Parent doesnt matter as its a semi fake model
        """
        if parent.isValid():
            return QtCore.QModelIndex()
        return self.createIndex(row, column, self)

    def parent(self, index):
        """
        ReImplemented Method

        Get the index of the model items parent, which is a QModelIndex as this is a fake model
        """
        return QtCore.QModelIndex()
With the model done, we want to make a very simple colour swatch widget, which will take the model instance and draw whatever is the current colour, even if it changes.
This is a very simple widget, and just requires overriding the sizeHint and paintEvent method as well as hooks for the model and we’re all set.
class PaintingModelColourSample(QtGui.QWidget):
    """
    A view on the PaintingModel current colour
    """
    def __init__(self, parent=None):
        """
        Constructor

        kargs:
            parent (QWidget): The parent widget
        """
        super(PaintingModelColourSample, self).__init__(parent=parent)
        self._model = None
        self.setSizePolicy(QtGui.QSizePolicy.Preferred, QtGui.QSizePolicy.Preferred)

    def setModel(self, model):
        """
        Set the current model that the view is using

        args:
            model (PaintingModel): The model to drive this view
        """
        self._model = model
        self._model.colourChange.connect(self.repaint)

    def model(self):
        """
        Get the current model that the view is using
        """
        return self._model

    def paintEvent(self, event):
        """
        ReImplemented Method

        Drawing the colour swatch from the model
        """
        painter = QtGui.QPainter()
        painter.begin(self)

        # Draw box around the widget
        painter.fillRect(0,0,self.width(), self.height(), self._model.colour())
        painter.drawRect(0,0, self.width(), self.height())
        painter.end()

    def sizeHint(self):
        """
        ReImplemented Method

        The size hint of the widget
        """
        return QtCore.QSize(20,20)
Taking what we’ve got from the PaintingModelColourSample widget, we want to start writing our view on the model. This will act to draw the model lines as well as handle the mouse interaction.
class PaintingModelView(QtGui.QWidget):
    """
    A view on the PaintingModel, acting as an interface level between user and model
    """
    def __init__(self, parent=None):
        """
        Constructor

        kargs:
            parent (QWidget): The parent widget
        """
        super(PaintingModelView, self).__init__(parent=parent)
        self._model = None
        self._toolType = PaintingToolEnum.BRUSH
        self.setSizePolicy(QtGui.QSizePolicy.Expanding, QtGui.QSizePolicy.Expanding)

    def setModel(self, model):
        """
        Set the current model that the view is using

        args:
            model (PaintingModel): The model to drive this view
        """
        self._model = model
        self._model.modelReset.connect(self._handleModelReset)

    def model(self):
        """
        Get the current model that the view is using
        """
        return self._model

    def setToolType(self, toolType):
        """
        Set the current tool type to be used by the view

        args:
            toolType (PaintingToolEnum): The current tool being used
        """
        self._toolType = toolType

    def _handleModelReset(self):
        """
        Handle the model's reset signal, repainting to clear the panel
        """
        self.repaint()

    def paintEvent(self, event):
        """
        ReImplemented Method

        Drawing the data in the model
        """
        painter = QtGui.QPainter()
        painter.begin(self)

        painter.setRenderHint(QtGui.QPainter.Antialiasing)

        # Draw box around the widget
        painter.drawRect(0,0, self.width(), self.height())
        basePen = painter.pen()
        if self._model is not None:
            for splineShape in self._model.splineShapes():
                pen = QtGui.QPen(splineShape.colour(), splineShape.width(), QtCore.Qt.SolidLine)
                painter.setPen(pen)
                painter.drawPolyline(splineShape.points())

        painter.setPen(basePen)
        painter.end()

    def mousePressEvent(self, event):
        """
        ReImplemented Method

        Handle the mouse press event, applying the tool to the model if applicable
        """
        if self._model is not None:
            if event.buttons() == QtCore.Qt.LeftButton:
                if self._toolType == PaintingToolEnum.BRUSH:
                    self._model.newShape(event.pos())
                elif self._toolType == PaintingToolEnum.ERASE:
                    self._model.erasePoint(event.pos())
                    pass
                self.repaint()

    def mouseReleaseEvent(self, event):
        """
        ReImplemented Method

        Handle the mouse release event, applying the tool to the model if applicable
        """
        if self._model is not None:
            if self._toolType == PaintingToolEnum.BRUSH:
                self._model.finishCurrentShape()
            self.repaint()

    def mouseMoveEvent(self, event):
        """
        ReImplemented Method

        Handle the mouse move event, applying the tool to the model if applicable
        """
        if self._model is not None:
            if event.buttons() == QtCore.Qt.LeftButton:
                if self._toolType == PaintingToolEnum.BRUSH:
                    self._model.addPointToCurrentShape(event.pos())
                elif self._toolType == PaintingToolEnum.ERASE:
                    self._model.erasePoint(event.pos())
            self.repaint()

    def sizeHint(self):
        """
        ReImplemented Method

        The size hint of the widget
        """
        return QtCore.QSize(100, 100)
In the original article, I used a .UI file to combine all these new widgets, but that approach has a lot of drawbacks, so nowadays I prefer to just write it out all in code. The final tool to bring this together is very simple, just adding all the widgets and models, and attaching a few signals up and we’re done!
class PaintingTool(QtGui.QMainWindow):
    """
    Demo Tool Window
    """
    def __init__(self):
        """
        Constructor
        """
        super(PaintingTool, self).__init__()
        self.setupUi()

    def setupUi(self):
        """
        Setup the UI and the model.
        """
        # Layout
        buttonLayout = QtGui.QVBoxLayout()
        colourLayout = QtGui.QHBoxLayout()
        mainLayout = QtGui.QHBoxLayout()

        # Widgets
        mainWidget = QtGui.QWidget()
        self._brushRadio = QtGui.QRadioButton("Brush")
        self._eraserRadio = QtGui.QRadioButton("Eraser")
        changeColourButton = QtGui.QPushButton("Change Colour")
        self._colourSample = PaintingModelColourSample()
        self._thicknessSpinner = QtGui.QSpinBox()
        clearButton = QtGui.QPushButton("Clear")
        self._drawingFrame = PaintingModelView()
        self._layerView = QtGui.QListView()

        # Model
        self._paintingModel = PaintingModel()

        # Configure
        self._brushRadio.setChecked(True)
        self._thicknessSpinner.setMinimum(1)
        self._thicknessSpinner.setValue(self._paintingModel.width())
        self._drawingFrame.setModel(self._paintingModel)
        self._colourSample.setModel(self._paintingModel)
        self._layerView.setModel(self._paintingModel)
        self._layerView.setSizePolicy(QtGui.QSizePolicy.Preferred, QtGui.QSizePolicy.Expanding)

        # Widgets to Layouts
        colourLayout.addWidget(changeColourButton)
        colourLayout.addWidget(self._colourSample)

        buttonLayout.addWidget(self._brushRadio)
        buttonLayout.addWidget(self._eraserRadio)
        buttonLayout.addLayout(colourLayout)
        buttonLayout.addWidget(self._thicknessSpinner)
        buttonLayout.addWidget(self._layerView)
        buttonLayout.addWidget(clearButton)

        mainLayout.addLayout(buttonLayout)
        mainLayout.addWidget(self._drawingFrame)

        # Layouts to Widgets
        mainWidget.setLayout(mainLayout)
        self.setCentralWidget(mainWidget)

        # Signals
        self._thicknessSpinner.valueChanged.connect(self._handleThicknessChange)
        changeColourButton.pressed.connect(self._handleChangeColour)
        clearButton.pressed.connect(self._handleClearButton)
        self._brushRadio.toggled.connect(self._handleToolTypeChange)
        self._eraserRadio.toggled.connect(self._handleToolTypeChange)

    def _handleThicknessChange(self, newValue):
        """
        Handle the Thickness value change to pass it on to the model
        """
        self._paintingModel.setWidth(newValue)

    def _handleChangeColour(self):
        """
        Handle the Colour change to pass it on to the model
        """
        colourDialog = QtGui.QColorDialog(self._paintingModel.colour())
        if colourDialog.exec_():
            self._paintingModel.setColour(colourDialog.selectedColor())

    def _handleClearButton(self):
        """
        Handle the clear button press
        """
        self._paintingModel.clear()

    def _handleToolTypeChange(self):
        """
        Handle the tool type changeing
        """
        if self._brushRadio.isChecked():
            self._drawingFrame.setToolType(PaintingToolEnum.BRUSH)
        elif self._eraserRadio.isChecked():
            self._drawingFrame.setToolType(PaintingToolEnum.ERASE)
This is far from a perfect implementation, and optimization hasn’t been a concern, but a good look at creating and using Qt’s Models for non-standard problems and how we can leverage them.
Its also worth noting that this whole project was done in Python 2.7 with PySide, but shouldn’t pose a problem to port over to Python 3 with PySide2 and would require minimal changes.
What’s great about this is that it’s a great platform to expand and, adding in new brush tools, options to save/load, folders for layers/shapes!
Download the full code below and have a go!
Thanks for reading
– Geoff Samuel
Making brighter Futures with Qt 19 May 2020, 4:11 am
Like many developers in Vfx and Games, I’ve been spending a lot of time looking at Python3 and what it new concepts it brings to the table. One that caught my eye is the new futures module.
The basic concept is that smaller self-contain tasks can be offloaded to a thread and later on the main code will ask for the results of that task, resulting in the main thread blocking until the task is finished, or just being able to give the result back if it’s completed.
with ThreadPoolExecutor(max_workers=1) as executor:
    future = executor.submit(pow, 323, 1235)
    print(future.result())
I love it! It opens up so many possibilities for pushing work to threads as well as being easy to integrate into existing code.
Sadly this is only in Python 3.5+, which is still not my go-to python version of choice, as well as PySide not really having any equivalent exposed in PySide (very happy to be corrected if I’m wrong).
So I started thinking about how this could be implemented. The obvious choice was to use the QRunnable class as the thread management is taken care of, but the drawback is that its one of the few Qt objects that cannot emit signals. Whilst the QRunnable is incapable of having signals, we can get around that by adding a QObject instance to it which can have signals.
Combining this design with the QRunnables and allowing for the main thread to wait until a signal is emitted (which I talked about in detail in my last post: http://geoffsamuel.com/2020/05/11/holding-for-the-applause-signal/) the code pretty much writes itself.
One design choice I wanted to add was use class and static methods to generate the jobs, rather than use context managers as I feel this leaves the code looking more readable as well as taking up less lines of code on the page.
import sys
import time

from PySide import QtCore


class _QFuturesStates(object):
    """
    The States of the QFutures
    """
    PENDING = 0
    PROCESSING = 1
    FINISHED = 2


class _QFuturesSignals(QtCore.QObject):
    """
    Class to emit signals
    """
    finishedSignal = QtCore.Signal()


class QFutures(QtCore.QRunnable):
    """
    QFutures Class
    """
    def __init__(self, function, *args, **kwargs):
        """
        Constructor

        args:
            function (method): The method to run
            *args + **kwargs: Arguments to be passed into the function to be run
        """
        super(QFutures, self).__init__()
        self._signals = _QFuturesSignals()

        self._state = _QFuturesStates.PENDING
        self._function = function
        self._args = args
        self._kwargs = kwargs
        self._result = None

    @staticmethod
    def submitToPool(pool, function, *args, **kwargs):
        """
        Static Method

        Submit the function to be run on a given QThreadPool instance

        args:
            pool (QThreadPool): The thread pool to run this function
            function (method): The method to run
            *args + **kwargs: Arguments to be passed into the function to be run
        """
        newFutures = QFutures(function, *args, **kwargs)
        pool.start(newFutures)
        return newFutures

    @staticmethod
    def submit(function, *args, **kwargs):
        """
        Static Method

        Submit the function to be run on the global threading pool

        args:
            function (method): The method to run
            *args + **kwargs: Arguments to be passed into the function to be run
        """
        newFutures = QFutures(function, *args, **kwargs)
        pool = QtCore.QThreadPool.globalInstance()
        pool.start(newFutures)
        return newFutures

    def run(self):
        """
        Re-Implemented Method

        The run logic of the QRunnable, call the function and store the results
        """
        self._state = _QFuturesStates.PROCESSING
        self._result = self._function(*self._args, **self._kwargs)
        self._state = _QFuturesStates.FINISHED
        self._signals.finishedSignal.emit()

    def result(self):
        """
        Gets the results of the function, will wait if the process isnt finished
        """
        if self._state != _QFuturesStates.FINISHED:
            self._wait()
        return self._result

    def _wait(self):
        """
        Blocking method to wait until the process is finished
        """
        if self._state == _QFuturesStates.FINISHED:
            return
        loop = QtCore.QEventLoop()
        self._signals.finishedSignal.connect(loop.quit)
        loop.exec_()
An easy way to test that everything is working as expected is to have a small method which will sleep for a set amount of time, and return a given value.
def sitAndWait(timeToWait, valueToReturn):
    """
    Demo method to wait for a given time, and return the given value
    """
    print "{} starting".format(valueToReturn)
    time.sleep(timeToWait)
    print "{} finished".format(valueToReturn)
    return valueToReturn


print "Start - Global Pool"
app = QtCore.QCoreApplication(sys.argv)

data1 = QFutures.submit(sitAndWait, 10, 2)
data2 = QFutures.submit(sitAndWait, 15, 3)
data3 = QFutures.submit(sitAndWait, 8, 4)

print "results for {}".format(sitAndWait(5, 1))

print "results for {}".format(data1.result())
print "results for {}".format(data2.result())
print "results for {}".format(data3.result())

print "Done"
Which outputs:
Start - Global Pool
1 starting
2 starting
3 starting
4 starting
1 finished
results for 1
4 finished
2 finished
results for 2
3 finished
results for 3
results for 4
Done
And that shows that it’s working as expected, the main thread was blocking until task 2 was finished, but when it came to wanting the results of task 4, they were ready.
We can modify the test to use a QThreadPool as well, using the QFutures.submitToPool method, giving us the ability to pre-allocate the pool to use for the task load, in this example, a more limited amount of threads.
print "Start - Thread Pool"
pool = QtCore.QThreadPool()
pool.setMaxThreadCount(2)
data1 = QFutures.submitToPool(pool, sitAndWait, 10, 2)
data2 = QFutures.submitToPool(pool, sitAndWait, 15, 3)
data3 = QFutures.submitToPool(pool, sitAndWait, 8, 4)

print "results for {}".format(sitAndWait(5, 1))

print "results for {}".format(data1.result())
print "results for {}".format(data2.result())
print "results for {}".format(data3.result())

print "Done"
Which outputs:
Start - Thread Pool
1 starting
2 starting
3 starting
1 finished
results for 1
2 finished
4 starting
results for 2
3 finished
results for 3
4 finished
results for 4
Done
So by combining some simple Qt tricks, we can make a Qt based Futures class to greatly speed up and offload smaller tasks, which a very minimal API change to existing code. It’s something I wished I knew about years ago and will be using a lot more in the futures!
– Geoff Samuel