Add your feed to SetSticker.com! Promote your sites and attract more customers. It costs only 100 EUROS per YEAR.
Pleasant surprises on every page! Discover new articles, displayed randomly throughout the site. Interesting content, always a click away
Abundance in Business LLC
Taking Care of Your Financial Clarity using QuickbooksHow Do You Track Jobs in QuickBooks Desktop? Part 2 4 Mar 2019, 12:39 am
In this second of a two-part series, we’ll explore how you use the job-related records you’ve created.
Last month, we showed you how to start building a foundation for tracking jobs in QuickBooks. We explained that you can use the software’s jobs tools to track income and expenses for any related group of items and/or services (you can think of them as projects, if you prefer).
We covered three elements of preparing to use “jobs”:
- Creating job records that you can use in transactions (example: develop promotional materials)
- Creating item records that can be assigned to jobs (example: website development)
- Determining whether you’ll need to create a new account in your Chart of Accounts for your job income and expenses. You should consult with us anytime you think it might be necessary to modify the Chart of Accounts.
Using Your Job-Related Records
Now that you’ve recorded the items and jobs themselves, you can start using them in transactions, and eventually track your progress by generating reports.
Let’s say you worked eight hours on website development for your promotion job. You’d open the Employees menu and select Enter Time | Time/Enter Single Activity to open this window:
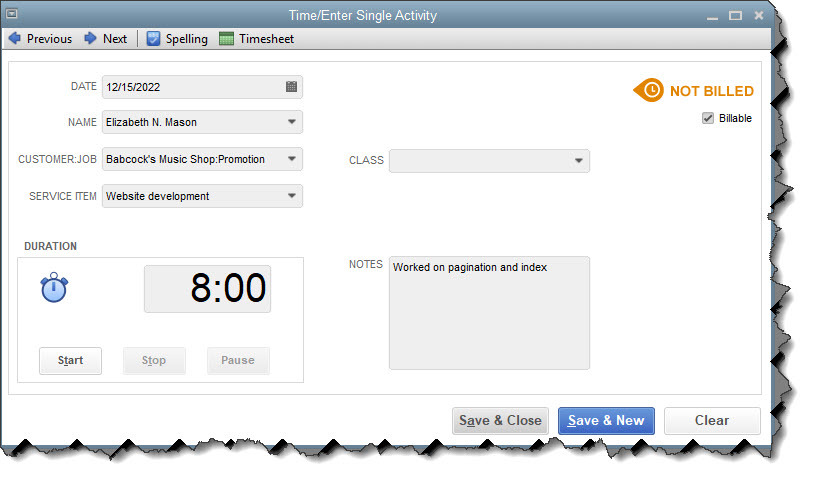
You can enter individual, billable activities and assign them to jobs.
In the example above, you’re limited to recording one day’s work on a specific SERVICE ITEM. You’d verify the date and select from the drop-down lists to complete the fields for employee NAME, CUSTOMER:JOB, and SERVICE ITEM. You can either use the timer to time the job or enter the number of hours manually in the DURATION box. Click in the Billable box to create a checkmark and add NOTES if you’d like. The CLASS field is optional; talk to us if you’re not familiar with this feature.
If you worked on two separate service items on the same day for that CUSTOMER:JOB, you would create two individual records. You can also enter billable activities directly on a timesheet by clicking Employees | Enter Time | Use Weekly Timesheet. Once you select the employee NAME at the top, any single activity(ies) you created that week will appear as individual records, and vice versa.
Writing a check or using a credit card for a job-related purchase that should be billed to the customer? You’d fill out these forms in QuickBooks like you usually do, making sure that you document the items or services by highlighting the Items tab, select the correct CUSTOMER:JOB, and make a checkmark in the BILLABLE? column.

If you write a check or charge your credit card for purchases that can be billed to a CUSTOMER:JOB, be sure to record it in QuickBooks.
If you’ll be doing some billable driving for your job, you should also be tracking your mileage in QuickBooks. Open the Company menu and select Enter Vehicle Mileage. If you haven’t created a VEHICLE record in QuickBooks, click <Add New> and easily do so. Complete the rest of the fields and save.
Tip: Do you want to see some of your overhead expenses on job costing reports? Create a CUSTOMER:JOB named “Overhead” and assign related costs to it.
Billing the Billables
When
the time comes to invoice your customers (Customers
| Create Invoices), you’ll see how your careful work in QuickBooks
simplifies that task. Open an invoice form and select a CUSTOMER:JOB. If you’ve entered billable items for him or her, this
small window will open:
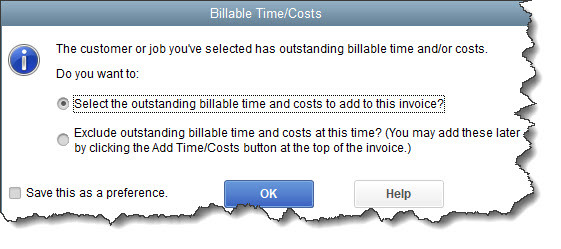
When you create an invoice for a CUSTOMER:JOB who has billable time, mileage, or other expenses, QuickBooks can automatically add them.
If you leave the first option checked and click OK, another window will open that lists all of the expenses you’ve marked as billable to the customer, arranged by type. Click in the first column of each expense you want to include and click OK. Your invoice containing those entries will open. Do any editing necessary, and then save it.
Note: You’ll probably notice two fields in the Choose Billable Time and Costs window that refer to Markup. This is an advanced concept that we can explore with you, should you want to charge customers more for expenses you’ve incurred on their behalf.
Related Reports
QuickBooks contains a wide variety of reports related to your work billing customers for jobs. Click Reports in the navigation pane or Windows menu, then Jobs, Time & Mileage to see what’s available. Choose a date range and click Run to see them appear with your own data.
If you’ve never worked with jobs in QuickBooks, we strongly recommend that you let us help you here. There are a lot of moving parts, and you don’t want to miss out on any of your efforts or expenses that are billable.
Could Your Sales Invoices Be Better? How QuickBooks Online Can Help. 2 Mar 2019, 4:14 pm
Every interaction with your customers can enhance your image. Here’s how QuickBooks Online contributes to that.
Getting paid by your customers—on time, and in full—can take some effort on your part. You set smart due dates and enforce them. Price your products and services so they’re both reasonable and profitable. Accept online payments.
But are your invoices working for you here? QuickBooks Online provides sales form templates that you can usually use without modifying. But it also offers tools that support multiple kinds of customization. It helps you shape the content and appearance of your invoices and their accompanying messages to be consistent with your company’s brand.
These may be cosmetic changes, but they can affect the way customers react to communications from you. You have few chances to make an impression, so anything you can do to enhance and personalize every interaction will have impact on their impression of you. Neat, well-designed sales forms convey professionalism and attention to details.
Here’s a look at what you can do.
Editing Fields
Unless you use every single field in QuickBooks Online’s default sales form template, your invoices will look sloppier than they might otherwise. The site gives you control over much of the content that your customers will see. To make changes, click the gear icon in the upper right of the screen and select Account and Settings, then Sales. You’ll see Sales form content in the left column. Click on any of the fields to the right to open a more thorough list of options.
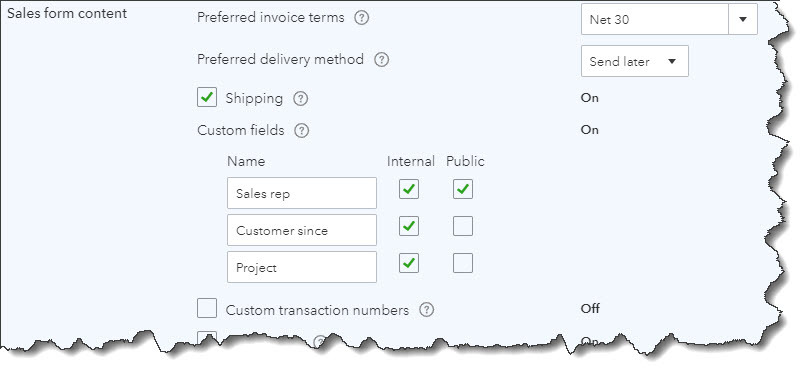
QuickBooks Online lets you turn fields on and off in your sales forms and specify other preferences.
Click on the status (On, Off) in the right column to change it. When you’re satisfied with your selections, click Save. Then close that window by clicking the X in the upper right corner.
You have more options than these. Click the gear icon again, and then Your Company | Custom Form Styles. You’ll see that there is already a “master” form. You can either edit it or create a new one. We recommend leaving the master form alone so you always have a clean copy to consult if you get tangled up while you’re working.
Click the down arrow in the New style box in the upper right and select Invoice. In the screen that opens, enter a descriptive name for your template in the field at the top and then click Content. A graphical representation of your invoice will appear in the right pane, grayed out. It’s divided into three sections: header, footer, and table (the middle of the invoice where you describe what you sold). Each displays a small pencil icon on the right side of the screen. Click the one in the middle to make that area more visible.
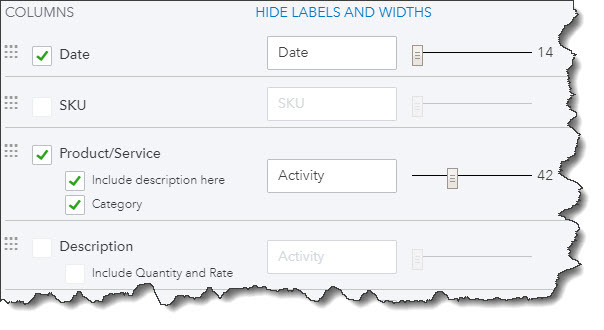
It’s easy to specify which fields should appear on your invoices, what the labels should say, and how wide the space should be.
As you check and uncheck boxes to indicate what content should be included, your invoice on the right will change to reflect your actions. You can Preview PDF by clicking that button in the lower right. When you’re satisfied with the changes you’ve made to all three sections, click on the Design tab.
Changing the Look
You don’t have to be a graphic artist to have QuickBooks Online forms that look attractive and consistent, which highlight your brand. The site provides tools that give you control over the appearance of your invoices, not just their content. Click each link below the Design tab to:
- Choose a template.
- Add your company’s logo.
- Select a color scheme and fonts.
- Change the printer settings to accommodate letterhead, for example.
Choosing Your Words
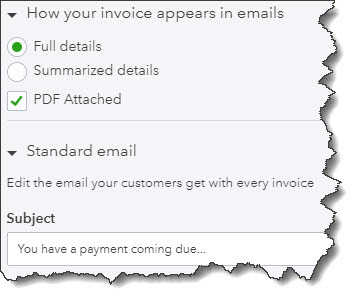
You have control over the messages that go out with your invoices.
Finally, click the Emails tab. Options here let you customize the emails that are sent to customers along with their invoices. Again, changes you make in the left pane will be reflected in the graphical version on the right side.
When you’ve completed all of your modifications, click Done.
We gave you this whirlwind tour of QuickBooks Online’s invoice customization options so you’d know what was possible. We expect you might need some assistance when you sit down to apply the concepts you’ve learned about to your own company’s sales forms. We’re available to help you present a polished, carefully-crafted image representing your brand to your customers.
How Do You Track Jobs in QuickBooks Desktop? Part 1 3 Feb 2019, 12:30 am
If your business divides some of its work into specific jobs and you’re not tracking them individually, you’re missing out on valuable insight.
Job-costing is not just for contractors. That’s probably the most common understanding of this concept in QuickBooks, but you can also use the software’s jobs tools to track income and expenses for any related group of items and/or services.
Think of them as projects. If you’re an expert in business promotions, for example, you probably have multiple projects going on simultaneously that consist of materials you might need to order for your client (like special paper) and the actual work you do (design, content-creation, etc.). You could also have to track expenses like mileage, and you may price your services by the hour.
QuickBooks can handle all of this. If you’re conscientious about documenting all of the pieces that go into every job, you’ll be able to run reports that show you how much you spent and took in on each. This information can help you better price your services and manage your time to maximize profitability.
Many Elements
In this first part of a two-column series, we’re going to explore the basic elements that go into job-tracking. Keep in mind that there are many different ways to work with jobs. How you choose to do it will depend on the structure of your business. We can help you devise a plan.
We’ll look at a simple example here. The first step involves setting up a job for an existing client. Even if you think you’re only going to be doing one project for them, you can still set it up as a jobso you can assign all related income and expenses to it. This will make it much easier if you get additional work from the customer down the line – and if you have to bill the customer for something that’s not related to a specific project.
To create a job, open the Customers menu and select Customer Center. Make sure the Customers & Jobs tab is highlighted. Select the customer by clicking on it. Right-click the name and select Add Job from the drop-down list. When the New Job window opens, click the Job Info tab.
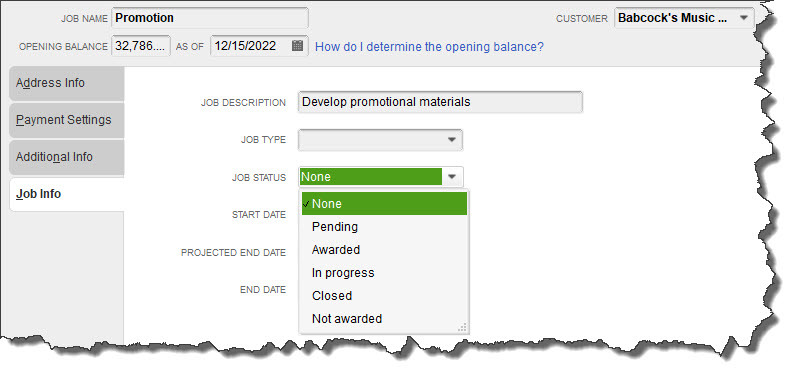
You can track your Jobs by keeping their status current in the New Job window.
Fill in the Job Name field. In this example, we’ve selected a name that’s broad enough that we’ll eventually be able to break down into specific tasks. If your customer has an outstanding balance as of the current date, that amount will appear in the Opening Balance field.
Enter a Job Description. The Job Type field is optional, but creating these classifications can help with advanced reports that gauge profitability. Consult with us if you want to explore these.
Open the Job Status list and select the correct one, then choose a Start Date and Projected End Date. You’ll document the End Date when you’re finished. Click OK.
Creating Item Records
You may already know that if you buy and/or sell products and/or services, you have to set up individual records for each one so you can include them on sales and purchase forms. You’ll need these to record income and expenses related to your Promotion job. If you’re new to QuickBooks, here’s how it works.
Open the Lists menu and select Item List. In the window that opens, click the arrow next to Item in the lower left corner and select New. A window like this will open:
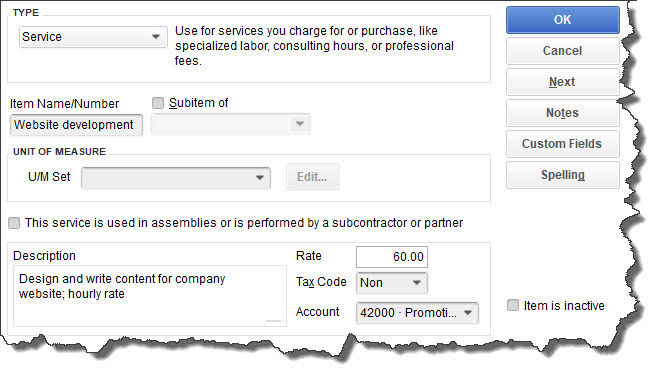
The New Item window
The Item Type list will drop down. Select Service. In the example above, you’re creating a record for a service you sell: Website Development. Enter that in the Item Name/Number field. Ignore the U/M Set field; this is not available in QuickBooks Pro or Premier.
Enter a Description and your hourly (or project) Rate. Choose the correct Tax Code statusand select the Account. When you’re done, click OK.
Warning: You may not have an Account in your Chart of Accounts that fits the specialized income and expenses you want to track. Let us help you set one up.
You’ll repeat this process for other types of promotional work you do (making flyers and brochures, designing and ordering branded products, general content creation, etc.).
Think It Through First
Before you create your first job, spend time envisioning how you want it structured. Remember that every invoice or timed activity or other income or expense you enter will only be assigned to one Customer:Job, but you can include as many Items as you want. As we said, we’re happy to help you think this through and go through setup with you.
Next month, we’ll demonstrate how the records you’ve created can be used.
How Does QuickBooks Online Handle Mobile Expenses? 2 Feb 2019, 11:09 pm
If you purchase several items and services away from the office, QuickBooks Online can help you record them while you’re out and about.
QuickBooks Online’s mobile app, available at the Apple App Store and Google Play, can do many of the same tasks that it performs on your office desktop. You can, for example:
- Check account balances.
- Add and edit estimates, invoices, and sales receipts.
- Add and edit customers, vendors, products, and services.
- Record invoice payments.
One of the most common uses of the app, though, is the recording of expenses. Rather than coming home from a trip with your briefcase stuffed full of receipts and notes about purchases you made, you can document them on the road using your mobile device. When you get back to the office and log on to QuickBooks Online, they’ll all be there.
How It Works
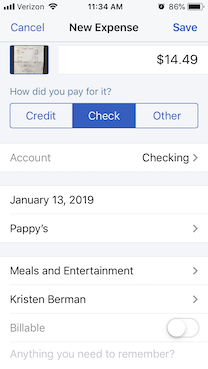
You can snap a photo of a receipt with your smartphone and attach it to an expense you record in QuickBooks Online’s mobile app.
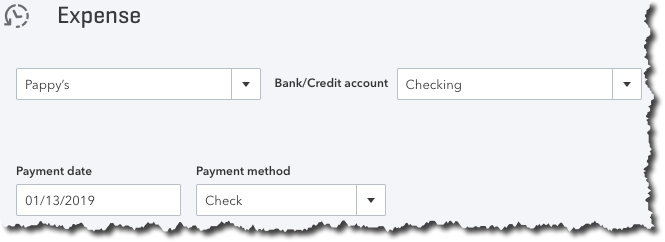
Open your QuickBooks Online mobile app and click the plus (+) sign at the bottom, then tap the Expense icon. The New Expense screen will open. If you have a paper receipt, lay it flat on a table in a well-lighted area. Click the camera icon and then the Take Photo link. If you took the picture outside of QuickBooks Online for some reason, you’d select the Choose Existing link. Your device’s camera will open, and you’ll see four squared corners on the edges of the screen.
Hover your device over the receipt. You’ll need to position the camera so the receipt area that you want captured appears within the four corners. QuickBooks Online will provide advice along the way to help you do this. When you’re in the right place, you’ll see the phrase, Great! Snap the pic. Click the shutter icon below, and your device will snap the photo and display it. If you want to use it, click Use this photo (if you want to try again, click the X in the upper left of the screen).
QuickBooks Online will open the New Expense screen. You’ll see a miniature version of your receipt in the upper left corner. Looking at your original version—it will be too small to see here—fill in the blanks with the data from the purchase. Be sure to click the Billable button if you can bill someone else for it. Make any notes you’ll need in order to remind yourself of the transaction, and Add a Split if you need to divide the transaction between categories, customers or vendors, or billable status. Click Save when you’re done.
Automatic Synchronization
Once you’ve entered an expense in QuickBooks Online’s mobile app, it will be synchronized with your desktop, browser-based version.
Of course, no duplicate data entry is required once you’ve entered a receipt in the QuickBooks Online mobile app – the two versions always update each other.
Once you’re back at your desktop, on the browser-based version of QuickBooks Online, click Expenses in the toolbar to open the Expense Transactions screen. You should see the transaction you just created on your mobile device first in line on the list that displays. Click View/Edit at the end of that line to see it. Look toward the bottom under Item Details to see the link to an attachment that contains the photo you snapped of the receipt.
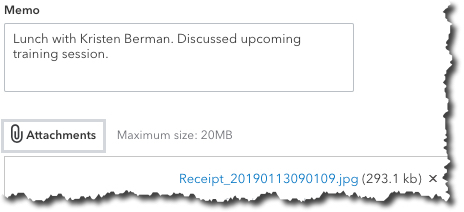
The record of the expense you entered on your mobile device will contain a link to an attachment that contains the photo of your receipt.
Of course, you don’t have to take a picture of your receipt with your mobile device. You can simply enter the details of your expense and Save the record.
QuickBooks Online’s mobile app can help you save time and improve the accuracy of your work done away from the office. As we mentioned earlier, the app is capable of doing much more than simply recording receipts. We’d be happy to run you through its pieces to make sure your remote accounting work is done correctly.
How to Apply Finance Charges in QuickBooks Desktop 20 Jan 2019, 10:00 pm
You may hate to have to do it, but assessing finance charges for late payments may improve your overall cash flow.
There are a myriad of ways to bring in customer payments faster and improve your cash flow. You can:
- Get a merchant account and let customers pay you electronically
- Offer a discount for early payments
- Shorten the payment due cycle (21 days instead of 30 days, for example)
- Be more aggressive about collections
QuickBooks can help you take all of these steps. It also offers a fifth option: assess finance charges for tardy remittances.
Maybe you don’t want to do this because it seems like a less-than-friendly way to treat customers – especially valued ones. But you’re not in the business of lending money, which is what you’re doing when you continue to let your accounts receivable slide. So, here’s how to do add finance charges to your payment policies.
Multiple Issues Involved
Before you can start adding finance charges to tardy payments, you’ll need to let QuickBooks know how you want them handled. Open the Edit menu and select Preferences. Click the Finance Charge tab in the left vertical pane, then the Company Preferences tab in the window that opens. You’ll see something like this:
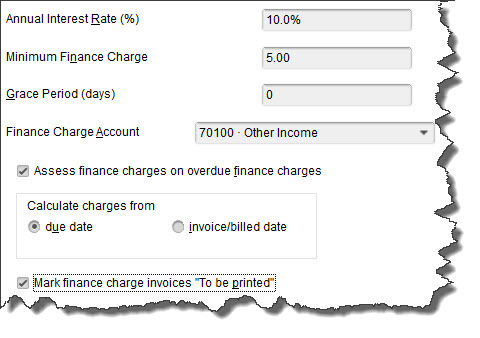
You’ll need to decide on your QuickBooks Finance Charge settings before you can begin to apply these late fees.
What Annual Interest Rate will you charge? Will there be a Minimum Finance Charge? Do you want to offer a Grace Period? If you’ve never worked with finance charges before, you might be at a loss as to how you should answer these questions. We can talk it through with you if you’d like, and make sure you’re selecting the correct Finance Charge Account. In our example, QuickBooks defaulted to 70100 – Other Income, which may be the best option for you.
The next question may require some research. Some jurisdictions don’t allow you to Assess finance charges on overdue finance charges; you’ll need to find out. If there’s any doubt, make sure that the box in front of that option isn’t checked.
QuickBooks also needs to know on what date it should start calculating finance charges: on the due date or invoice/billed date. Finally, check the box in front of Mark finance charge invoices “To be printed.” QuickBooks doesn’t include finance charges on invoices themselves; it bills them on separate invoices. Check this box if you want the software to print all of them as a batch.
When you’re done here, click OK.
Applying the Charges
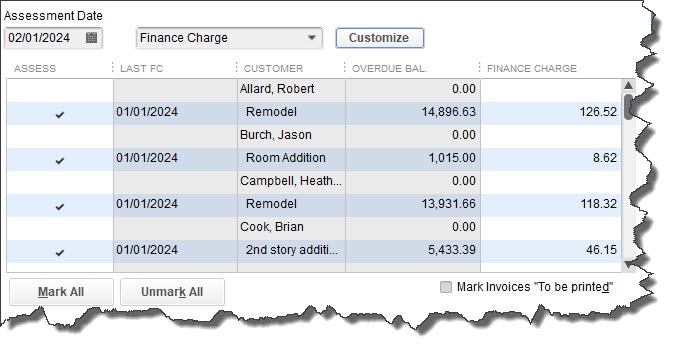
By selecting an Assessment Date, you’re telling QuickBooks how many late days should be included in its finance charge calculations.
When you’re ready, open the Customers menu and select Assess Finance Charges. A window like the one in the image above will open.
QuickBooks, of course, performs all of the required calculations in the background. But it must first know what specific date you plan to actually assess the charges so that it can determine the number of late days that should be included. This may not be the current date, so be sure the Assessment Date is correct before proceeding.
All you have to do here is make sure there’s a check mark in front of every finance charge that should be invoiced (they’ll probably already be there, but you should verify this). If you send statements, clear the box in front of Mark Invoices “To be printed.” The finance charges will appear on the next statement.
When you’re satisfied, click Assess Charges.
Dispatching the Charges
Your finance charges have now been recorded in QuickBooks as individual invoices. When it’s time to print, open the File menu and select Print Forms | Invoices. You’ll see your numbered finance charge invoices displayed like this:
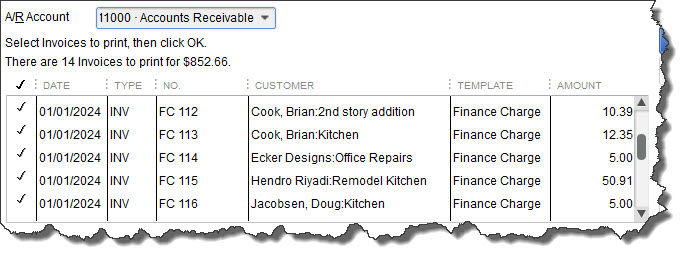
You can see your finance charge invoices when you go to print them.
(Of course, if you email invoices, you’d click on File | Send Forms.)
It’s a good idea to notify your customers before you start assessing finance charges. This will give them a chance to catch up, and no one will be surprised to see the extra invoices.
QuickBooks does the hefty lifting as far as calculations are concerned, but it’s very important that you set your finance charges up correctly. Customers will be annoyed by mistakes. And it’s much easier for us to help you get this tool set up right from the start than to have to go in and untangle errors. Let us know if you plan to start assessing finance charges, and we’ll help make it work for you.
Resolve to Do Three Things in QuickBooks Online This Month 19 Jan 2019, 12:52 am
‘Tis the season for making resolutions and setting goals. Try exploring these three areas to dig deeper into QuickBooks Online.
By now, many New Year’s resolutions have already been made – and broken.Though they’re usually created with the best of intentions, they’re often just too ambitious to be realistic.
For example, you might decide to learn more about QuickBooks Online and keep up with your accounting chores more conscientiously in 2019. That’s hard to quantify. How will you know if you achieved that goal?
Instead, why not pick three (or more) specific areas and focus on them this month? We’ll get the ball rolling for you by making some suggestions.
Explore the QuickBooks Online mobile app:
Yes, QuickBooks Online itself is already mobile; you can access it from any computer that has an internet connection and browser. But you probably don’t always lug a laptop around when you’re away from the office, and you’re sometimes at locations where using it wouldn’t be practical. But you can always pull out your smartphone and fire up the QuickBooks online app, available for both iOS and Android.
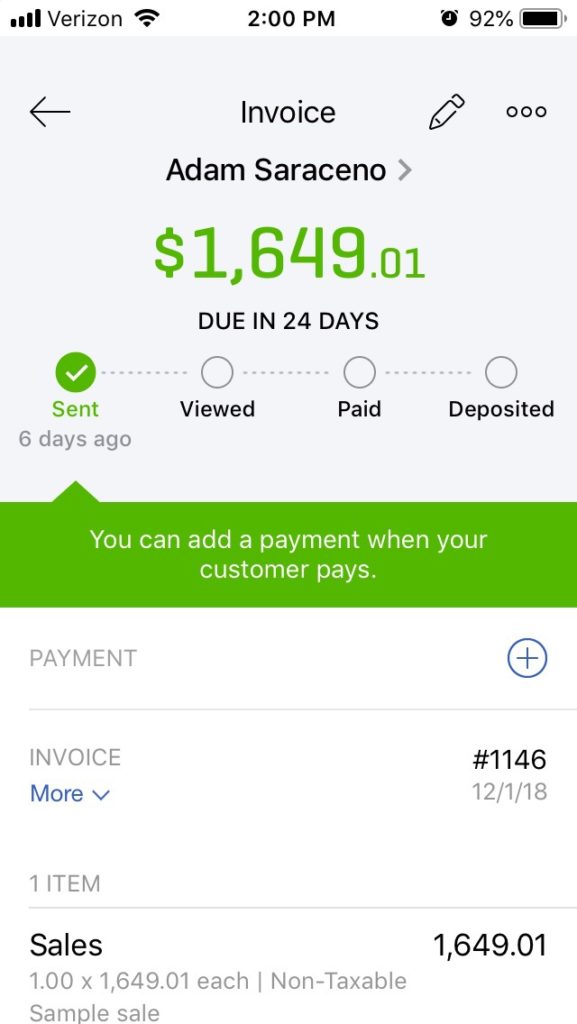
No matter how small your smartphone (this image was captured on an iPhone SE), you can still do your accounting tasks using QuickBooks Online’s app.
QuickBooks Online’s app replicates a surprising percentage of the features found on the browser-based version. You can create, view, and edit invoices, estimates, and sales receipts for example, as well as see abbreviated customer and vendor records. Your product and service records are available there, including tools for recording expenses on the road.
Create a budget for one month:
Budgets are intimidating. That’s one reason why some small businesses don’t create them. So instead of trying to estimate what your income and expenses will be for an entire fiscal year, just build a budget for one month. In QuickBooks Online, you’d click the gear icon in the upper right, then select Budgeting. Click Add budget in the upper right to open the New Budget window.
Give it a name, like “February Budget,” and select FY2019. Leave the Interval at Monthly, and open the Pre-fill data? menu to click on Actual data – 2018 (if you have data from last year). Then click Create Budget in the lower right corner. Look at last year’s February numbers and estimate how they might change in 2019. Replace the old numbers with your new ones.

Creating a framework for a budget in QuickBooks Online is easy.
We’re suggesting you try it for just one month, so you get a feel for how this tool works. And that experiment will probably leave you with some questions. We can help you go further and complete an annual budget.
Customize your sales forms:
Every piece of paper and email you send to your customers contributes to their impression of you. Are you presenting an attractive, consistent image of your business to them? QuickBooks Online can help with this. It offers simple (for the most part) tools that allow you to modify the boilerplate forms offered on the site – without being an experienced graphic designer.
Start by clicking on the gear icon in the upper right and selecting Your Company | Custom Form Styles. Unless you’ve done some work in this area before, the screen that opens will have just one listed entry: your Master form, the one that comes standard in QuickBooks Online. To see what you can do, click Edit at the end of that line. Your four options are:
- Design. This section contains links to modifications you can make to your sales forms’ visuals. You can, for example, add a logo or color and change the default fonts.

Want to change your logo or other elements of your sales forms? QuickBooks Online has the tools.
- Content. Do you want to add or remove the standard columns (Date, Quantity, etc.) displayed on your invoices? You can do so by checking and unchecking boxes.
- Emails. QuickBooks Online sends email messages with forms; you can edit them here.
- Payments. This is a reminder that QuickBooks Online supports online payments, which can help you get paid faster.
There’s more you can do to make your sales forms look professional and polished. We can help you with these tools – and any others you want to explore to expand your use of QuickBooks Online. It’s a new year, and who knows what might come your way over the next 12 months? Contact us if you want to prepare for the new accounting challenges that 2019 might present.
Customer Statements in QBO: When, Why, and How 25 Oct 2018, 2:27 am
If your business relies on invoices to get paid, there may be times when you need to create and send statements.
You enter into an informal contract with a customer when you send an invoice. You expect that you will receive payment in a timely fashion for goods or services you’ve sold.
That probably works most of the time. But what happens when it doesn’t, when you’ve sent a reminder and are still waiting? And what do you do when a customer orders frequently and is confused about what’s been paid and what hasn’t?
If you’re using QuickBooks Online, you can easily send a statement, a list of sales transactions, credits, and payments. There are three kinds of these:
- Balance Forward. This document emphasizes what’s currently owed by displaying it at the top. Below that is a list of sales transactions that occurred between two dates you specify.
- Open Item. You select a date, and the statement shows all transactions that were completed before it.
- Transaction Statement. There’s no total balance here, just the amounts billed and received for every transaction.
Setting Up Statements
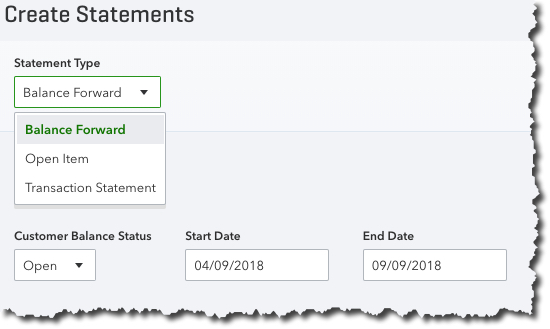
Balance Forward statements cover a period of transactions that you define.
There are three way to create statements. You can:
- Click the Plus (+) icon at the top of the screen.
- Dispatch one while you’re in a customer record.
- Launch a batch action from the Customer
Before you create your first statement, though, make sure QuickBooks Online is set up the way you want it to be. Click the gear icon in the upper right of the screen and select Your Company Account and Settings. Click the Sales tab and scroll down to Statements. Click Statements to open the options there.
You can List each transaction as a single line or List each transaction including all detail lines. Click the button in front of the one you prefer. If you want to Show aging table at bottom of statement, click in the box. This will show customers how many days each transaction is overdue.
Click Save when you’re done.
Creating Statements
If you’ve already started entering transactions so there’s some data in QuickBooks Online, click the Plus (+) icon in the upper right corner of the screen.
Tip: If you don’t see the plus (+) icon, you’re in an active screen. Click the X in the upper right to close it, saving it first if necessary.
Click Statement, which is located under Other on the far right. Under Statement Type, select Balance Forward. Below that is the Customer Balance Status field. Do you want to see customers with open balances, those who have overdue invoices, or all customers? The third option will include credit memos.
Select a Start Date and End Date. In this example, these were 04/09/2018 and 09/09/2018, and the statement date was 09/10/2018. Click Apply. QuickBooks Online will display a list of matching customers. Click Print or Preview at the bottom of the screen to see your statements.
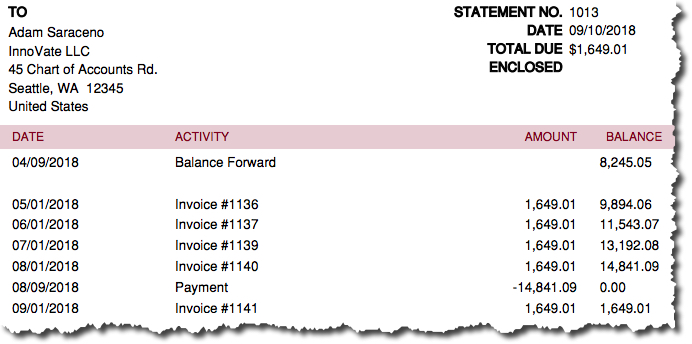
In this preview, the customer’s balance forward on 04/09/2018 was $8,245.05. A catch-up payment was made on 08/09/2018 and another invoice sent on 09/01/2018, which accounts for the TOTAL DUE at the top.
From this screen, you can either Print the statements or Close to go back to the previous page, where you can Save and Send.
Two Other Options
As we stated earlier, there are two other ways to create statements. Click Sales in the left vertical toolbar and highlight the Customers tab by clicking on it. Hover your cursor over a customer and click the down arrow at the very end of that line. From the list that opens, select Create statement.
You can also hand-pick multiple customers to receive statements. With the Customers window open, click in the box in front of your choices, and then click the down arrow next to Batch actions at the top of the list. Select Create statements.
The mechanics of creating statements in QuickBooks are fairly simple. But you don’t want to send an inaccurate one to a customer. Make sure your transactions are up to date before you generate any statements, and choose your date ranges carefully. As always, we’re available to help with this task – or any other area of QuickBooks Online that might be confusing to you. We’re here to help you be pro-active to avoid problems in the long run.
5 QuickBooks Online Reports You Should Run Regularly 15 Jul 2018, 2:10 am
There are numerous QuickBooks Online reports that you should be consulting at regular intervals. But you need these five at least every week.
QuickBooks Online’s Dashboard, the first screen you see when you log in, provides an effective overview of your company’s finances. It contains at-a-glance information about your recent expenses, your sales, and the status of your invoices. It displays a simple Profit and Loss graph and a list of your account balances. Scroll down and click the See all activity button in the lower right and your Audit Log opens, a list of everything that’s been done on the site and by whom.
You can actually get a lot of work done from this page. Click the bar on the Invoices graph, for example, and a list view opens, allowing you access to individual transactions. Click Expenses to see the related Transaction Report. Below the list of account balances, you can Go to registers and connect new accounts.
Other Pressing Questions
The Dashboard supplies enough information that you can spot potential problems with expenses and sales, accounts, and overdue invoices. But you’re likely to have other tasks that require attention. How’s your inventory holding up? Are you staying within your budget? How about your accounts payable – will you owe money to anyone soon?
QuickBooks Online offers dozens of report templates that answer these questions and many more. If you’ve never explored the list, we suggest that you do so. It’s impossible to make plans for your company’s future without understanding its financial history and current state.
QuickBooks Online has many reports that can provide real-time, in-depth insight into your company’s financial health.
Comprehensive and Customizable
When you click Reports in your QuickBooks Online toolbar, the view defaults to All. The site divides its report content into 10 different sections, including Business Overview, Sales and Customers, Expenses and Vendors, and Payroll. Each has two buttons to the right of its name.
Click the star, and that report’s title will appear in your Favorites list at the top of the page. This will save time since you’ll be able to quickly find your most often-used reports. Click the three vertical dots and then Customize to view your customization options for that report (you’ll have access to this tool from the reports themselves).
Necessary Knowledge
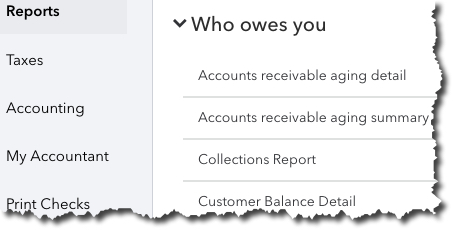
You can, of course, run any report you’d like as often as you’d like. Most small businesses, though, don’t require this frequent intense scrutiny. But there are five reports that you do want to consult on a regular basis. They are:
- Accounts Receivable Aging Detail. Displays a list of invoices that haven’t yet been paid, divided into groups like 1-30 days past due, 31-60 days past due, etc.
- Budget vs. Actuals. Just what it sounds like: a comparison of your monthly budgeted amounts and your actual income and expenses.
Warning: Some reports let you choose between cash and accrual basis. Do you know the difference and which you should choose? Ask us.

You can customize QuickBooks Online reports in several ways.
- Unpaid Bills. Helps you avoid missing accounts payable due dates by displaying what’s due and when.
- Sales by Product/Service Detail. Tells you what’s selling and what’s not by displaying date, transaction type, quantity, rate, amount, and total.
- Product/Service List. An accounting of the products and/or services you sell, with columns for price, cost, and quantity on hand.
Customization, Complex Reports
Note that there’s a category of reports in QuickBooks Online named For My Accountant. That’s where we come in. The site includes templates for reports that you can run yourself, but that you’d have difficulty customizing and analyzing. These standard financial reports—which, by the way, you’ll need if you create a business plan or try to get funding for your business—include Balance Sheet, Statement of Cash Flows, and Trial Balance.
You don’t need to have these reports generated frequently, but you should be learning from the insight they provide monthly or quarterly. We can handle this part of your accounting tasks for you, as well as any other aspect of financial management where you need assistance. Contact us, and we’ll see where we might help provide the feedback and bookkeeping expertise that can help you make better decisions for the future of your business.
Creating Product and Service Records in QuickBooks Online 10 Apr 2018, 2:00 am
QuickBooks Online is good at managing and tracking inventory – as long as you’ve created thorough records.
When you first started your business, you might have been able to keep track of your merchandise by counting manually. But as you and your product list grew, this became impractical. You might have recorded it all in a spreadsheet, or even a box full of notecards.
QuickBooks Online has a much better way. Whether you sell products or services or both, you need records of specific items to use in transactions and reports. Those records are especially important if you have physical inventory; they can store details that help you know, for example, when it’s time to reorder.
Building a database of your inventory is time-consuming work that requires a lot of detail. But the information it supplies will be of great significance as you make critical buying decisions.
Detailed Templates
It’s easy enough to create your individual records. To get started, click the gear icon in the upper right corner of QuickBooks Online and select Products and Services under Lists. A table will open that will eventually contain a comprehensive list of what you sell. Click New in the upper right corner, and the Product/Service information pane slides out. You’ll see your four options here:
- Inventory: Products you buy and/or sell
- Non-inventory: Products you buy and/or sell that don’t require tracking
- Services: Services you sell
- Bundle: Products and/or services that you sell together
We’ll focus on the first option. Click Inventory. Enter the product’s Name and SKU (if there is one) and click the pencil icon to upload a photo if you’d like. If this item is going to be a sub-product or service of another, you’d click the box in front of that option and select the “parent” product or service from the drop-down list.
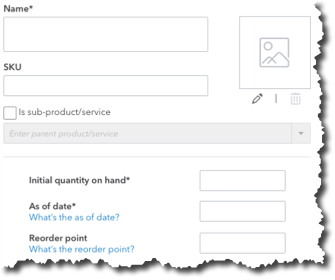
To create an Inventory item record in QuickBooks Online, you’ll have to fill in several fields.
How many do you currently have of that item? Enter the number in the field to the right of Initial quantity on hand, and then enter the As of date in the next box. When your stock level hits a certain number, you’ll want to reorder more. Enter that number in the box to the right of Reorder point.
Your item needs to be assigned to an Inventory asset account for tracking and reporting purposes. This field should default to Inventory Asset. If it doesn’t, or if you want a more thorough explanation of this element of accounting, contact us.
Enter a description of the item in the Sales information box; this will appear on sales forms. What will your customers be charged for it? This is the Sales price/rate. The Income account should automatically display Sales of Product Income, and you should click in the box in front of Is taxable if that’s the case.
If you buy the item to resell, enter a description in the Purchasing information box, and provide your Cost, the price you pay when you buy the item from another source. The Expense account should default to Cost of Goods Sold.
When you’re done, save the record.
Viewing Your Records
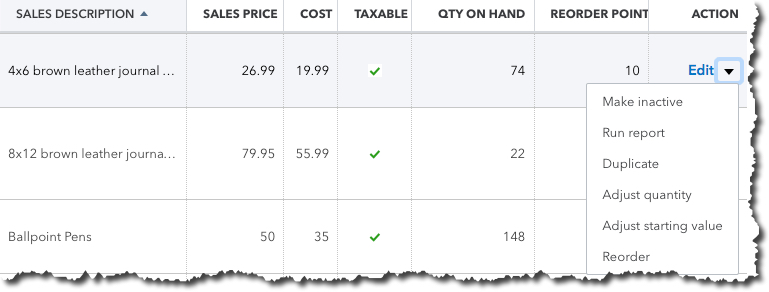
Once you create a record for an item or service, it will appear in this table.
You don’t have to create records for absolutely every product or service you sell before you start using them. When you create an invoice, for example, and you open the drop-down list under Product/Service, the option at the top of the list will be + Add new. Select that, and the Product/Service information pane opens. You can create a record on the fly.
To get to the list of the product and service records you’ve created, click the gear icon in the upper right and select Products and Services, like we did early on here. You’ll see a screen similar to the one pictured above. You’ll also notice that you can link to several action screens from each entry.
If you maintain careful item records, you’ll be able to create a number of reports that can advise you on the state of your inventory. Click on Reports in the toolbar, and then All Reports | Manage Products and Inventory. These reports are fairly self-explanatory, but by customizing them, you can get even more focused insight. We can help you with this. We’d also be happy to go over any other aspect of inventory-tracking and management that’s confusing. Just let us know when you want to get started.
Using QuickBooks Online’s Customer Records 5 Jan 2018, 1:47 am
Using QuickBooks Online’s Customer Records
Your customers are your company’s lifeblood. Are you managing those relationships carefully? Here’s how QuickBooks Online can help.
If you’ve been in business long enough to remember tracking your customers manually, you probably remember what a nightmare it was. Maybe you had a card file and paper folders – and lots of sticky notes and calendar notations.
Unless you had an unusually effective organization system, it was probably difficult to find historical transactions when customers called with questions, for example, and you may have experienced cash flow problems because it was hard to keep up with invoices and statements and payments.
If you’re already using QuickBooks Online, you know those days are over. But have you explored all the customer relationship management tools available to you on the site?
Thorough Records
The core of any good customer-tracking system is a comprehensive set of individual profiles. QuickBooks Online offers thorough, flexible record templates for just that purpose. Click Sales in the main toolbar, then the Customers tab at the top of the screen. To create a new customer record, click New Customer off to the right to open the Customer Information window.
Note: If you have your customer database in an existing Excel or .CSV file, you should be able to import it. QuickBooks Online provides instructions for this.
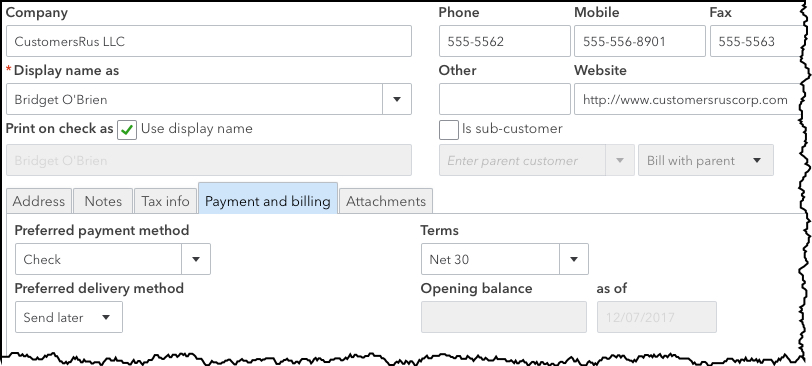
You can create a profile for each customer in the Customer Information window.
You’ll need to enter a lot of the information yourself here, mostly contact details. A down arrow next to a field indicates that there’s a drop-down list of options available.
The lower left quadrant of the screen contains a series of tabbed information windows. Click on each to enter what you can about each customer’s:
- Address – both billing and shipping
- Notes – any that you’d like to enter
- Tax info – exemption details and default tax code (if taxable)
- Payment and billing – preferred payment and delivery method, payment terms, and opening balance
- Attachments – any files pertaining to this customer that you want to include
When you’re done, click Save. Your new record will appear in your list of customers. You’ll be able to toggle back and forth between the details you just entered and a list of their transactions.
Working with Customers
You can always add new customers as you go along, but it’s a good idea to enter records for all of them before you start creating transactions. It will save time down the road, and their accessibility will help with other accounting tasks.
When you click on Sales | Customers now, you’ll see something like this:
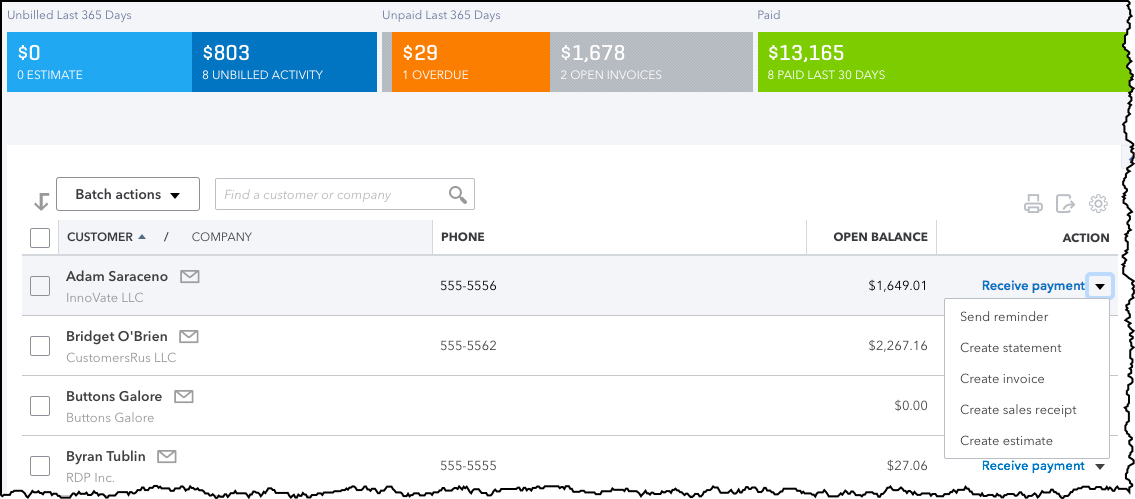
Your Customers page contains a list of customers with links to related activities. It also provides a color-coded row of bars that represent the status of invoices and estimates.
The Customers page consists of many elements. The main section displays a table of your customers. Click on one to open the page containing the Transaction List and Customer Details.
On this screen, though, you’ll only see columns for Customer/Company, Phone, Open Balance, and Action by default; click the gear icon in the upper right if you want to include more columns here. When you click on the down arrow next to a field in the Action column, a drop-down list will display the options available for that customer, like Receive payment, Send reminder, and Create Statement.
A series of colored bars runs across the top of the screen. Each represents the current status of a specific transaction type: Estimates, Unbilled Activity, Overdue, Open Invoices, and Paid Last 30 Days. Click on any of these to open a list of pertinent transactions.
You can do all of these activities elsewhere in QuickBooks Online, but it’s convenient to be able to work directly from the Customers screen, too. The fewer clicks, the better.
Call on Us
Did you make a resolution to start using QuickBooks Online this year? The site was built for use by business managers, not accountants, but it can still be a little daunting at first. We’re always available to take your questions and help you with setup and/or daily implementation. Connect with us if you need assistance.