Add your feed to SetSticker.com! Promote your sites and attract more customers. It costs only 100 EUROS per YEAR.
Pleasant surprises on every page! Discover new articles, displayed randomly throughout the site. Interesting content, always a click away
MRK WP
The WordPress ProfessionalsHow to Display Multiple Sidebars with Kadence Elements 26 Mar 2025, 3:29 am
Introduction
Do you want to display different content in various sidebars across your site? This guide will walk you through using Kadence Elements to create and manage multiple sidebars. With Kadence Pro, you can use elements to control exactly what appears in your sidebar areas.
Table of Contents
Video Guide
For a visual walkthrough of implementing multiple sidebars, watch our YouTube tutorial on how to show sidebars in WordPress with Kadence.
What You’ll Need
- Kadence Theme installed
- Kadence Pro plugin was activated
Understanding Multiple Sidebars
Traditional WordPress sidebars vs. Kadence Pro’s flexibility
By default, WordPress sidebars offer limited customization. Kadence Pro, however, allows for dynamic, content-rich sidebars tailored to specific pages or sections. With Kadence Elements sidebars, you can achieve the following benefits;
- Targeted content display: Show specific content to a specific group of users.
- Enhanced content control: Display relevant content based on the page’s context. You can also set other display conditions for your content, such as an expiry date.
- Improved user experience: With this feature, you can display content based on user devices, hence improving the UX (User Experience) for your site visitors.
How to Set Up Multiple Side Bars
To use this setup, activate the Hooked Elements, a Kadence Pro Add-on, which enables conditional content placement across your site. After activation;
- Navigate to Kadence Elements: Navigate to Appearance > Elements in your WordPress dashboard.
- Create a new element for your custom sidebar: Add a new element and set “Content Section” as your Element type. Name the Kadence Element and add content to your sidebar using the WordPress block editor.

- Explore the Element Settings menu: Within your new element, familiarize yourself with these key options:
- Content: The block editor where you set the element type as Content Section.
- Preview Settings: Preview how your element will appear on different devices.
- Placement: Define where your element will be displayed using hooks.
- Display Settings: Control which pages, users, and devices will see your element.

- Configure Placement Settings: Use hooks under the placement settings to display content anywhere on your site. For this setup, we will select the “Replace Sidebar” option that replaces the default sidebar on the pages where our element/sidebar appears.

Target other areas with Kadence Elements!
You can override existing content with your tailored content in any other these areas;
- Headers: Add custom content above or below your header.
- Footers: Replace or enhance your footer with custom designs.
- Content sections (before/after): Insert content before or after the main page content.
- Single pages and archive pages: Target specific pages or groups of pages and other areas
- Set Display Settings: Control sidebar visibility by tailoring the display based on individual pages, archive types, user status (logged in or not), and device type (desktop, tablet, mobile). Display settings also allow you to set expiration dates for time-sensitive content. Last but not least, you can set exclude settings to hide sidebars on specific pages or posts.

- Ensure Sidebar Visibility:
- Access page settings within the WordPress editor: Go to the page where the custom sidebar is meant to display.
- Enable the right sidebar layout: Click the page settings icon in the editor. Ensure the sidebar is enabled for that page.

- Customizing Sidebars in the WordPress Customizer:
- To access the Customizer, go to Appearance > Customize.
- Configure sidebar layouts for posts, pages, and custom post types: Adjust sidebar settings for specific archive and single post layouts for sidebar visibility.

Advanced Techniques and Tips
Beyond having a variety of sidebars for specific pages, you can also achieve the following with Kadence Elements;
- Create custom footers: Design unique footers for different devices.
- Design device-specific content blocks: Create content optimized for mobile or tablet users.
- Leverage hooks for precise content placement: Use hooks to insert content in specific locations.
- Combine multiple settings for advanced content targeting: Use a combination of display and placement settings to achieve complex content strategies.
Final Thoughts
With Kadence Pro and its Hooked Elements add-on, you can create dynamic and highly customized WordPress multiple sidebars throughout your website. By following this guide, you can control content display and deliver a more engaging experience for your site visitors.
The post How to Display Multiple Sidebars with Kadence Elements appeared first on MRK WP.

Fixing WordPress Emoji Saving Issues with ChatGPT Output 5 Mar 2025, 10:27 pm
Intro
Are you having trouble saving ChatGPT output in your WordPress posts because of emojis? You’re not alone! Many users encounter errors when trying to save content containing emojis. This issue often arises from incorrect database collation settings. This blog post will guide you through troubleshooting this problem, and for a more detailed walkthrough, check out this video on Youtube.
Table of Contents
Video Guide
Understanding the Problem
When you paste content with emojis into your WordPress editor and hit “save,” you might encounter an error. This often indicates that your database’s character encoding isn’t correctly configured to handle UTF-8 emojis. Specifically, the collation setting might be outdated.
The Solution: Check and Update Your Database Collation
The key to resolving this issue lies in verifying and, if necessary, updating your database collation. Here’s how:
- Install WP Adminer: Begin by installing the WP Adminer plugin. This tool allows you to directly manage your WordPress database.
- Access WP Adminer: Once installed, access WP Adminer through your WordPress admin panel.
- Check Your Current Collation: Look at your database tables. If you see a collation like utf8mb3_unicode_ci, this is likely the cause of the problem. WordPress tables should ideally use utf8mb4_unicode_520.
- Update the Collation:
- Use the “alter table” command to modify the collation of your post table and other major fields.
- Change the collation to utf8mb4_unicode_520.
- Execute the changes and save.
Why This Works
Newer tables in WordPress use utf8mb4 Unicode 520, which supports a broader range of characters, including emojis. By updating the collation of your existing tables, you ensure that they can properly store and handle emoji characters.
Alternative (Not Recommended): Filtering Emojis
While it’s possible to filter out emojis to avoid the error, this is not the ideal solution. Correcting the database encoding ensures that all characters are saved properly and you won’t lose any content.
Final Thoughts
If you’re struggling to save ChatGPT output with emojis in WordPress, the first step is to check your database encoding. By ensuring your database collation is set to utf8mb4_unicode_520, you can resolve the issue and save your content without errors. If the problem persists, then investigate other potential issues.
The post Fixing WordPress Emoji Saving Issues with ChatGPT Output appeared first on MRK WP.

Why Every WordPress Developer Should Use PHPCS and WordPress Coding Standards 19 Nov 2024, 1:49 am
If you are a WordPress developer and are writing code for use on multiple websites then you should be using coding standards.
As a developer you’ve probably heard fellow developers talk about PHPCS and WordPress Coding Standards. But are they really worth implementing in your workflow? The short answer is absolutely – and here’s why.
Think of coding standards as the grammar rules of programming. Just as proper grammar makes written content easier to understand, coding standards make your code more readable and maintainable. PHPCS (PHP CodeSniffer) acts as your personal code editor, catching mistakes and ensuring you follow these standards consistently.
When you’re deep in development mode, it’s easy to focus solely on making things work. However, writing clean, standardized code isn’t just about satisfying your inner perfectionist – it’s about creating sustainable, professional-grade plugins that stand the test of time. Whether you’re working solo or as part of a team, following WordPress Coding Standards through PHPCS brings numerous advantages to your development process.
First and foremost, it ensures your code maintains consistency with WordPress core. This isn’t just about following rules for the sake of it – it’s about creating plugins that integrate seamlessly with the WordPress ecosystem. When your code follows the same standards as WordPress core, it becomes more reliable, secure, and easier to maintain.
For team projects, PHPCS is particularly valuable. It acts as an automated code reviewer, catching potential issues before they make it into production. This means fewer bugs, better security, and more efficient code reviews. Plus, when everyone on the team follows the same standards, collaboration becomes much smoother.
But perhaps the most compelling reason to use PHPCS and WordPress Coding Standards is the long-term benefit to your development practice. As your plugins grow and evolve, having standardized, well-documented code makes updates and maintenance significantly easier. It also makes your code more accessible to other developers who might need to work with it in the future.
The best part? Modern development tools make it easier than ever to implement these standards. With PHPCS, you can automate the process of checking your code against WordPress standards, catching issues early in the development cycle. Many popular IDEs and text editors offer integration with PHPCS, making it a seamless part of your workflow.
Whether you’re a seasoned WordPress developer or just starting your journey, implementing PHPCS and WordPress Coding Standards is an investment in your code’s quality and longevity. It might take a little time to adjust at first, but the benefits to your development process and final product make it well worth the effort.
How to use PHP Coding standards on Mac
At MRK we all use MacOS as our primary development tool.
To make PHPCS work you need to have PHP running on your local machine.
I use a tool called “homebrew” to get that working.
By visiting there website you can get that working. Its not just for command line tools either, all sorts of things can be managed and installed with brew commands.
Once you have “homebrew” running you can paste a simple command to install PHPCS.
However that is only part of the solution. You still need to get WordPress coding standards on your local machine.
To set that up you need to pull down a couple of git repos.
First open terminal and change into the correct directory:
cd /opt/homebrew/binonce you are in this folder you will need to pull in the following git repos.
First the WordPress coding standard – I use the develop branch.
git clone -b develop https://github.com/WordPress/WordPress-Coding-Standards.git wpcsThis will clone the WordPress coding standards into a WPCS folder.
Next, Clone in the PHPCUtils repo.
git clone https://github.com/PHPCSStandards/PHPCSUtilsFinally clone in the PHPCSStandards.
git clone https://github.com/PHPCSStandards/PHPCSExtraThis now means you have 3 new libraries.
Remember, you will have to keep these up to date so when ever you update PHP or other brew packages you will have to manually go into the locations and do a Git Pull to keep them up to date.
Now you have these libraries we need to tell PHPCS to look at them as additional standards.
This terminal command will get the result:
phpcs --config-set installed_paths /opt/homebrew/bin/wpcs,/opt/homebrew/bin/PHPCSUtils,/opt/homebrew/bin/PHPCSExtraNext, run the “phpcs -i” command and you should see the new items available.
My output looks like the following:

This shows that I now have the various WordPress standards available inside “phpcs”.
Now that you have that running its now just a case on adding an extension to VS Code.
Here is the link to the tool I use.
The only setting you need to adjust to get started in the “phpcs executable path”.

Once these are enabled you will get prompts inside VS Code to fix code.
Yellow items are warnings and red are errors.
These show up in the Problems tab for each file in VS Code.

Showing these problems is a big advantage to finding code issues. It also keeps everything consistent.
If you want to use a beautifier to auto format code you can now do that too.
I use the PHP_CodeSniffer library to get this working.
Once activated you can use the format selection or document tools to automatically fix errors.

Its a huge time saver.
I hope you like these tips for WordPress developers. You can checkout other guides and tools in the suggest reading below.
The post Why Every WordPress Developer Should Use PHPCS and WordPress Coding Standards appeared first on MRK WP.
WordCamp Sydney 2 Nov 2024, 7:22 pm

At WordCamp Sydney – 2024 I presented a talk on how I moved from PHP to React and blocks.
Here are some notes for those people who attended my talk.
Slides
https://docs.google.com/presentation/d/1Ir8m3nyeCl0AY68YVMHnXRSu6cqaszuw5QjJqASoJhE/edit?usp=sharing
Usefull Links
Example Repo on the multi block with Dynamic Setup
https://github.com/MRKWP/wcsyd-blocks/tree/main
WP Categories Link
https://github.com/MRKWP/wp_list_categories/tree/main
Rankmath Shortcodes to Blocks
https://github.com/MRKWP/mrkwp-rankmath
Eightshift Docs
https://eightshift.com/docs/welcome
10up Gutenberg
Block Examples
https://github.com/WordPress/block-development-examples
The post WordCamp Sydney appeared first on MRK WP.
8 Killer Features for WordPress Agencies: Boost Your Business with Cloudways 1 Sep 2024, 11:47 pm
Disclosure: If I’m not making money through affiliate links on the post you’re currently reading, it’s an oversight on my part and will be corrected soon.
I have been building websites for 20 years. Over that time frame I’ve found that an essential part for every single website I have built is my hosting partner. Having a great host means that my websites are up and reliable. Good hosting is essential for delivering a website for any business.
When it comes to hosting WordPress that hosting partner needs to be even more specific. Getting a WordPress specific hosting can be more costly, but you need to get a good fit to get the best results for your WordPress Agency and your client websites.
Is Cloudways that killer partner for your WordPress agency? In this article I’ll go over some of the reasons why you should consider Cloudways for your WordPress Agency.
Table of Contents
1. Unlimited Sites, No Location Restrictions
One of the coolest things about Cloudways is that you can host unlimited sites on servers located anywhere. Unlike other hosting companies that limit the number of websites or impose hidden restrictions, Cloudways breaks free from those chains. Whether it’s hard disk space, processing power, or server location, Cloudways has got you covered. You can literally have unlimited websites and scale your servers in any direction and place them wherever you need. How awesome is that?
Perfect for Micro Agencies and Small Enterprises
If you’re running a micro agency or a small enterprise, Cloudways is a game-changer. Imagine setting up a host where you can manage tons of small WordPress sites. With Cloudways, you can set up multiple WordPress installations with the right caching and configurations for magazine-style websites that won’t crash. You get one mega server that can handle many, many websites without any scaling limitations. It’s perfect for delivering cookie-cutter or templated websites to small to medium businesses.
Tailored Solutions for Resource-Heavy Sites
Now, what if you’ve got a resource-draining website? No worries! Cloudways lets you set up a specific server tailored just for that site. This is super handy for large WooCommerce sites or membership sites that rely on dynamic data. You’ll need powerful processing and a robust database, but maybe not a ton of disk space. With Cloudways, you can pick the perfect server setup to meet your site’s unique needs. They even have auto scaling options.
So, whether you’re managing a bunch of small sites or one big resource-hungry site, Cloudways offers the flexibility and power you need. Cloudways has made my hosting life a whole lot easier! Make sure you review it for your agency needs.
2. Automatically update WordPress websites without errors.
For a small fee, Cloudways takes the hassle out of updates by running automatic updates for you. But hold up—it’s not just a simple click-and-update process. Nope, it’s way cooler than that.
What Makes Safe Updates So Awesome?
Cloudways actually creates an entire testing process for each of your WordPress websites. It runs these updates in an isolated container, away from your live site. This is super handy because it ensures your WordPress websites stay error-free while still benefiting from automatic updates.
Why I Love Safe Updates from Cloudways
We use this feature on all our Cloudways-hosted sites, and here’s why: it drastically cuts down the time we spend on updates. Instead of manually updating and testing, we can focus our care plan time on real-world improvements for our clients’ websites. Whether it’s SEO tweaks, content updates, or other enhancements, we have more time to make meaningful changes for our clients.
To top it off we also have less downtime and lower chances of errors. Safe Updates is actually better than a human in testing our updates. This tool saves me time and is reliable.
The Bottom Line
With the Safe Update tool, we don’t have to worry about spending hours running updates and testing. Cloudways handles it all, making our lives a lot easier and our websites a lot more reliable. If you’re looking to save time and keep your WordPress sites running smoothly, the Safe Update feature is definitely worth checking out!
3. The vulnerability scanner at scale
It’s super important to keep your websites secure. This is especially true for those running on open source software. We all know there’s a risk of vulnerabilities creeping into your WordPress websites, whether from an update or just old, outdated software. So, how can you stay on top of vulnerability management? You need the right tools.
The Challenge
Imagine you’ve got hundreds of websites. How do you know which ones need updates or have vulnerabilities? Without a scanner, you’re pretty much in the dark. And manually checking each site? That’s a nightmare!
Running a scanner makes sense but a lot of existing tools are costly and require special configuration. Wouldn’t it be better if your host could look after this for you automatically?
Enter Cloudways Vulnerability Scanner
This is where Cloudways comes to the rescue with their free vulnerability scanner. It’s a game-changer. The scanner gives you a clear picture of what’s going on with every single website, highlighting which plugins have security concerns and what specifically needs updating. This saves me a ton of time, especially if there are errors within those updates.
How it works in the real world
With the scanner, I quickly identify which sites need attention. Then, I copy those sites to staging with the cloudways build in tools, run the update and test them out. Once I have finished that up I roll out to production with the cloudways tools. It’s a streamlined process that not only saves me a lot of time but also keeps my websites secure.
So, if you’re managing multiple sites and want to keep them safe and up-to-date, definitely give Cloudways’ vulnerability scanner a try. When you pair it with the auto update tool, you will be running your clients websites with super powers.
4. Object Cache with Redis for Fast Loading Data-Heavy WordPress Sites
When it comes to hosting, one of the big challenges is caching. And let’s face it, caching can get pretty complex. There are different types of caches for different needs. Object cache is one of the best tools for your WordPress sites to speed up the response times on the server.
Why Object Cache?
Every WordPress website is frequently chatting with the database. Every page load comes from your database. And guess what? Those database calls? They can be heavy and time-consuming. The more complex your WordPress website is, the more data it has to fetch from the database. That takes a toll on your load times. This is even more dramatic for Membership sites and E-Commerce.
Enter Redis
This is where Redis comes in to save the day. Redis is an exceptionally fast caching database that can handle a whopping 50,000 reads per second.
How does this help? Imagine having a web page with 70 different queries running. These queries are for navigation, content, ads, and various listings. With Redis, all those queries can go through the object cache instead of hitting your MySQL database. The result? Lightning-fast load times! Instead of those lookups taking one or two seconds, they happen in the blink of an eye.
This is especially handy if you’re using page builders like Divi, Elementor, or Beaver Builder, which often lean heavily on the database. By integrating Redis, you’ll make your website noticeably faster.
I have seen reductions of 1 or 2 seconds on Divi websites by simply migrating the website to Cloudways and taking advantage of the free Redis and object cache addon. Note: You will need a 2GB or bigger server to get these tools enabled.
Object Cache Pro
Redis on Cloudways includes an amazing plugin called Object Cache Pro. This is integrated with the Breeze caching plugin for your WordPress websites. This takes all the difficult configuration out and means you can easily get the performance you need without getting stuck.
So, if you want to speed up your data-heavy WordPress site, spin up a 2GB server with cloudways and give Redis a shot. Your load times will drop and your clients will thank you!
5. Elasticsearch Included for Great WooCommerce Search at No Extra Cost
When it comes to WooCommerce’s search functionality, things can get pretty limited. Hosting a WordPress site means that searching and filtering through all your info can be a real headache. You might try different plugins, but often the search speeds are still painfully slow. Sure, our old friend object cache can help a bit, but for advanced search capabilities, you need something more powerful.
This is where Elasticsearch steps in. Designed specifically for filtering WooCommerce Products and other e-commerce databases, Elasticsearch is a game-changer. It excels at managing various attributes associated with data collections, making search and filtering a breeze.
The best part? Cloudways includes Elasticsearch with its hosting plans. If you’ve got a WooCommerce site, just select the right server, pop Elasticsearch in there, and voila—you get an awesome search experience.
Backed by the Best
Elasticsearch is also supported by 10up and other top-notch partners in the WordPress world, ensuring a solid and reliable search tool. This means a great user experience for your visitors, which ultimately translates to more sales. A good search function helps people find exactly what they need without the hassle, making them more likely to complete a purchase.
Do you need WooCommerce search that is fast and user-friendly, give Elasticsearch a try. Your customers will thank you!
To help get ready for all those sales you will want to consider the next big feature, Auto Scaling.
6. Excellent Uptime with Auto Scale Options: No Surprise Downtimes
If you get large amounts of traffic, you may end up in a situation where you need to do scaling. Now, scaling is never easy and is often quite expensive. The wonderful thing about cloudways is they have a specific product geared towards the scaling conundrum. Cloudways Autonomous is very affordable and allows your WordPress website to scale automatically.
Why Cloudways Autonomous Rocks
Imagine you’ve got a large WooCommerce site, and you’re gearing up for a massive holiday promotion. The last thing you want is for all that traffic to slow your site down. With Cloudways’ auto-scaling, you don’t have to worry. It automatically scales your server behind the scenes as traffic ramps up, preventing slowdowns and downtime.
This means your WordPress site becomes virtually uncrashable. Plus, the beauty of auto-scaling is that it doesn’t just stay big. Once the traffic surge is over, it scales back down, saving you money. Unlike the traditional route where you’d need a massive server all the time (and pay for it even when you don’t need it), auto-scaling adjusts based on your traffic needs.
Perfect for Seasonal Sales
This is a game-changer for seasonal sales or WooCommerce sites with periodic promotions. Whether it’s a holiday sale or a social media marketing campaign with product drops, auto-scaling ensures your site stays fast and reliable.
If you want to keep your client website’s running smoothly during traffic spikes without breaking the bank, Cloudways Autonomous needs to be on your agency shopping list.
7. Cloudflare Enterprise That Won’t Break the Bank
You might already know that Cloudflare boosts website security and performance. It’s a leading CDN and security solution making waves across all sorts of websites. What’s even better is Cloudways’ Cloudflare Enterprise setup. It gives you an enterprise solution for a very low price.
With Cloudways’ Cloudflare Enterprise, you get highly cached Cloudflare content, meaning your site loads lightning-fast and puts less strain on your server. Plus, it protects your site from brute force attacks and other threats that can slow down a traditional WordPress site.
Most importantly you get polish, an image optimisation tool with images loaded from cloudflare CDN that are automatically optimized.
The trade offs
Now, a heads-up: Cloudways’ Cloudflare Enterprise isn’t the same thing as Cloudflare Enterprise. You can’t log into the Cloudflare admin panel—everything is controlled by Cloudways. This might be a bit of a bummer if you like fine-tuning settings. But on the flip side, you get excellent image optimization, pre-configured rules, static caching, and page speed enhancements—all without touching the Cloudflare security panel. It is also integrated into the Breeze cache plugin and gives you amazing results in a simple setup.
Is It Right for You?
If this setup works for you, it’s a fantastic solution that saves you money. It’s especially great for magazine-style or brochure-style WordPress websites without complex WooCommerce integrations. If that sounds like your site, Cloudflare Enterprise will work wonders, keeping your server load light and delivering super-fast websites for your clients.
8. 24-Hour Chat Support That Can Help You
You know, when it comes to any kind of Hosting partner, I found that getting quick responses on a 24-hour chart is really important.
The Importance of Quick Responses
When it comes to hosting partners, getting quick responses around the clock is absolutely crucial. Living in Australia, I need support that’s available even in the middle of the night, especially when dealing with American companies. Over the years, this has been a significant challenge for me. I need a hosting partner that is available on chat when I need them. I need someone to respond promptly and effectively.
I also don’t want an inexperienced operator. As a 20 year veteran the last thing I want to hear is “Did you clear your cache?”. I also don’t want to be training the operator. The only thing worse than that is a chatbot.
The Chatbot Frustration
Nobody likes dealing with a chatbot that’s just, well, a bot. It’s incredibly frustrating to start a chat and then wait 12 to 16 hours for a real response. I see this issue frequently with various hosting providers worldwide. But here’s the good news: Cloudways offers real, 24-hour chat support.
Why Cloudways shines in Chat support
For agencies, waiting hours for a response is simply not an option. Cloudways generally gets back to you within minutes, ensuring you’re never left hanging. Their 24-hour chat support is staffed with real people who can provide genuine help for your WordPress websites.
In my experience the operators are knowledgeable, and get to the point of solving the problem.
They also do not expect that every issue is user error, this saves me a ton of time because I can avoid the simple troubleshooting and get on with solving the issue at hand.
Note: If you ever find the cloudways control panel down, there is no way to contact support. It has happened once. I hope it does happen again. Its something to be aware of.
Other great Cloudways features
I have covered just 8 core features in this article. Cloudways has so many more excellent tools. The cron job manager, the excellent custom control panel and staging tools as well as built-in daily backups. These are all a pleasure to use. They are also great value which not only save time but they save money too.
Is it time to consider a new host?
So the question remains, will cloudways work for your agency? If you are hosting websites that need these 8 killer features then cloudways needs to be on your review list. If you are doing large numbers of websites on servers or you’re doing complex woocommerce websites, then you definitely want to make sure that you check on cloudways to utilize their unique product offering.

What does your Agency need in a WordPress hosting partner? Do you have questions on any of these killer features? Reach out to the team and let me know.
The post 8 Killer Features for WordPress Agencies: Boost Your Business with Cloudways appeared first on MRK WP.
How to: Make Popups fast with Kadence Conversions 7 Aug 2024, 4:56 am

In this video guide we make use of Kadence Conversions to create popups and notifications for your WordPress site. Kadence Conversions is a premium plugin from the team at Liquid Web and StellarWP.
You can check out more about the tool and its pricing on the KadenceWP website.
Highlights
 Create diverse popups and notifications with Kadence Conversions.
 Easy installation on staging sites for testing before going live.
 Choose from various conversion types: popups, slide-ins, and banners.
 Set launch triggers and conversion settings for optimal user engagement.
 Customize links to direct users to specific pages or resources.
 Enable analytics tracking to monitor conversion performance.
 Benefit from an integrated ecosystem if using other Kadence tools.
Key Insights from this Video
 User-Friendly Interface: Kadence Conversions simplifies the process of creating popups, making it accessible even for beginners. This ease of use can enhance user engagement on your site.
 Staging Environment: Testing changes on a staging site before deploying them helps mitigate risks and ensures that modifications won’t disrupt the live site, promoting a smoother user experience.
 Customization Options: The ability to fully customize popups using the block editor allows for unique designs that align with your website’s branding, making your calls to action more effective.
 Scheduled Promotions: Setting up scheduled banners for specific events can drive timely engagement, ensuring that users are aware of important updates or promotions as they happen.
 Analytics Integration: Integrating analytics helps track how well your popups perform, allowing for data-driven decisions to optimize future marketing efforts.
 Single Ecosystem Advantage: Using Kadence Conversions alongside other Kadence tools provides consistency and compatibility, reducing potential conflicts and improving overall performance on your WordPress site.
 Repeat Control Features: The ability to manage how often popups appear based on user interactions enhances user experience by preventing annoyance while still providing valuable information.
The post How to: Make Popups fast with Kadence Conversions appeared first on MRK WP.
Migrating to WordPress.com: A Comedic Odyssey (Or Nightmare) 15 Jul 2024, 8:22 am
Have you ever thought: Should I migrate to WordPress.com? Me too. So much so thatI recently embarked on what I thought would be a simple migration to WordPress.com. I have many self hosted wordpress websites. I have changed hosts and providers many times over the years. This meant I came into the wordpress.com migration with an impression that 15 years of experience would make this a breeze. Boy was I wrong.
Table of contents

The initial Purchase.
I decided on the creator plan. It was easy to buy and the checkout was easy sailing. I was taken in with the bundling and figured I would get the 3 year plan with the giant discount. There was no free trial or 7 day paid trial, I would have liked that but here goes.
After purchasing a creator plan, the onboarding process began. The first issue, I found myself trapped in an account with a non-customizable domain name. The original account had been created without me being prompted to set a subdomain. I tried all I could to find how to change it, and the buttons seems to be inactive. Id get stuck with a redirect or nothing would happen. Hmm. A sign of things to come? I brushed that off.
I told myself – that’s not a big problem. I will be mapping my domain name later anyway. Let’s move onto moving my self hosted wordpress site into the new environment.
The migration
The promised migration tools were nowhere to be found. I checked the documentation, and the buttons kept trying to make me to sign up for another website. I could import from other platforms, like wix or squarespace etc. That was out of the question as I was using WordPress.
My experience told me, just use your normal method.
I installed WP Migrate and the wordpress.com site panel began to do something strange. It made a whole new domain on a staging version of what I thought was already a staging site.
That was unexpected but I figured it was okay, as maybe you can only install plugins in staging and then migrate to production. I got stuck on a random error page. This meant I had to run the install twice. No idea why. After installing wp migrate on my other site, I began the migration. It started well and all the files moved over relatively quickly. It was fast, really fast. I was pretty excited about this because a fast migration is generally a good sign of a solid hosting solution.
I thought it had gone perfectly. Little did I know that I was about to enter a redirect loop of hell.
The redirect troubles begin
I logged back into the site as this often happens with a WP Migrate. The users change so that was not a surpise. I reactivated Akismet and Jetpack. These seem to be critical for wordpress.com and despite them being an MU (Must Use) plugin the are not MU. So I activated them and got stuck pretty fast.
The staging domain and production site plan I purchased was no longer connected to my site. Why?
This was especially confusing because it looked like I was inside a WordPress multisite, but I couldn’t use my site. Hmm. What to do?
I click on the jetpack reconnect process. It didn’t work. It just redirected me to a document that didn’t show what I was seeing. The documentation was a complete failure. I figured I would go into the website and check the plugin setup for Jetpack and Akismet.
I went ahead and activated jetpack via the admin plugin panel and then fell into a redirecting black hole.
Everything I clicked inside the WordPress.com hosting backend now led me to the WordPress admin page on my CMS. There was no impact of any click. I got only two results, WordPress Dashboard or a 403 error saying Im not allowed to access that page.
I was looking for a sync tool to send the site to my production site, but that had now disappeared as well.
At this point I was not feeling great about the product. I realised WordPress.com’s decision to merge their control panel with the WordPress.org interface created a Frankenstein’s monster of a system. I was constantly met with “you’re not allowed to access this page” errors, despite having the necessary permissions.
The support kanundrum
At this point I noticed the live chat panel. I could really use some help here. Unfortunately the Live chat is not a live chat anymore. Like many companies WordPress decided that a bit showing the same useless information would be a good thing to implement. It is not. I tried to get a real person by thumb downing each response and finally I got a notification that “someone” would respond in the next 24 hours. Gee, thanks,
What an amazing premium experience. For any host out there, make live chat live chat. No one ever said “Gee this bot is great, no need for real people any more”.
The domain decider
I figured I would wait for the support response. I moved on to work out what was going to happen with my domain name. I was being nagged about a free domain earlier so figured I should check that out.
I was shocked with what I found: domain mapping restrictions. WordPress.com requires full DNS delegation, a deal-breaker for many users including myself and countless potential clients. This single requirement is a big part in explaining why WordPress.com isn’t a major player in the hosting market. Migrating to wordpress.com for a whole DNS setup? That is a big ask and you need an alternative.
I like using Cloudflare DNS for Turnstile and admin login access. I would have to say “good bye” to these features if I moved my DNS.
I left Kinsta some years ago when they said there DNS setup with Cloudflare Cnames was going to fix everything. It didn’t. It broke heaps of stuff. I warned them it would but hey, what do I know from 20+ years of making websites.
Time to admit defeat
At this point I decided I should not go any further, I cancelled the account. I had spent all of 1 hour in the platform to realise, this sucks. The documentation is missing all vital information I need and the support is not-present in Australian hours. This is one of the reasons I love WP Engine. They have Australian support hours with real people in the live chat.
Now, I have to wait how long for a refund? 5 to 7 days. Apparently refunding a paypal payment is very difficult for WordPress.com – Im not surprised. Making a Hosting panel and migration process seems hard for them too.
What can WordPress.com do to improve their hosting platform?
- The platform desperately needs improvements in migration. Make my migration easy peasy. It’s easy to find inspiration for this. Blogvault?
- Control panel design – I need more separation from the WP admin. It’s really confusing and I get this weird admin thing that is just – weird. You could at least make the menu readable.
- Remove DNS domain restrictions – Let me map using my own DNS. I should be able to just add cname or a records. No need for all the other stuff. I know you do email, but if I don’t want it, why are you asking me to setup SPF records? Please don’t. Please remove the my mailbox etc. if I don’t want it. Note: I later found there is a tiny link to use direct A name records.
- Data center location choices – I should be able to choose where my website is. Why can’t I select Australia as my core data centre? This is important for a lot of users. You guys aren’t really that clear about where my website is. I know you have co-location but give me some peace of mind and let me choose. The happiness engineers did respond saying the site is fast in Australia, however that is not my concern. Most Australians want a website in Australia. Its a security thing and part of a fit for purpose discussion that most cyber security people recommend.
With these changes, WordPress.com could become a game-changer. It could be a market leader and start to take business from other hosts. They clearly have an excellent platform in terms of speed. It’s just making all the other stuff work is clearly not good.
Until these kinds of changes are in place, I’ll be sticking to my self-hosted WordPress environment providers.
To be specific I find Nexcess, WP Engine and Cloudways great for standard WP and WooCommerce. Anything that is custom, I use a Digital Ocean server and the Spinup WP controller. It works and is pretty easy to use.
If you’re considering migrating to WordPress.com from a self hosted WordPress, proceed with caution and be prepared for potential headaches. You only really know how good a company is when something goes wrong.
Footnote
A day after this adventure the team of happiness engineers got back to me. They had identified a few things to help me out,
- The DNS can be external to WordPress but its actually pretty hard to find as its all small text links. I looked at it but I was not at all certain anything would work at this point. Id lost confidence in the system.
- They gave me a week to free trial it, but again, I was just to un certain.
- Happiness engineers take too long to respond. If I have to wait hours for a response then its really not something I can work with. I got spoiled by WP Engine and other hosting providers.
- The jetpack connection had something to do with needing a user with the same email as my WordPress account.
Even after the support I just couldn’t bring myself to switch the domain. I had no confidence in the platform. It’s a shame to see that it came to that. I have seen this in the past, once your confidence is gone in a product, you get too scared to use it and have to find an alternative solution.
Hope that helps you all with your WordPress hosting. If you need help making a hosting choice for WordPress, reach out to the team here at MRK or use my social handles. Always happy to share our experiences.
The post Migrating to WordPress.com: A Comedic Odyssey (Or Nightmare) appeared first on MRK WP.
How to: Gravity From Calculations with BMI example. 21 Jun 2024, 11:42 am

Summary
Learn how to create dynamic form calculations in Gravity Forms on WordPress without using JavaScript or custom PHP. Follow step-by-step instructions to make a BMI calculator for live calculations on your website.
Affiliate link to purchase Gravity Forms: https://bit.ly/3sZlimF
Highlights
- Easy creation of dynamic form calculations in Gravity Forms on WordPress

- Utilizing number fields for height, weight, height square, and BMI in the form
- Using conditional logic to display results based on BMI calculations

- Hiding unnecessary fields to streamline the user experience

- Embedding the form on a WordPress page for interactive BMI calculation

- Demonstrating immediate updates in BMI value as height and weight inputs change

Key Insights
- Creating dynamic form calculations with Gravity Forms on WordPress. Use plugins to simplify the process for users who are not familiar with JavaScript or custom PHP coding. This allows for the easy integration of complex calculations on websites.
- Utilizing number fields for height, weight, height square, and BMI. This ensures accurate data input and calculation, providing users with a seamless experience while using the BMI calculator.
- Implementing conditional logic to display different results based on BMI calculations. Enhances the functionality of the form, allowing users to receive personalized feedback on their BMI status.
- Hiding unnecessary fields such as height square improves the visual appeal of the form. Prevents users from being overwhelmed by irrelevant information, creating a more user-friendly interface.
- Embedding the form on a WordPress page enables users to interact with the BMI calculator directly on the website.
- Demonstrate immediate updates in the BMI value as height and weight inputs change. Showcase the real-time calculation features of Gravity Forms, enhancing user experience and encouraging active participation.
The post How to: Gravity From Calculations with BMI example. appeared first on MRK WP.
Dynamic Blocks video on Youtube 20 Jun 2024, 9:27 am

Summary
The video script explains how to create a custom block for listing categories in WordPress. We show how to use PHP functions within the block editor.
The WP List Categories Block Plugin is available in the products section of this website.
Github reference: https://github.com/MRKWP/wp_list_categories
Highlights
- Building a custom block for listing categories in WordPress
- Using PHP functions within the block editor to create custom blocks

- Explaining the process of registering and rendering the custom block

- Demonstrating the use of attributes and controls in the block editor

- Showcasing the flexibility of adding additional features to the custom block
- Providing insights on debugging and testing custom blocks for functionality
- Encouraging viewers to experiment with creating their own custom blocks in WordPress

Key Insights
- The video showcases the step-by-step process of creating a custom block for listing categories in WordPress. This gives valuable insights into using PHP functions effectively within the dynamic block development.

- I explain the registration, rendering, and customization of attributes in the custom dynamic block. Viewers gain a comprehensive understanding of the technical aspects involved in developing a functional block.
- The demonstration of controls, such as text fields, toggles, and select dropdowns. This highlights the versatility of custom blocks and the ability to tailor them to specific requirements.
- The emphasis on debugging and testing custom blocks underscores the importance of ensuring functionality. Help you in troubleshooting any issues that may arise during the development process.

- Encouraging viewers to experiment with creating their own custom dynamic block. Fosters a hands-on approach to learning and inspires creativity in leveraging WordPress’s block editor capabilities.

Take a look at related posts for other similar content. For in depth tutorials go to the Guide section of this website.
The post Dynamic Blocks video on Youtube appeared first on MRK WP.
How to Add Alt Text to Images in WordPress 3 May 2024, 3:12 am
Images play an important role in website design. Without images, designs can be bland and boring to view.
So, how does a vision-impaired person view your website without being able to see images?
Have you thought about a Google bot or website crawler? How does it understand your page content?
Behind every image is an often overlooked crucial element: alt text. Alt text is a textual description of an image.
Every content image on your site should have alt text to ensure that every visitor gets the best possible user experience.
This article defines alt text and explains why it’s crucial for your website. It also shares some tips on crafting effective descriptions for your website images.
In addition, we will also show you how to add alt text to your images in WordPress, that is, from inside the media library and via popular page builder tools.
Let’s jump on it.
Table of contents
What is Alt Text?
Alt text is a HTML attribute of the image tag. It provides a description of an image’s content.
It serves as a substitute for the image when it cannot be displayed or accessed. The Alt attribute provides context and understanding of images to users who cannot view them visually.
Importance of Alt Text
- Accessibility: Alt text is essential for making your website accessible to everyone. It ensures people using screen readers can understand images.
- SEO Benefits: Search engines use alt text to help understand the content and relevance of images on a website. Good alt text will boost your site’s organic traffic referrals from search engines.
What is good Alt Text?
Good alt text is a short but informative description of an image. It helps people understand what an image is all about, especially those who can’t see the image itself.
Here is a good example of alt text on an image.
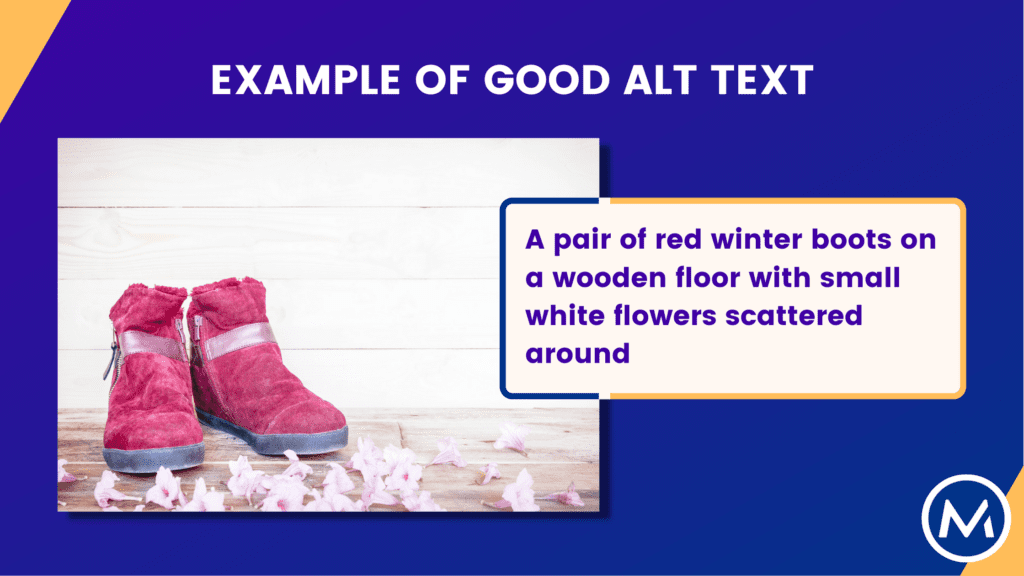
From the above example, here are some qualities of good alt text:
- Clear and concise: The text addresses all objects and actions with a few words.
- Descriptive: It further describes the colour of the boots and flowers, the nature of the floor etc
- Keyword Relevance: For example, if this image appears in a “top 10 winter boots” blog post, this alt text potentially includes relevant keywords like “winter boots”.
- Contextual (Matches the Content): The alt text directly describes the image and is relevant to the surrounding content. This text would work for a “top 10 winter boots” blog post, but not for a flower blog.
- Accuracy: Describes the image content truthfully. It avoids misleading or irrelevant information.
- Natural language: The descriptive text is clear and natural. Avoid complex or technical words.
5 Tips on Writing Good Alt Text
Writing good alt text involves providing a concise yet descriptive summary of the image’s content. Below are 5 tips on how to create helpful alt text:
- Describe the Who, Where, and What: Define the key elements, subjects, and actions represented in the image.
- The Who: Is there a person in the image? Briefly describe them and their action.
- The Where: Where is the image depicted? A beach, a conference room, or a specific location?
- The What: What is the main subject of the image? Is it a product, a graph, or an action taking place?
- Consider Context: How does the image relate to the surrounding content? Your alt text should explain what the image is about in relation to the web page/blog post.
- 125 characters or less: Screen readers only read the first 125 characters of alt text. Keep your alt text short and concise.
- Avoid redundancy: Don’t use phrases like “image of” or “screenshot of“; screen readers and search engine bots already know they are dealing with an image.
- Avoid keyword stuffing: While incorporating relevant keywords is beneficial for SEO, avoid stuffing alt text with keywords. Search engine bots perceive this as spammy content.
Adding Alt Text in WordPress
Depending on your WordPress setup, you can add alt text to images in numerous ways. We’ll cover the most common four methods:
- Adding alt text from Media Libray
- Setting the alt text inside the Block Editor
- Alt text in Elementor
- Inside the Divi Image module.
1. Adding Alt Text inside the Media Library
Adding alt text in the Media Library works everywhere on your WordPress site. This method applies no matter which editor or page builder you use.
When you add alt text to an image from the media library, that description travels with the image. When you add an image to your website in a page editor, the alt text will automatically populate in the HTML.
To add alt text from the media library,
- Inside the WordPress dashboard, go to the Media Library.
- Click on an image to open the Attachment details dialog box.
- Find the “Alternative Text” field and add the image description.
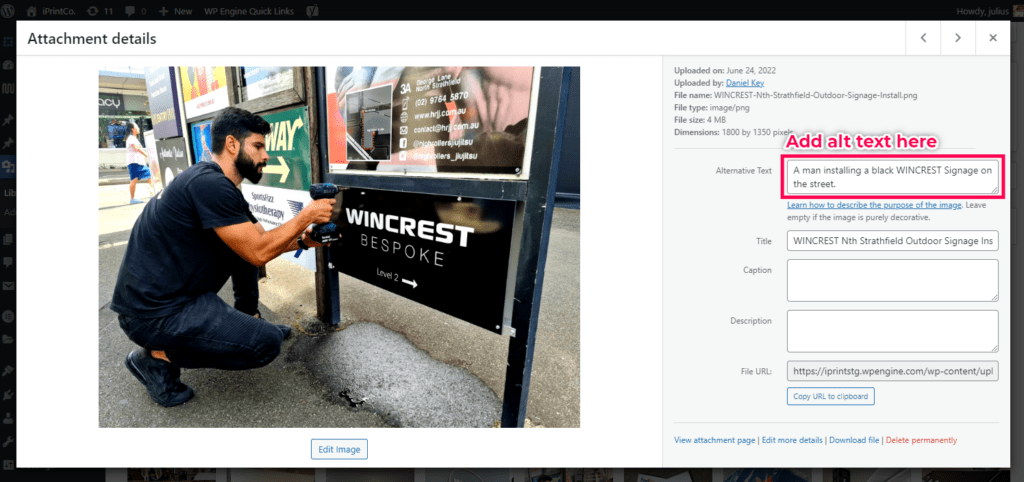
When you use this method, your images will utilise this alt text wherever you place them on your website.
2. Setting Alt Text in the Block Editor
If you are using the Gutenberg Block Editor, you can add alt text to your images using the default image block.
In contrast to the previous approach, adding alt text via the image block only applies to that specific instance(block). Should you decide to use the same image elsewhere on your website, the alt text will not reflect.
To add alt text inside the Block Editor
- Select the image block inside the block editor.
- Locate the “Alternative Text” field via the Block settings.
- Fill in the image description.
- Click Update or Publish to save the changes.
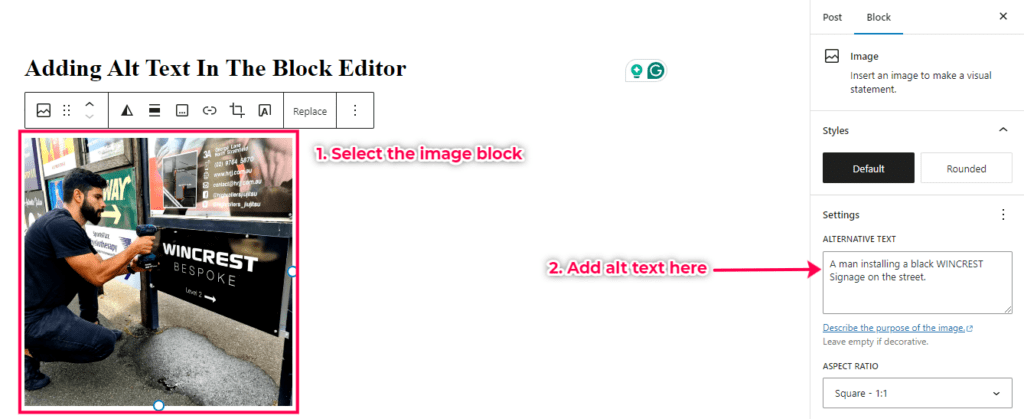
Alt text inside the Image Block takes priority.
If an image already has alt text from the media library, the latest description added from the block editor will take priority.
This lets you tailor the description to fit the specific context of where the image is used.
3. Alt Text in Elementor
For Elementor, you can follow the steps below to set alt text for your images.
- Click on the image widget inside the Elementor editor.
- Navigate to the “Content” tab of the widget.
- Click on the image to launch the Attachment Details dialog box we saw in method 1.
- Add the image description in the Alternative Text field.
- Close the dialog to return to the editor.
- Update to save the changes.
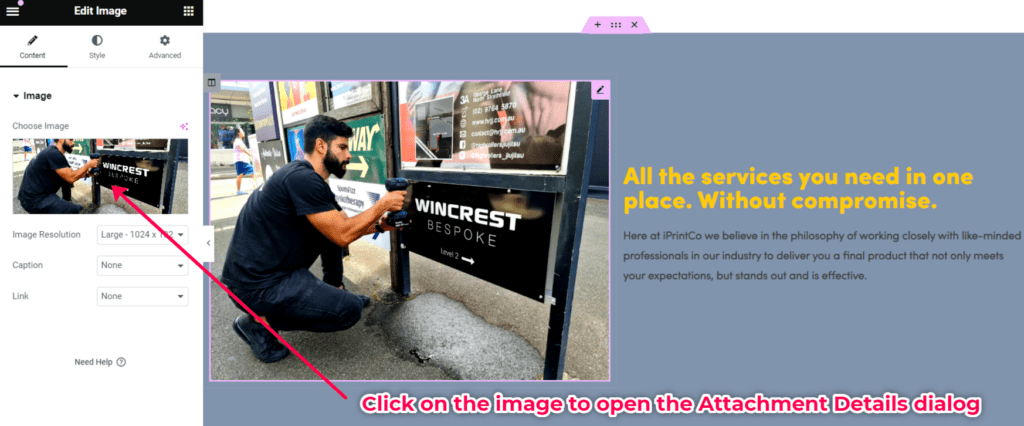
Under this method, the alt text is also added via Attachment details. This implies that its description will accompany the image wherever you use it on the site.
4. Inside the Divi Image Module.
For sites using Divi, you can use the Image module to set the alt text using the following steps.
- Select the image module to which you want to add alt text inside the Divi Builder.
- Switch to the “Advanced” settings tab.
- Locate the “Image Alternative Text” field and enter your alt text.
- Save the changes to apply the alt text to the image.

Alt text added in Divi’s Image Module only applies to that specific instance of the image ( and its module). If you use the same image elsewhere on your site, you need to add its alt text again.
The future of Alt Text: AI assistance is here
Adding alt text can be time-consuming, especially for websites with many images. Thankfully, the future of alt text is looking bright with the emergence of AI-powered tools.
AI tools can interpret images and generate alt-text suggestions. These will save time and effort.
Here are some popular AI tools that can help you with alt text creation:
- Ahrefs AI Image Alt Text Generator: This free tool allows you to upload your image and receive multiple alt text suggestions with different tones (casual, formal).
- AltText.ai: This tool also uses AI to generate alt text automatically. It offers integration with platforms, such as WordPress, which makes adding alt text to your site easy.
Caution!
AI tools can be helpful. They are far from perfect. You should review and edit AI alt text suggestions for accuracy. AI might not always capture how your image us used inside your content. Ensure the alt text aligns with your website’s content and design.
Final thoughts
This guide should help you better understand image alt text. We covered specific WordPress use case’s for editing alt text and how Good alt text will improve accessibility and SEO for your website.
If you need help with alt text or SEO for your website reach out to the team at MRK WP.
Frequently Asked Questions
Alt text/alternative text, briefly describes an image.
Accessibility: Alt text helps screen readers understand the content of your images.
SEO: Search engines use alt text to help understand your images and how they are used in your website content.
Alt text should describe the key elements, subjects, and actions depicted in the image. It should be within 125 characters. You should also avoid keyword stuffing.
You can add alt text to images through various methods. This is dependent on the tools used on your WordPress site.
Here are three ways to add alt text to your image files:
Media Library: This works for most editors and page builders.
Block Editor: Image block within the default page editor for WordPress.
Page Builders (Divi/Elementor): Use their respective image modules/widgets.
Extra Image SEO Tips!
Discover extra tips to improve your site’s Image SEO.
The post How to Add Alt Text to Images in WordPress appeared first on MRK WP.
Dual Branding Success: A Website for Gaffney Valtra 3 May 2024, 2:00 am
Our long time customer, AEH Group recently approach out team to create a brand-specific website for Gaffney Valtra.
This website is a new branding for the existing machinery group Gaffney Machinery.
The website build has two goals.
- Establish a distinct online presence for Valtra, a leading agricultural machinery brand.
- Maintain the user-friendly functionality of the established Gaffney Machinery site.
The result is a great website with clear branding partnership for Gaffney and Valtra.
Table of contents
Project Breakdown: A Foundation and a Fresh Look
The project commenced with cloning the Gaffney Machinery website. This provided a solid foundation for the new Valtra website, built with WordPress and Blocksy Theme. Using the same structure ensured a familiar and user-friendly experience for visitors.
Next came the visual transformation. M R K carefully implemented a new website design that made use of Valtra’s branding guidelines. This involved an update to the visual elements of the website including:
- Logos: The brand identity for the website had to match the Valtra guidelines. To achieve this, we replaced the familiar Gaffney Machinery logo with the streamline Valtra logo. We added the Gaffney Machinery logo into the website’s footer. This makes the relationship clear for those already familiar with Gaffney Machinery.
- Colour Scheme: To reflect the bold brand of Valtra, we implemented a new colour scheme using the Valtra red and black.
- Fonts: We opted to continue using Gaffney Machinery’s existing fonts. This decision also helped create a subtle distinction between the Valtra website and the Gaffney Machinery site.
- Imagery: Our goal was to create a visually engaging experience for potential customers. We replaced the original imagery with high-quality images showcasing Valtra’s tractors. We sourced all images from Valtra’s stock image library. This ensured consistency with Valtra’s brand identity.
Throughout the project, the Valtra brand kit served as our guide. By following it closely, we ensured the website clearly communicated the distinct Valtra brand identity. This meant highlighting all the elements that make Valtra stand out in the agricultural machinery market.
However, we didn’t want to completely alienate visitors familiar with Gaffney Machinery. That’s why we included subtle references to the Gaffney Machinery brand throughout the website. This way, we struck a balance between showcasing Valtra and maintaining a sense of sameness for existing customers.
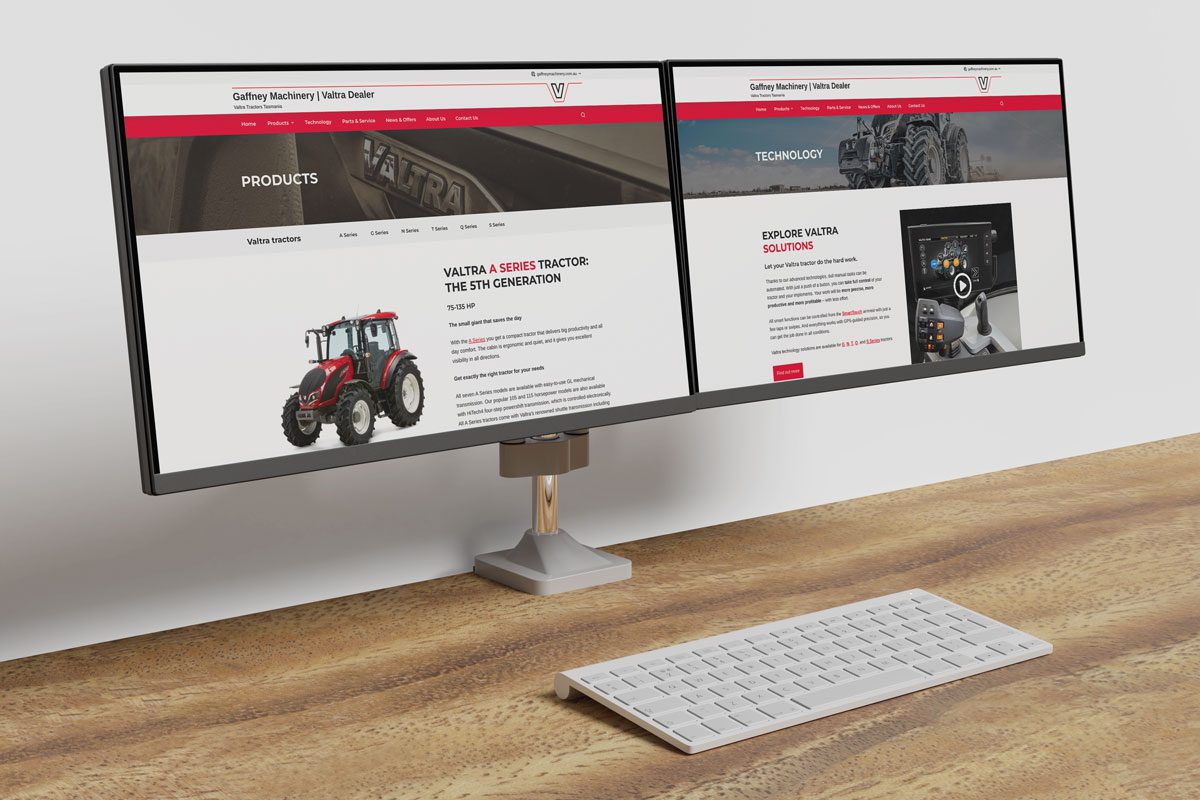
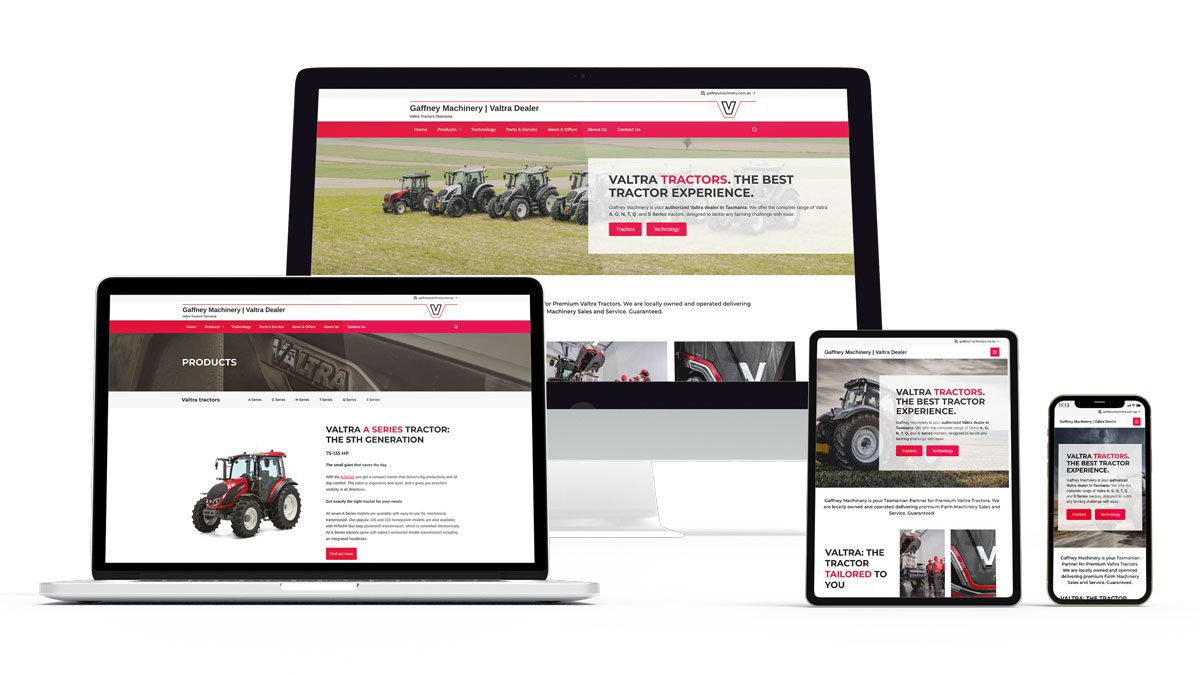
See a visual comparison of the two home pages below – Gaffney Machinery (left) and the new Gaffney Valtra (right).


Content Integration: Bringing Valtra’s Products to Life
The next step involved integrating new content specifically related to Valtra. This content integration aimed to:
- Highlight Valtra Products: We created a dedicated product page featuring a comprehensive listing of all Valtra tractors available. To bring the content to life, we added videos and high-quality visuals throughout the page (supplied by Valtra).
- Inform Potential Buyers: Visitors gain the information they need to choose the right Valtra tractor. Clear calls to action encourage them to contact the dealership for a quote or more information.
- Showcase Valtra’s Expertise: The content effectively highlights Valtra’s unique features and benefits. Visitors see why Valtra stands out from the competition.
The new content transformed the website into a great resource for exploring Valtra’s agricultural equipment.
Since the website was cloned from the original Gaffney Machinery site, it initially contained content for various brands. To ensure visitors could only find information about Valtra, it was necessary to perform a content refresh. This involved removing all other brand-related content.
We also focused on improving how visitors navigate the website. We streamlined the site structure by removing pages irrelevant to Valtra’s brand. In their place, we created dedicated new pages for Valtra Products, Valtra Technology, and Valtra News & Offers.
This clear organisation makes it easy for visitors to find the information they need quickly.
Results: A Branded and Functional Website
The final result was a fully functional Valtra website for Gaffney Machinery, boasting the following features:
- Distinct Branding: The website’s design seamlessly reflects Valtra’s distinct brand identity. This creates a unique platform to showcase Valtra’s offerings, separate from the main Gaffney Machinery website.
- Seamless User Experience: The familiar structure of the Gaffney Machinery website was retained, ensuring user-friendliness.
- Comprehensive Product Information: The website provides comprehensive information about Valtra products and services. This content helps buyers make informed choices and contact the dealership for a quote.
At M R K, we focus on a mobile-friendly and fast-loading experience for every website we build. This Gaffney Valtra website is no exception. It ensures a smooth browsing experience for users on any device.
The website also included technical configurations, like domain mapping, email delivery and SEO. The domain was properly mapped to the website. We configured the website to send and receive emails effectively. And to give the website the best chance of ranking well in search results, we performed an initial SEO audit.
For peace of mind, the new Valtra website was also seamlessly integrated into Gaffney Machinery’s existing WordPress Care Plan. This ensures ongoing security updates, maintenance, and technical support to keep the website running smoothly and securely.
Conclusion: A Successful Collaboration
This project wasn’t about starting from scratch. We took the existing Gaffney Machinery website, and leveraged its strengths as a foundation. We built upon it, creating a distinct website that proudly showcases the Valtra brand.
The result is a website that’s a win for both visitors and Gaffney Valtra. Visitors can easily navigate and find the product information they need. The content is presented in a visually appealing way that reflects Valtra’s brand identity.
This successful collaboration between brands is a testament to the power of strategic website development. It proves that careful planning and execution can create a strong online presence, in this case for Gaffney Valtra.
Inspired by the success of the Gaffney Valtra website?
Elevate your agricultural machinery website with M R K WP. Our experienced team specialises in creating user-friendly, results-oriented websites for the agricultural industry. We can help you:
- Showcase your equipment with impactful visuals and detailed information.
- Streamline the user experience and boost conversions.
- Increase your brand visibility online.
- Create effective used machinery listings that attract buyers.
- Develop user-friendly dealer location directories to connect customers with your network.
Schedule a Free Consultation! Let’s discuss how we can elevate your machinery website.
The post Dual Branding Success: A Website for Gaffney Valtra appeared first on MRK WP.
How to Style the Date Display on Event Calendar in WordPress 28 Mar 2024, 6:53 am
Have you ever felt like the date display on the Events Calendar‘s list view lacks the desired visual spark?
If yes, then you are not alone. Many users, including me, find the default date styling in the Events Calendar rather plain.
In this article, we will share with you a free CSS snippet we created for one of our clients, Parkes Golf. The css will improve the display of your dates on your events page. This makes it easier to see when your events are held.
Table of contents
Why the Default Styling Needs Improvement
Let’s face it: Tribe Event’s skeleton styles for dates on the list view are boring and get lost in the design.
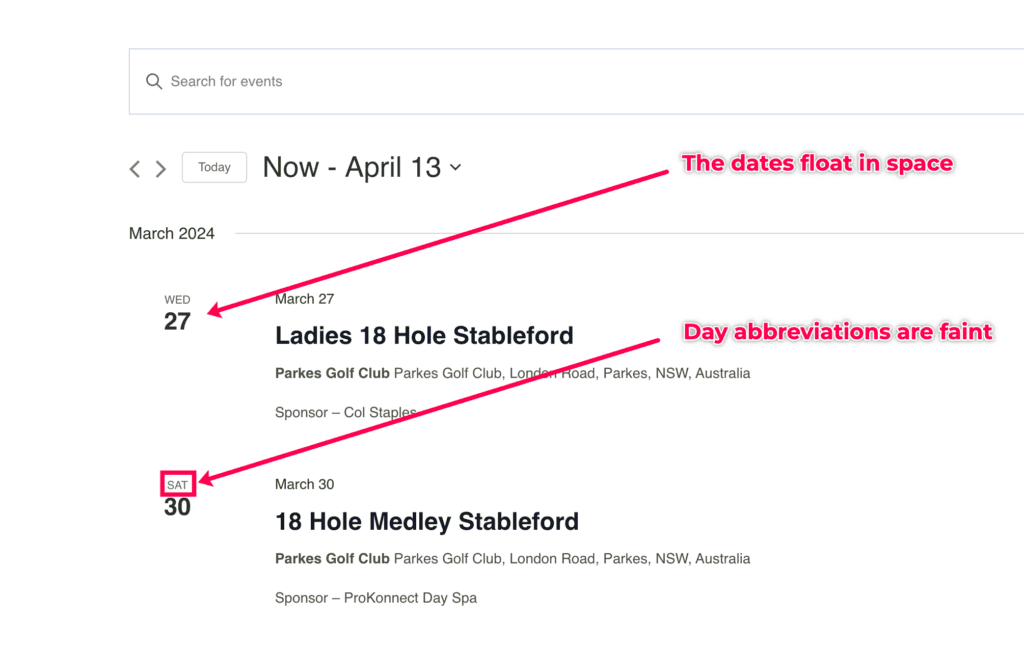
- The dates float aimlessly on the page without defined borders or distinct visual cues.
- The abbreviations for the days of the week are often too faint, hindering readability.
Fortunately, there’s a simple solution to make your dates stand out and elevate the overall look of your events page.
Video: Style the Date Display in the Events Calendar in WordPress
Before diving into the implementation, we recommend checking out our video tutorial. In this video, we walk you through the process of styling the date display within the Events Calendar on your WordPress website.
Improving Default Date Display
We will improve how dates appear on the Events Calendar by using MRK’s custom CSS code for date styling. To do this, we will;
- Identify where to add the custom CSS.
- Grab the custom CSS snippet from GitHub and add it to the site.
1. Identify Where to Add the Custom CSS
You can add custom CSS to your WordPress website using various methods. These include;
- Theme’s Additional CSS: Most WordPress themes offer an option to add custom CSS directly from the theme customiser settings.
- Child Theme Stylesheet: If you use a child theme, you can add your CSS directly to the child theme’s stylesheet.
- Custom CSS Plugin: Alternatively, you can use a custom CSS plugin to add custom CSS to your website.
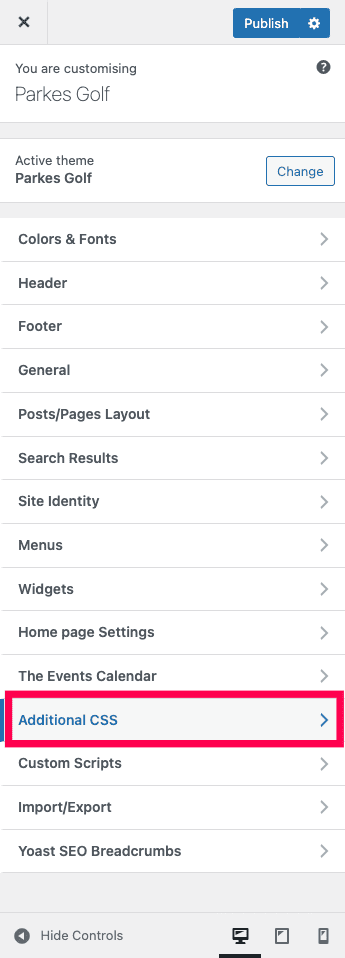
In this guide, we will be using Kadence‘s Additional CSS settings to show you the steps.
2. Add the Custom CSS snippet to the site
Grab the custom date styling CSS code snippet below and paste it into your theme’s Additional CSS settings.
Remember to save your changes inside the theme customiser.
Remember!
The CSS makes use of variables for the default color values. If you want to change them you can, just change the variables to HEX or RGB values in the css to get the desired styling.
The variables are your global colour values from the styling side WordPress and should work with most themes.
The variables we use are:
- var(–global-palette5)
- var(–global-palette9)
- var(–global-palette-highlight)
Results: New Events Calendar Date Styles
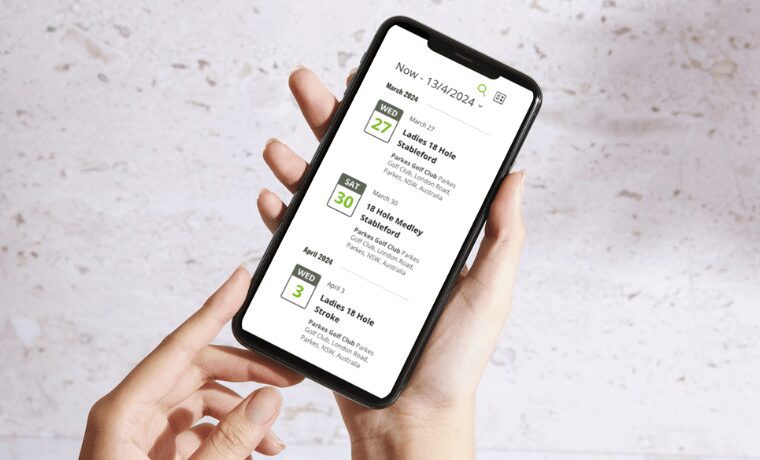
Check out your site ‘s events page. The dates on the events list layout should have a fresh, stand-out look.
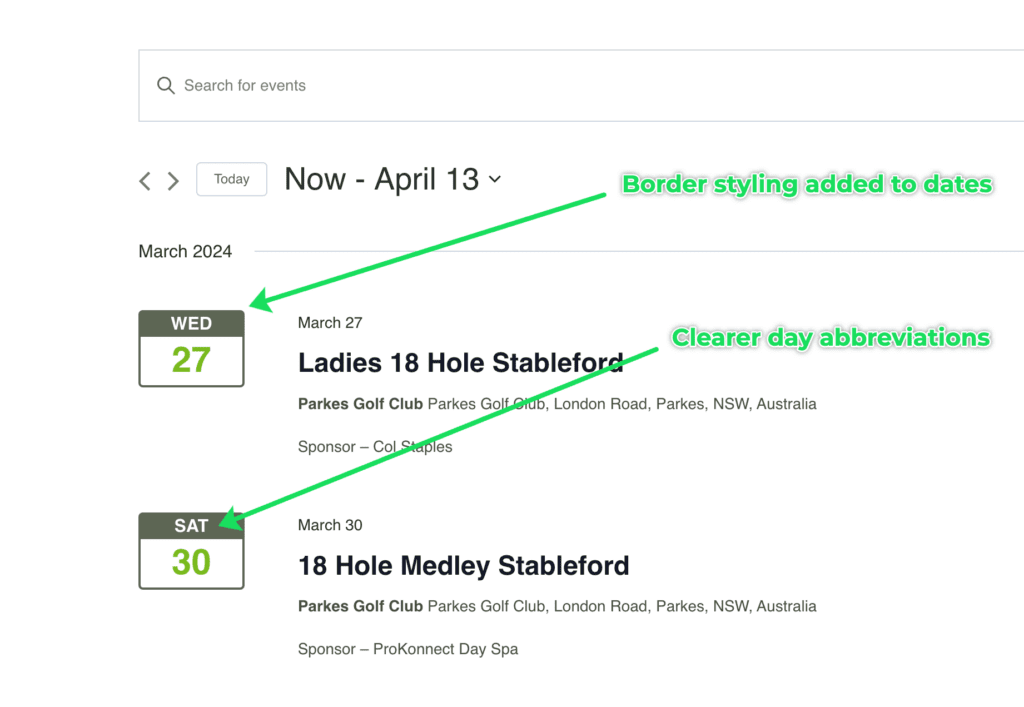
The new styles will also make your dates look great on any mobile device, including phones and tablets.
We added some custom padding and a media query to get the right result.
Conclusion
On completion of this tutorial you will have the improved Events Calendar date display styles.
At MRK WP, we offer support for The Events Calendar plugin as part of our WordPress Care Plan service. Contact us if you need assistance customising your website’s events system.
The post How to Style the Date Display on Event Calendar in WordPress appeared first on MRK WP.